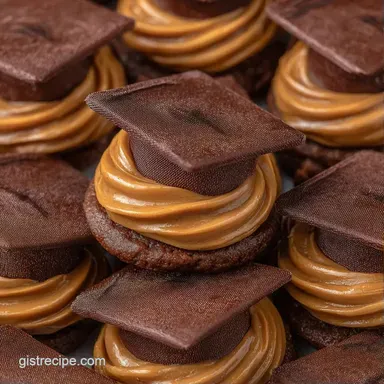
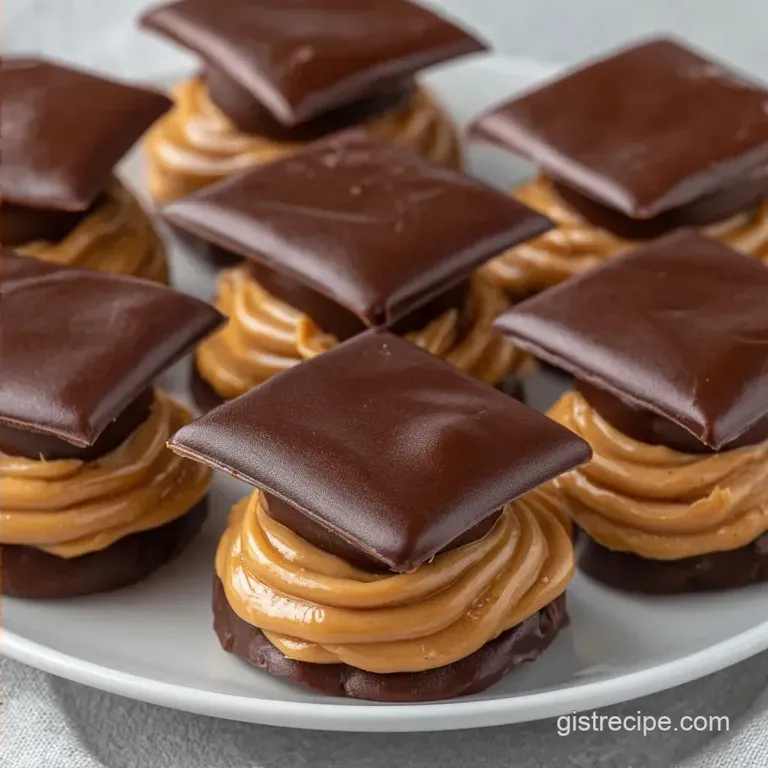
Peanut Butter Cup Grad Caps: Party-Ready Treats
- Time:20 minutes active + 1 hour 20 mins chilling/setting
- Flavor/Texture Hook: Velvety peanut butter center with a crisp chocolate shatter
- Perfect for: Graduation parties, dessert tables, or a cute gift for a grad
The scent of melted dark chocolate and toasted peanut butter is basically the smell of happiness. I remember the first time I tried to make these for my nephew's graduation party. I wanted something that looked polished, not something that would melt into a puddle the second a guest touched it.
I spent an hour fighting with a piping bag that wouldn't behave, and my first few "caps" looked more like melted pancakes than academic headwear.
But after I realized the secret was in the chilled base, everything clicked. Once you get that peanut butter foundation rock solid in the freezer, the rest is just assembly. These Peanut Butter Cup Grad Caps are the ultimate "cheat code" for party food because they use a few store-bought shortcuts to get a professional look without needing a pastry degree.
You can expect a treat that hits all the right notes: salty, sweet, and a bit rich. The dark chocolate provides a sharp contrast to the creamy filling, and the candy melt tassels add that final pop of school color.
It is a project that feels like a craft session as much as a cooking session, and honestly, it is a blast to put together with a few friends.
Peanut Butter Cup Grad Caps
The real trick here isn't about the decoration, it is about the structural integrity. If your base is too soft, the chocolate square will just slide right off, and you'll end up with a messy pile of candy.
By using a specific ratio of coconut oil and maple syrup, we create a center that is firm enough to hold weight but still melts in your mouth.
- Fat Stability
- Coconut oil hardens quickly in the cold, creating a solid anchor for the chocolate.
- Sugar Binding
- Maple syrup acts as a glue, keeping the peanut butter from crumbling when you bite into it.
- Thermal Bond
- Using melted chocolate as an adhesive creates a permanent weld between the base and the cap.
- Tension Control
- Chilling the base before adding the top prevents the chocolate from melting the peanut butter.
Right then, let's look at how this method stacks up against making traditional chocolate peanut butter cups from scratch.
| Feature | Fast Assembly Method | Classic Homemade Cups |
|---|---|---|
| Prep Time | 20 minutes | 45 minutes |
| Structure | High (frozen base) | Low (soft center) |
| Tool Needs | Basic | Tempering gear |
| Best For | Theme parties | Everyday snacking |
It's worth noting that while the "fast" version uses the freezer to lock everything in place, the flavor remains identical to a high end candy. Trust me on this, nobody at the party is going to care that you used a freezer shortcut when the taste is this velvety.
Quick Project Overview
Before we jump into the mixing, it's good to have a mental map of the timeline. You've got about 20 minutes of active work, but the total time is closer to 1 hour 40 mins because of the setting phases. You can't rush the freezer time, or you'll be dealing with sliding caps.
I usually start these a few hours before the guests arrive, or even the day before. They hold up beautifully in the fridge. If you are making these as part of a larger spread, you might want to pair them with a Traditional Vanilla Layer Cake to balance out the richness of the peanut butter.
Component Analysis
Not every ingredient is just for flavor; some are there to do the heavy lifting. Understanding what each part does helps you avoid those annoying "why did it melt?" moments.
| Ingredient | Science Role | Pro Secret |
|---|---|---|
| Coconut Oil | Structural Setting | Use refined oil if you don't want a coconut taste |
| Maple Syrup | Moisture/Binding | Adds a depth of flavor that honey lacks |
| Dark Chocolate | Rigid Shell | Higher cocoa percentage means a better shatter |
| Peanut Butter | Base Mass | Use a no stir variety for a smoother texture |
For the chocolate, I highly recommend using a bar for the "cap" part rather than just chips. According to the guides at Serious Eats, the consistency of a molded chocolate bar is much more uniform, which makes cutting those perfect squares way easier.
Minimal Tool Kit
You don't need a professional kitchen to pull this off. I've made these using the most basic gear I had in my drawers. The only thing you really can't skip is a ruler, because "eye balling" the squares usually leads to a very lopsided graduation cap.
First, grab a medium mixing bowl and a sturdy spoon. For the molds, mini muffin liners are the easiest, but silicone mini muffin pans work even better because you can just pop them out.
You'll also need a microwave safe bowl for the chocolate and a small piping bag (or even a Ziploc bag with the corner snipped off) for the tassels.
If you have a digital scale, that's great for the 100g of chocolate, but a standard kitchen scale or even a few precise ounces will do. Keep your workspace cool, as a hot kitchen is the enemy of any chocolate project.
Simple Assembly Steps

Let's crack on with the actual build. Follow these steps closely, and you'll have a tray of professional looking treats in no time.
- Mix the peanut butter, maple syrup, melted coconut oil, and salt in a bowl until the texture is smooth and cohesive. Note: Make sure the coconut oil is fully liquid before adding.
- Spoon the mixture into the bottom of mini muffin liners or molds, pressing down firmly with the back of a spoon to remove air pockets.
- Place the molds in the freezer for 15 minutes until the base feels firm to the touch.
- Melt a small amount of dark chocolate chips in the microwave in 20 second bursts to use as adhesive. Note: Stir between bursts to avoid scorching.
- Use a ruler to cut the dark chocolate bar into 1/2 inch (1.2cm) squares.
- Dip the bottom of each chocolate square into the melted chocolate and center it carefully on top of the chilled peanut butter base.
- Melt the colored candy melts and pipe a thin line from the center of the square to the edge to create the tassel.
- Use a tiny dot of melted chocolate to secure a small sprinkle or a mini chocolate chip at the center of the cap.
- Let everything set in the fridge for another 20 minutes until the candy melts are hard.
- Gently peel off the liners if using, or pop them out of the silicone mold.
Chef's Note: If your chocolate squares are sliding, your base wasn't cold enough. Pop them back in the freezer for 5 minutes before trying to glue the cap on again.
Fixing Common Mishaps
Even for a pro, chocolate can be finicky. The most common issue is "bloom," where the chocolate gets those weird white streaks. This usually happens if the chocolate gets too hot or cools too slowly. It doesn't affect the taste, but it does affect the look.
Troubleshooting Common Issues
| Issue | Solution |
|---|---|
| Why Your Cap Is Sliding | This is almost always a temperature issue. If the peanut butter base is too warm, the "glue" (melted chocolate) will just slide around instead of gripping. |
| Why Your Chocolate Is Grainy | This happens when the chocolate is overheated in the microwave. Chocolate is sensitive, and once it "seizes," it loses its velvety texture. Always use short bursts and stir constantly. |
| Why Your Tassels Are Blobby | If your candy melts are too thin, they will run. If they are too thick, they won't pipe. Warm them just until they flow like honey. |
Common Mistakes Checklist
- ✓ Did you press the PB base down to remove air?
- ✓ Are your chocolate squares exactly 1/2 inch?
- ✓ Did you stir the chocolate every 20 seconds?
- ✓ Is the base fully chilled before adding the cap?
- ✓ Did you use a thin line for the tassel?
Flavor Twists And Swaps
While the classic peanut butter and dark chocolate combo is a winner, you can easily tweak this to fit different tastes or dietary needs. If you want something a bit more sophisticated, try using a cashew butter base and a white chocolate cap.
If you are serving these at a larger event, they make a great addition to a dessert table alongside a Homemade Butter Birthday Cake recipe. The buttery crumb of the cake pairs wonderfully with the salty snap of the caps.
| Original Ingredient | Substitute | Why It Works |
|---|---|---|
| Peanut Butter (3/4 cup) | Almond Butter (3/4 cup) | Similar fat content. Note: Slightly more subtle flavor |
| Maple Syrup (2 tbsp) | Honey (2 tbsp) | Similar binding properties. Note: Adds a floral sweetness |
| Dark Chocolate (100g) | White Chocolate (100g) | Same structural rigidity. Note: Much sweeter, best with salty fillings |
| Coconut Oil (1 tbsp) | Unsalted Butter (1 tbsp) | Hardens when chilled. Note: Slightly creamier, less "snap" |
For a vegan version, just ensure your chocolate chips and candy melts are dairy-free. Most dark chocolates are naturally vegan, but always check the label for milk solids.
Storage And Waste
These treats are best kept in the refrigerator. Because of the coconut oil in the base, they can soften if left out in a warm room for too long. Store them in an airtight container with parchment paper between layers so the tassels don't stick together.
They will stay fresh in the fridge for up to 2 weeks, or in the freezer for 2 months.
When reheating, don't use a microwave! Just let them sit at room temperature for about 10 minutes before serving. This allows the peanut butter to soften slightly while the chocolate retains its shatter.
To avoid waste, save any leftover melted chocolate or candy melts. You can drizzle them over some fresh fruit or use them to decorate a simple batch of cookies. If you have a bit of peanut butter mixture left in the bowl, just roll it into a small ball, dip it in chocolate, and call it a "chef's snack."
Sweet Pairing Ideas
Since these are quite rich, you want to pair them with things that offer a bit of contrast. A tart raspberry coulis or some fresh sliced strawberries on the side can cut through the density of the peanut butter.
If you're planning a full graduation spread, I suggest serving these with a light, airy beverage like a sparkling lemonade or a cold brew coffee. The acidity of the coffee helps cleanse the palate between bites of the velvety chocolate.
For those who want a more filling dessert pairing, a slice of vanilla sponge cake is a classic choice. The simplicity of the vanilla lets the complex, salty sweet profile of the peanut butter shine without competing for attention. Just keep the portions small, as these caps are potent little flavor bombs!
Recipe FAQs
How to make a graduation cap out of candy?
Mix peanut butter, maple syrup, coconut oil, and salt. Spoon the mixture into molds, freeze for 15 minutes, attach a chocolate square using melted chocolate, and pipe a tassel with candy melts.
Why is the chocolate cap sliding off the base?
The peanut butter base is too warm. This prevents the melted chocolate "glue" from gripping the surface, causing the square to slide.
How to stop the chocolate from becoming grainy?
Melt in 20-second bursts and stir constantly. Overheating causes the chocolate to seize, which ruins the velvety texture.
Where should I store these treats to keep them fresh?
Store them in an airtight container in the refrigerator. Use parchment paper between layers to keep tassels from sticking; they last 2 weeks chilled or 2 months frozen.
Can I microwave these to soften them before serving?
No, avoid the microwave. Let the caps sit at room temperature for 10 minutes so the peanut butter softens while the chocolate retains its shatter.
How to ensure the tassels look clean and not blobby?
Adjust the consistency of your candy melts. Ensure they are neither too thin, which causes running, nor too thick, which prevents piping. If you enjoyed mastering consistency here, see how the same principle works in our soft gluten-free doughnuts.
Is it true that these can be left out at room temperature for hours?
No, this is a common misconception. Because of the coconut oil, the base will soften and potentially lose its shape if left in a warm room for too long.
Peanut Butter Cup Grad Caps