Mini Graduation Cap Cookies: Velvety Butter Crumb
- Time:45 minutes active + 2 hours chilling
- Flavor/Texture Hook: Velvety butter crumb with a crisp, snap dry icing shell
- Perfect for: Graduation parties, dessert platters, or celebratory gifts
- How to Make Mini Graduation Cap Cookies
- Why These Treats Work
- Component Analysis
- Gathering Your Essential Ingredients
- Necessary Baking Tools
- Step-by-Step Baking Process
- Fixing Common Baking Errors
- Dietary and Flavor Tweaks
- Baking Myths
- Storage and Freshness Tips
- Creative Serving Ideas
- Recipe FAQs
- 📝 Recipe Card
The scent of warm vanilla and toasted butter always takes me back to my niece's high school graduation. I had decided, in a fit of ambition, to make a mountain of treats, but my first batch of "hats" looked more like melted puddles than academic regalia.
I remember the sight of those sad, rounded blobs on the parchment paper and the sheer panic of seeing the clock tick toward the party start time.
It was a total mess until I realized the issue was my butter temperature and my impatience with the fridge. Once I slowed down and let the dough actually set, the results changed completely.
These Mini Graduation Cap Cookies became the hit of the table, not because they were fancy, but because they actually looked like the real thing and had that satisfying, buttery snap when you bite into them.
How to Make Mini Graduation Cap Cookies
Right then, let's get into it. The secret to these isn't some fancy equipment, but rather the timing. Most people rush the dough, and that's where the disaster starts. We're going for a cookie that stays put in the oven, providing a flat, stable canvas for the icing.
You'll want to focus on the "architecture" of the cookie. Because we're adding royal icing and fondant, the base needs to be sturdy. If the cookie is too soft or chewy, the icing will crack the moment you try to move it. We're aiming for a texture that is tender but holds its form, almost like a high end shortbread.
Trust me on this, the decorating part is where the real fun is, but it requires a bit of patience. You can't just flood the cookie and call it a day. There's a specific order to the icing that prevents the colors from bleeding into each other. Let's crack on with the details.
Why These Treats Work
Fat Stabilization: Chilling the butter heavy dough prevents the fats from melting too quickly in the oven, which keeps the cap shape from rounding out.
Protein Structure: The specific ratio of flour to baking powder ensures the cookie rises just enough to be tender but not so much that it domes.
Icing Tension: Meringue powder creates a high protein bond in the icing, allowing it to dry into a hard, shatter like shell that doesn't smudge.
Moisture Barrier: The royal icing seals the cookie surface, preventing the fondant tassel from absorbing oils from the butter and getting soggy.
| Method | Time | Texture | Best For |
|---|---|---|---|
| Oven Baked | 12 mins | Crisp & Uniform | Large batches, sharp edges |
| Stovetop/Pan | 15 mins | Softer, browned | Small batches, rustic look |
Component Analysis
| Ingredient | Science Role | Pro Secret |
|---|---|---|
| Unsalted Butter | Provides structure and flavor | Use 18°C butter for a fluffier cream |
| Meringue Powder | Stabilizes the icing | Sift it with powdered sugar to avoid lumps |
| All Purpose Flour | Builds the cookie frame | Measure by weight for consistent thickness |
| Warm Water | Activates icing proteins | Use distilled water for a glossier finish |
Gathering Your Essential Ingredients
For the dough, we need a few basics. Make sure your butter is softened but not greasy, or your cookies will spread. I always suggest weighing your flour if you can, as according to King Arthur Baking, a few extra grams of flour can completely change the spread of a sugar cookie.
For the Cookie Base:
- 1 cup (225g) unsalted butter, softenedWhy this? Standard fat for a classic, velvety crumb
- 1 cup (200g) granulated sugarWhy this? Provides the necessary sweetness and crisp edges
- 1 large (50g) eggWhy this? Binds the dough and adds richness
- 1 tsp (5ml) vanilla extractWhy this? Classic aromatic base
- 3 cups (375g) all purpose flourWhy this? Provides the structure to hold the cap shape
- 2 tsp (10g) baking powderWhy this? Minimal lift to keep cookies flat
- 1/2 tsp (3g) saltWhy this? Balances the sugar
For the Icing and Detail:
- 4 cups (480g) powdered sugar, siftedWhy this? Base for the royal icing
- 3 tbsp (45ml) meringue powderWhy this? Ensures the icing dries hard
- 5 tbsp (75ml) warm waterWhy this? Thins the icing to the right consistency
- 2 oz (56g) yellow fondantWhy this? Best material for the 3D tassel
- cornstarchWhy this? Prevents fondant from sticking to the counter
| Original Ingredient | Substitute | Why It Works |
|---|---|---|
| Unsalted Butter | Margarine | Similar fat content. Note: Slightly softer texture, less rich flavor |
| Meringue Powder | Egg Whites (whipped) | Provides protein. Note: Less stable, takes longer to dry |
| All Purpose Flour | gluten-free Blend | 1:1 ratio. Note: Drier crumb, may require 1 tbsp extra water |
| Yellow Fondant | Yellow Modeling Chocolate | Similar pliability. Note: Melts faster, tastes richer |
Necessary Baking Tools
You don't need a professional studio, but a few things make this way easier. A graduation cap cookie cutter is the obvious choice, but if you don't have one, you can use a square cutter and a small circle cutter to carve the shape manually.
I highly recommend a stand mixer such as KitchenAid for the creaming process, but a hand mixer works fine too. You'll also need a piping bag with a small round tip for the borders and a scribe tool (or a toothpick) to pop air bubbles in the flood icing.
For the fondant, a small rolling pin or even a smooth wine bottle wrapped in parchment paper will help you get that tassel rope perfectly uniform.
Step-by-step Baking Process
Phase 1: Building the Foundation
- Cream the butter and sugar in a bowl until the mixture is pale and fluffy. Beat in the egg and vanilla until fully incorporated. Note: Don't overbeat the egg or the dough might break.
- Slowly mix in the flour, baking powder, and salt on low speed until a stiff dough forms. Note: Stop mixing the moment the flour disappears.
- Divide dough into two discs, wrap in plastic, and refrigerate for at least 2 hours. This is non negotiable for preventing spread.
Phase 2: Precision Cutting and Baking
- Preheat oven to 350°F (175°C) and line baking sheets with parchment paper.
- Roll dough to 1/4 inch (6mm) thickness on a lightly floured surface and cut into graduation cap shapes. Note: Use a light touch with the cutter to avoid distorting the edges.
- Bake for 10-12 minutes until edges are barely set. Cool on the pan for 5 minutes before transferring to a wire rack.
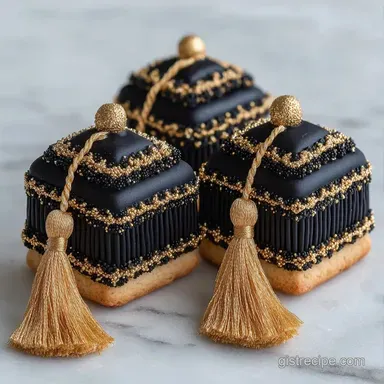
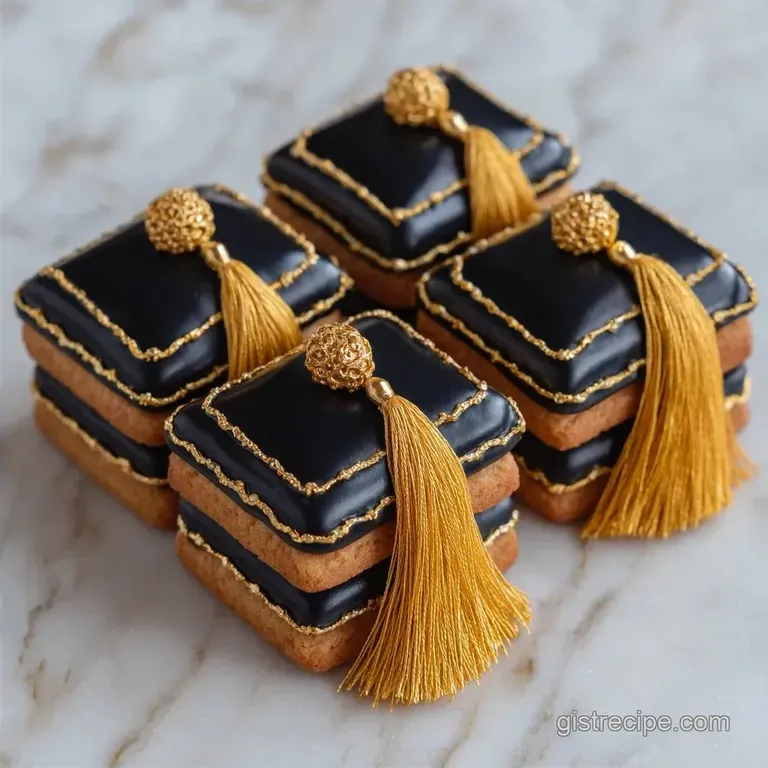
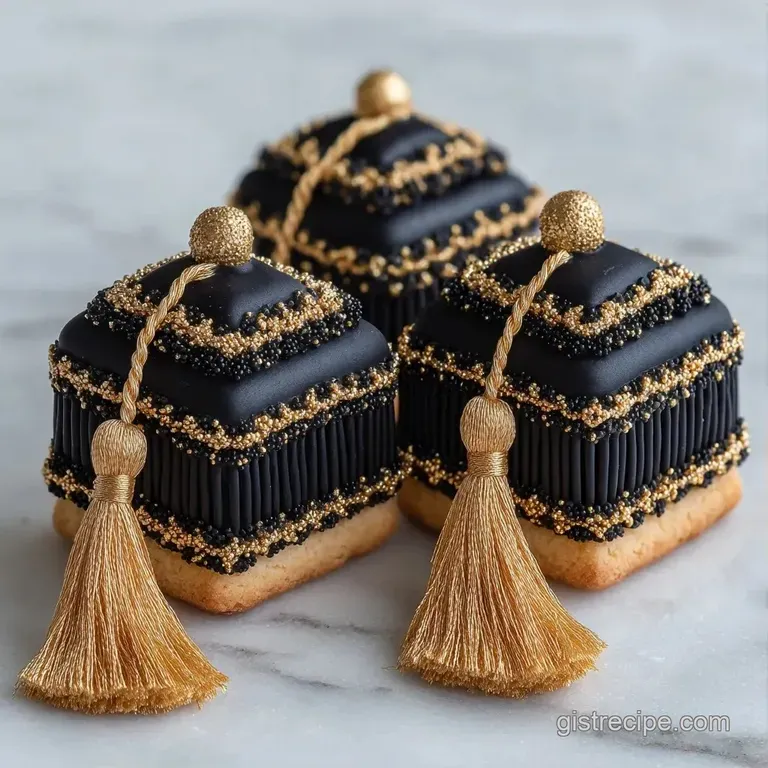
Phase 3: Architecture and Decoration
- Pipe a border around the diamond top and base of the cap using stiff black royal icing. Note: This border acts as a "dam" to hold the flood icing in.
- Fill in the centers with flood consistency icing and pop air bubbles with a scribe tool.
- Roll a thin rope of yellow fondant and attach it to the center of the cap to create the tassel.
- Allow cookies to dry undisturbed for 8-12 hours until the icing is completely hard.
Fixing Common Baking Errors
The most frustrating part of making Mini Graduation Cap Cookies is when the icing doesn't behave. If you see the black icing "bleeding" into the yellow tassel, it's usually because the icing was too thin or the cookies weren't completely cool.
Why Your Cookies Spread
If your hats look more like pancakes, the butter was likely too warm when it hit the oven. This happens if the dough didn't chill for the full 2 hours or if your kitchen is extremely hot.
Why Your Icing Stays Soft
Royal icing depends on the meringue powder to set. If it's still tacky after 12 hours, you might have used too much water or the humidity in your room is too high.
| Problem | Root Cause | Solution |
|---|---|---|
| Icing Bubbles | Trapped air during mixing | Pop with a toothpick immediately after flooding |
| Fondant Slumping | Too much cornstarch/oil | Knead fondant more to build elasticity |
| Brittle Cookies | Overbaked by 1-2 mins | Pull them out when edges are just barely matte |
Common Mistakes Checklist
- ✓ Did you chill the dough for the full 2 hours?
- ✓ Is your icing "dam" thick enough to hold the flood?
- ✓ Did you sift the powdered sugar to avoid lumps?
- ✓ Are the cookies completely cold before icing?
- ✓ Did you pop the bubbles in the flood icing?
Dietary and Flavor Tweaks
If you want a different flavor profile, you can easily swap the vanilla for almond extract. It gives the cookies a more sophisticated, wedding cake vibe. For those who want something even more indulgent, you could try my Peanut Butter Cup Grad Caps if you prefer a no bake approach.
For a Vegan Version
Swap the butter for a chilled vegan butter stick and the egg for a "flax egg" (1 tbsp ground flax + 3 tbsp water). For the icing, use aquafaba (chickpea brine) instead of meringue powder. The texture will be slightly softer, but the look remains the same.
For a gluten-free Version
Use a high-quality 1:1 gluten-free flour blend that contains xanthan gum. Because GF flour absorbs moisture differently, let the dough rest for an extra 30 minutes after chilling to ensure the flour is fully hydrated.
For a Chocolate Variation
Replace 1/4 cup of the flour with high-quality cocoa powder. This creates a dark base that blends seamlessly with the black icing. If you love chocolate, you might also enjoy my Chocolate Chip Cookies for a more casual treat.
| Variation | Change | Result |
|---|---|---|
| Almond | Vanilla → Almond Extract | Nutty, refined flavor |
| Double Choc | Flour → Cocoa Powder | Rich, dark base |
| Lemon | Add 1 tsp zest | Bright, zesty contrast |
Baking Myths
Searing or "shocking" the dough by putting it in the freezer for 5 minutes right before baking does not actually stop the spread. While it helps slightly, it doesn't replace the 2 hour slow chill which allows the flour to hydrate and the fats to stabilize.
Another myth is that you should use "room temperature" eggs for everything. In this specific recipe, a slightly cool egg actually helps keep the overall dough temperature lower during the creaming process, which is better for the final shape.
Storage and Freshness Tips
Store these in an airtight container once the icing is fully dry. They'll stay fresh at room temperature for about 5 days. If you're making them for a party a week in advance, you can freeze the baked (un iced) cookies for up to 2 months. Just thaw them at room temperature before you start the decorating process.
To avoid waste, use any leftover royal icing to pipe small dots or stars on other cookies. If you have leftover fondant, wrap it tightly in plastic wrap and store it in the fridge for up to a month. To reuse it, just microwave it for 5-10 seconds to make it pliable again.
Creative Serving Ideas
These Mini Graduation Cap Cookies look brilliant when piled up on a tiered dessert stand. To add some contrast, pair them with something creamy. My Vanilla Buttercream can be used as a dip on the side for a bit of extra decadence.
For a high school graduation party, try arranging the cookies on a platter around a central bowl of fresh berries. The bright reds and blues of the fruit make the stark black and yellow of the cookies pop.
If you're serving them as party favors, place two cookies in a clear cellophane bag tied with a ribbon in the graduate's school colors.
Recipe FAQs
How to make graduation biscuits?
Cream the butter and sugar until fluffy, then beat in the egg and vanilla. Mix in the flour, baking powder, and salt to form a stiff dough, chill for 2 hours, and bake at 350°F (175°C) for 10-12 minutes.
How to make graduation cap cute?
Pipe a stiff black royal icing border around the diamond top and base. Fill the center with flood icing and add a thin rope of yellow fondant as the tassel for a polished look.
What are good finger foods for a graduation party?
Yes, these mini cookies are an excellent choice. Their small size and themed appearance make them easy for guests to enjoy while mingling without needing utensils.
How to make a graduation cap out of candy?
Roll chilled cookie dough to 1/4 inch thickness and cut into cap shapes. Using a baked base instead of candy provides a stable structure for the royal icing and fondant tassel.
What should I do for a joint graduation and birthday party?
Pair these themed cookies with a classic celebratory cake. Balancing these rich treats with a lemon zest cake ensures there is a refreshing flavor profile for every guest.
How long can I store these cookies?
Keep them in an airtight container for up to 5 days at room temperature. For longer storage, freeze the baked but un-iced cookies for up to 2 months.
How to remove air bubbles from the royal icing?
Pop them immediately using a scribe tool or toothpick. Do this while the icing is wet to ensure a smooth surface before the cookies dry for 8-12 hours.
Mini Graduation Cap Cookies