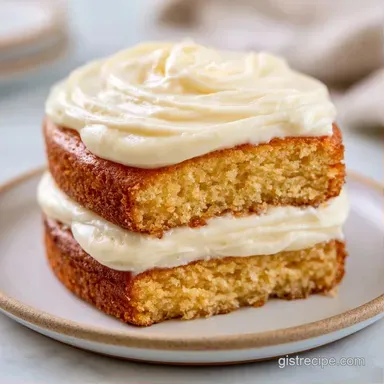
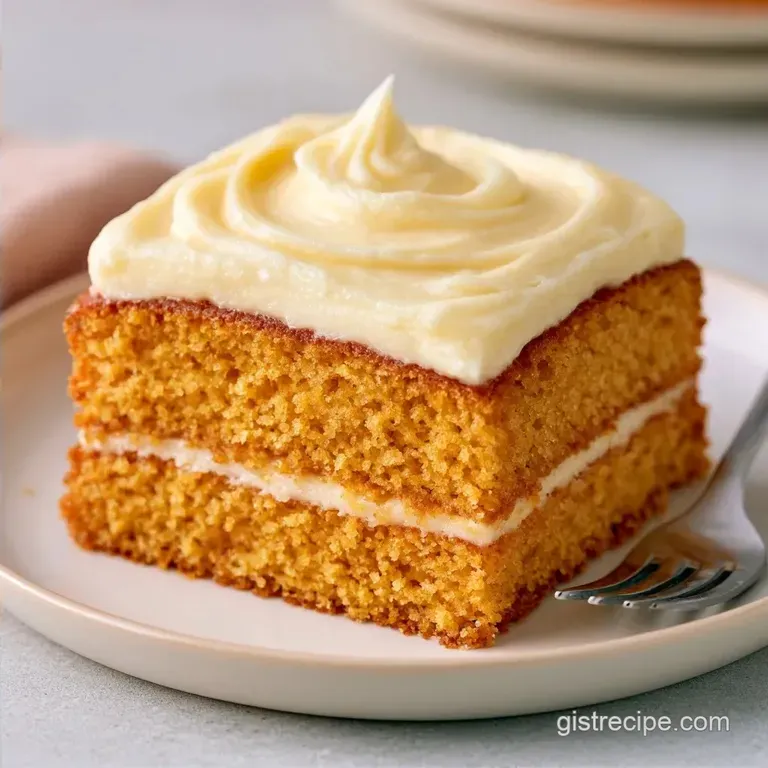
Moist Yellow Layer Cake: Velvety and Rich
- Time: 20 min active + 60 min cooling = 110 min total
- Flavor/Texture Hook: Velvety crumb with a rich, buttery finish
- Perfect for: Birthday parties and family gatherings
- Secrets to a Moist Yellow Layer Cake
- Why This Batter Actually Works
- Getting Your Essentials Ready
- Necessary Baking Gear
- Step by Step Baking Guide
- Fixing Common Baking Issues
- Swapping Ingredients for Diet
- Adjusting the Recipe Size
- Baking Myths Debunked
- Freshness and Storage Tips
- Best Treats to Pair
- Recipe FAQs
- 📝 Recipe Card
Secrets to a Moist Yellow Layer Cake
The smell of vanilla and browned butter hitting the air is enough to bring everyone into the kitchen before the timer even goes off. I remember the first time I tried to make a "fancy" cake for my sister's birthday.
I followed a recipe that looked professional, but the result was a dry, crumbly mess that felt more like a sponge than a dessert. I spent the next few months experimenting with different fats, wondering why some cakes felt like clouds and others felt like cardboard.
The real secret isn't some hidden ingredient, but the balance of fats. I found that relying solely on butter gives you that classic taste, but it can dry out quickly in the fridge. By adding a bit of vegetable oil, the cake stays tender and moist even after two days.
It's a small tweak that completely changes the experience of eating a slice.
When you use this Moist Yellow Layer Cake recipe, you're getting a crumb that is tight but tender. It's the kind of cake that doesn't need a soak or a syrup to feel rich. Whether you're frosting it with a simple buttercream or loading it up with fresh berries, the base is sturdy enough to hold the weight but soft enough to melt on your tongue.
Why This Batter Actually Works
I've always been curious about why certain cakes feel "heavier" than others. After reading up and testing, I realized it's all about how we handle the ingredients and the chemistry of the crumb.
The Fat Blend: Combining softened butter for flavor and oil for moisture ensures the cake doesn't harden at room temperature. The oil coats the flour proteins, which prevents too much gluten from forming.
Extra Yolk Power: Adding two extra egg yolks provides additional lecithin, a natural emulsifier. This creates a more stable batter and results in a velvety, tight crumb.
Acidic Tenderness: The buttermilk provides an acidic environment that reacts with the baking powder. According to Serious Eats, this helps create a finer bubble structure and a more tender texture.
Low Protein Flour: Using cake flour instead of all purpose is a non negotiable. As explained by King Arthur Baking, the lower protein content prevents the cake from becoming too bread like or chewy.
| Method | Time | Texture | Best For |
|---|---|---|---|
| all-butter | 110 min | Dense & Rich | Traditionalists |
| Oil Only | 110 min | Spongy & Light | Quick mix cakes |
| Butter Oil Blend | 110 min | Velvety & Moist | Special Occasions |
Getting Your Essentials Ready
Before we dive in, let's look at what's actually happening in the bowl. I like to think of my ingredients as a team where everyone has a specific job to do.
Component Analysis
| Ingredient | Science Role | Pro Secret |
|---|---|---|
| Cake Flour | Structure | Sift twice to incorporate air |
| Buttermilk | Tenderizer | Ensure it's room temp to avoid curdling |
| Egg Yolks | Emulsifier | Room temp eggs incorporate faster |
| Vegetable Oil | Moisture Lock | Prevents the cake from staling quickly |
The Master List
For the cake layers, you'll need: - 2.5 cups cake flour Why this? Low protein for a tender, soft crumb - 1.5 cups granulated sugar Why this? Provides sweetness and moisture - 1 tbsp baking powder Why this? The primary lift for the
Layers - 0.5 tsp salt Why this? Balances the sweetness - 0.5 cup unsalted butter, softened Why this? Essential for that classic buttery taste - 0.25 cup vegetable oil Why this? Keeps the crumb moist for days - 3
Large eggs, room temperature Why this? Binds the ingredients together - 2 large egg yolks, room temperature Why this? Adds richness and a golden hue - 1 cup buttermilk, room temperature Why this? Adds tang and tenderizes the
Flour - 2 tsp pure vanilla extract Why this? The aromatic heart of the cake
For the classic buttercream: - 1 cup unsalted butter, softened Why this? The base for a silky frosting - 3.5 cups powdered sugar Why this? Provides structure and sweetness - 2 tbsp heavy cream Why this? Adjusts the
Consistency - 1 tsp pure vanilla extract Why this? Enhances the butter flavor - 1 pinch salt Why this? Cuts through the heavy sugar
| Original Ingredient | Substitute | Why It Works |
|---|---|---|
| Cake Flour (2.5 cups) | AP Flour (2.25 cups) + 1/4 cup cornstarch | Mimics low protein. Note: Slightly less tender |
| Buttermilk (1 cup) | 1 cup milk + 1 tbsp lemon juice | Adds necessary acid. Note: Less creamy flavor |
| Vegetable Oil (0.25 cup) | Melted Butter (0.25 cup) | High flavor. Note: Cake may dry out faster |
| Heavy Cream (2 tbsp) | Whole Milk (2 tbsp) | Thins the frosting. Note: Less stable consistency |
Necessary Baking Gear
I'm a big fan of minimal tools. You don't need a professional kitchen to nail this Moist Yellow Layer Cake, but a few basics make life easier.
First, you'll want two 8 inch round cake pans. I always suggest lining the bottoms with parchment paper. I've had too many cakes stick to the pan to ever skip this step again. It's a lifesaver.
A stand mixer, such as a KitchenAid, is great for the creaming process, but a hand mixer works just as well. The most important thing is that you have a medium bowl for your dry ingredients and a large bowl for the wet.
Finally, a wire cooling rack is essential. If you leave the cakes in the pans for too long, they can steam themselves, which makes the bottoms soggy. Getting them onto a rack quickly ensures the edges stay clean and the structure sets properly.
Step by step Baking Guide
Right then, let's get into the actual process. Trust me on the room temperature ingredients - it's the difference between a smooth batter and a curdled one.
Phase 1: Prepping the Foundation
Preheat your oven to 350°F (175°C). Grease your two 8 inch round cake pans thoroughly and line the bottoms with parchment paper. Sift together the cake flour, baking powder, and salt in a medium bowl. Note: Sifting removes lumps and ensures the baking powder is evenly distributed.
Phase 2: Emulsifying the Batter
In a large bowl, cream the softened butter and granulated sugar on medium high. Do this for approximately 3 minutes until the mixture looks pale and fluffy. While the mixer is still running, slowly stream in the vegetable oil.
Add the whole eggs and egg yolks one at a time. Beat well after each addition until the batter is smooth and glossy. If it looks like it's splitting, just keep mixing for another 30 seconds.
Phase 3: The Final Fold
Reduce your mixer speed to low. This is where we alternate. Add the dry ingredients in three parts, alternating with the buttermilk and vanilla extract. The order is: Dry, Wet, Dry, Wet, Dry. Mix only until the flour streaks just disappear.
Note: Overmixing at this stage will make the cake tough.
Phase 4: The Bake & Cool
Divide the batter evenly between your two pans. Bake for 28-32 minutes until a toothpick inserted in the center comes out clean.
Let the cakes cool in their pans for about 10 minutes. Then, carefully transfer them to wire racks to cool completely for approximately 60 minutes. Note: Frosting a warm cake is a recipe for a melted disaster.
Phase 5: Finishing Touches
Prepare the buttercream by creaming 1 cup of softened butter. Gradually add the powdered sugar, heavy cream, vanilla extract, and a pinch of salt. Beat on medium until the frosting is silky and spreadable.
Place one layer on a plate, spread a thick layer of buttercream, and top with the second layer. Frost the top and sides until smooth.
Fixing Common Baking Issues

Even the best of us have days where the cake doesn't behave. Most of the time, it's a simple fix or a lesson for next time.
"My Cake Sank in the Middle"
This usually happens because the structure wasn't strong enough to hold the air, or the oven temperature was off. If you open the oven door too early, the rush of cool air can collapse the rising cake.
"The Texture is Too Dense"
Overmixing is the most common culprit here. When you mix flour with liquid, gluten starts to develop. In a cake, we want as little gluten as possible to keep that velvety feel.
"The Frosting is Too Runny"
Humidity plays a huge role in buttercream. If your kitchen is warm, the butter softens too much, making the frosting slide off the cake.
| Problem | Root Cause | Solution |
|---|---|---|
| Cake Sinks | Door opened too early | Don't peek before 25 mins |
| Dense Crumb | Overmixing the batter | Mix until just combined |
| Runny Frosting | Butter too soft | Chill frosting for 15 mins |
Common Mistakes Checklist
- ✓ Used room temperature eggs and buttermilk
- ✓ Sifted the cake flour to avoid lumps
- ✓ Avoided overmixing after adding flour
- ✓ Cooled cakes completely before frosting
- ✓ Lined the bottom of the pans with parchment
Swapping Ingredients for Diet
If you need to tweak this Moist Yellow Layer Cake for someone with dietary restrictions, you can definitely do it without ruining the vibe.
For a gluten-free crumb, you can use a high-quality 1:1 gluten-free baking flour. However, keep in mind that GF flours often absorb more liquid, so you might need an extra tablespoon of buttermilk to keep it from being too dry. If you're looking for other GF friendly bakes, my Muffins in 40 Min recipe are a great way to use similar flavor profiles.
For a dairy-free version, swap the butter for a vegan butter stick and the buttermilk for a mix of soy milk and lemon juice. The result will be slightly less rich, but still very satisfying. Honestly, don't even bother with low-fat cheese or butter substitutes here; the fat is what makes the cake work.
Adjusting the Recipe Size
Sometimes you don't need a full two layer cake, or maybe you're feeding a whole crowd. Here is how to scale this Moist Yellow Layer Cake.
Scaling Down (Half Batch): To make a single 8 inch layer, cut all ingredients in half. For the egg, beat one large egg in a small bowl and use exactly half of it. Reduce the baking time by about 20%, but start checking at 22 minutes.
Scaling Up (Double Batch): If you're making four layers, don't just double everything blindly. Keep the salt and baking powder at 1.5x the original amount to avoid an "off" taste or an over rise that collapses.
Work in batches if your mixer can't handle the volume, as overcrowding the bowl prevents proper aeration.
For larger batches in the oven, lower the temperature by 25°F (to about 160°C) and extend the baking time. This ensures the centers bake through before the edges burn.
Baking Myths Debunked
There's a lot of advice floating around the internet that just isn't true. Let's clear a few things up.
Myth: Butter must be melted for a moist cake. Actually, creaming softened butter with sugar creates tiny air pockets. These pockets expand in the oven, giving the cake its lift. Melted butter leads to a denser, more brownie like texture.
Myth: All purpose flour is just as good as cake flour. Not really. All purpose flour has more protein, which creates more gluten. This results in a tougher, breadier cake. While you can make a substitute, real cake flour is the secret to that professional, velvety crumb.
Myth: You should grease the pans with oil only. Oil is fine, but a mix of butter and flour (or parchment) is better. Butter gives the edges a nice golden brown crust, while the parchment ensures the cake actually comes out of the pan.
Freshness and Storage Tips
To keep your Moist Yellow Layer Cake tasting fresh, avoid leaving it on the counter if your house is warm. The buttercream can soften, and the cake may dry out.
Storage Guidelines:
- Fridge: Store in an airtight container for up to 5 days. Since we used oil in the batter, it won't get rock hard in the fridge like all-butter cakes do.
- Freezer: You can freeze the unfrosted layers. Wrap them tightly in plastic wrap and then foil for up to 3 months. Thaw them in the fridge overnight before frosting.
- Reheating: If you've refrigerated a slice, let it sit at room temperature for 30 minutes before eating. This brings the butter back to a silky state.
Zero Waste Tips: Don't throw away those leftover egg whites from the extra yolks! You can whip them into a meringue or save them in a jar in the fridge for a healthy breakfast omelet.
If you have a bit of leftover buttercream, freeze it in small dollops on parchment paper; they make great toppings for warm brownies later.
Best Treats to Pair
A cake this rich deserves a few companions to balance out the sweetness. If you're hosting a party, I love serving this with a side of fresh, tart berries or a dollop of whipped cream.
For those who love a classic celebration spread, this pairs perfectly with a Birthday Cake for 10 recipe if you're doing a dessert table with multiple options. The yellow cake is richer, while the vanilla is lighter, giving your guests a bit of variety.
If you want something to sip on, a strong cup of black coffee or a tart hibiscus tea cuts through the richness of the buttercream beautifully. Trust me on this, a little bit of bitterness on the side makes every bite of the cake feel brand new.
Recipe FAQs
What is the secret to a moist yellow cake?
Combining vegetable oil with buttermilk. Oil provides a consistent moisture that butter alone cannot, while the acidity in buttermilk tenderizes the crumb.
How to make cake layers more moist?
Ensure all ingredients are at room temperature. This prevents the batter from curdling and ensures a smooth emulsion that traps air and moisture during baking.
What is the best frosting for yellow cake?
A classic vanilla buttercream. Its sweetness and richness balance the buttery notes of the cake; use our vanilla buttercream for the perfect professional finish.
What flavor is yellow cake?
A rich, buttery vanilla. Unlike white cake, which uses only egg whites, yellow cake incorporates whole eggs and extra yolks for a deeper flavor and golden hue.
Is it true that birthday cake flavor is entirely different from yellow cake?
No, this is a common misconception. Birthday cake is typically just a moist yellow cake paired with colorful sprinkles and a sweet buttercream frosting.
How to make a small birthday cake using this recipe?
Halve all the ingredients and use a single 8 inch pan. Check for doneness with a toothpick starting at 25 minutes, as a single layer may bake slightly faster.
Why did my cake layers come out dry?
Overbaking or overmixing the batter. Stick strictly to the 28 32 minute bake time at 350°F and stop mixing as soon as the flour streaks disappear.
Moist Yellow Layer Cake