Mini Graduation Cheesecakes: Rich and Tangy
- Time: 20 min active + 4 hours 20 mins chilling
- Flavor/Texture Hook: Buttery crust with a silky, dense center
- Perfect for: Graduation parties, dessert platters, or easy party prep
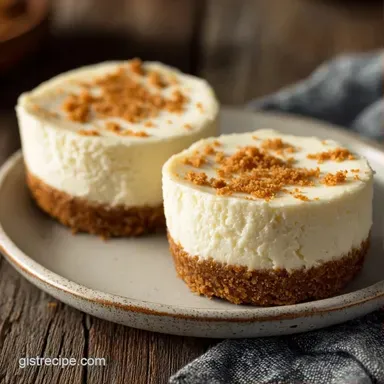
- Bite Size Graduation Dessert with Mini Cheesecakes
- The Room Temperature Trick
- Quick Recipe Specs
- What Each Ingredient Does
- Essential Baking Tools
- Step by Step Guide
- Fixing Common Problems
- Mix Up the Flavors
- Scaling Your Batch
- Truths About Mini Baking
- Storage and Leftover Tips
- Best Ways to Serve
- Recipe FAQs
- 📝 Recipe Card
The smell of toasted graham crackers and vanilla hitting the oven air is a total mood. There is something about mini desserts that makes a party feel a bit more fancy, even if you're just hosting in your living room. Here is the perfect recipe for a Bite Size Graduation Dessert with Mini Cheesecakes.
I used to overthink the baking process, trying to use water baths for every single cheesecake. But these mini versions, you just don't need that. They bake fast and set firm, which means you can spend more time actually enjoying the party and less time hovering over the oven.
You can expect a dessert that's creamy, slightly tangy, and small enough that people can grab two or three without feeling overwhelmed. It's an easy graduation dessert platter addition that always disappears first.
Bite Size Graduation Dessert with Mini Cheesecakes
The key to this recipe isn't some complex technique, it's actually just patience and temperature. If you rush the cooling process, you'll end up with a texture that's more like a pudding than a cheesecake. Trust me on this, the 4 hour chill is where the magic happens.
Right then, let's talk about the flow. You'll spend about 20 minutes getting the crusts pressed and the filling whipped. Then, a quick 20 minute bake, and you're mostly done until the chilling phase. It's a great "do it-the night before" project.
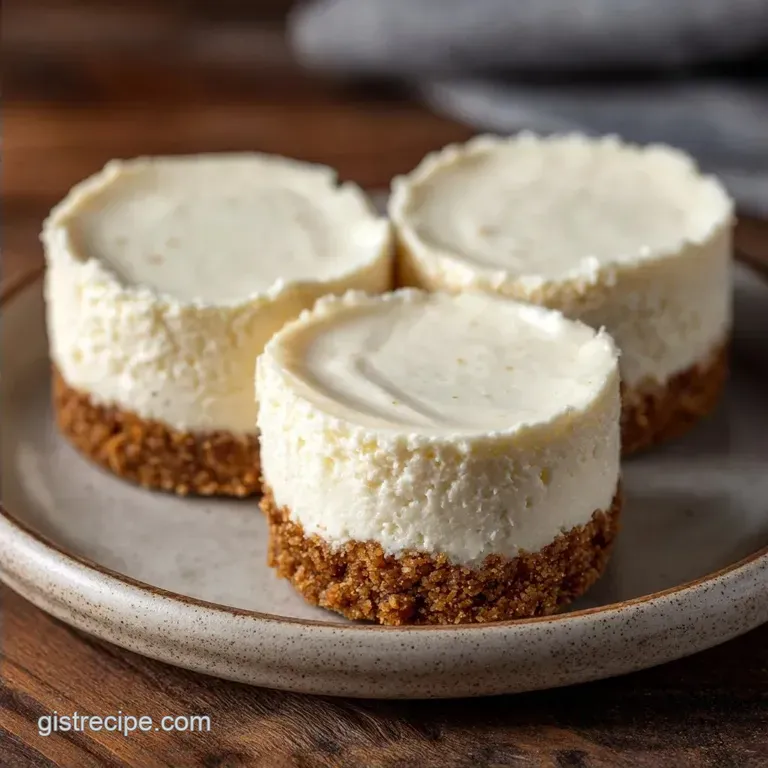
Since these are bite size graduation party treats, they're incredibly versatile. You can leave them plain, top them with a single raspberry, or even a tiny drizzle of melted chocolate. The small scale makes them far less intimidating than a full sized cake.
The Room Temperature Trick
Room Temp Ingredients: When cream cheese and eggs are warm, they blend into a smooth batter without needing to overbeat.
Low Speed Mixing: Beating on low prevents too much air from entering the batter, which stops the cheesecakes from puffing up and then cracking.
| Feature | Fresh Graham Crust | store-bought Crumbs |
|---|---|---|
| Texture | Slightly chunkier | Uniform and fine |
| Effort | Crush by hand/food processor | Pour and mix |
| Flavor | Toasty and fresh | Consistent, sweet |
Quick Recipe Specs
The timeline here is straightforward: prep, bake, and a long wait for the set. I like to think of it as a three step flow. First, the "Base Build" where you prep the liners. Second, the "Batter Blend" for the filling. Third, the "Cold Cure" in the fridge.
Precision is your friend here. I recommend three specific checkpoints to ensure success: your oven must be exactly 325°F (160°C), you should pull them out at the 18-20 minute mark, and you must let them chill for a full 4 hours.
What Each Ingredient Does
| Ingredient | What It Does | Best Swap |
|---|---|---|
| Cream Cheese | Provides the rich, tangy structure | Mascarpone (richer, less tangy) |
| Sour Cream | Adds moisture and a velvety finish | Greek Yogurt (more tart) |
| Graham Crumbs | Creates the buttery, crunchy base | Digestive biscuits (more salty) |
| Eggs | Sets the filling as it bakes | 1/4 cup applesauce (for eggless, denser) |
Essential Baking Tools
You'll need a standard mini muffin pan and paper liners. Using liners is a non negotiable here because trying to peel a mini cheesecake off the metal is a nightmare. I also suggest a hand mixer or a stand mixer such as KitchenAid to get the lumps out of the cream cheese.
For the crust, a small measuring cup or even the back of a spoon works to press the crumbs down. Don't forget a wire rack for the initial 30 minute cooling period before they head into the fridge.
Step by step Guide

- Preheat your oven to 325°F (160°C) and line your mini muffin pan with paper liners.
- Mix graham cracker crumbs, melted butter, and sugar in a bowl until the mixture looks like wet sand.
- Spoon about 1 teaspoon of crumbs into each liner and press down firmly with your thumb to create a compact base. Note: A firm base prevents the crust from crumbling when you bite in.
- Beat softened cream cheese and sugar on medium low speed until the mixture is smooth and has no lumps.
- Stir in the sour cream and vanilla extract using a spatula or the mixer on low.
- Add the eggs one at a time, mixing on the lowest speed just until combined. Stop immediately when the yellow of the egg disappears to avoid adding air.
- Spoon the filling evenly over the crusts, filling each cup nearly to the top.
- Bake for 18–20 minutes until the edges are set and matte, but the centers still have a slight, jelly like jiggle.
- Cool in the pan for 30 minutes, then move to the refrigerator for at least 4 hours.
Fixing Common Problems
If your filling comes out lumpy, it's almost always because the cream cheese was too cold. You can't really fix it once it's in the oven, so always feel your cream cheese before starting. If it's cold, microwave it for 10 seconds.
Cracks on top usually happen from over mixing the eggs. When you beat too much air into the batter, it rises like a soufflé and then collapses. Keep that mixer on the lowest setting.
| Problem | Root Cause | Solution |
|---|---|---|
| Lumpy Batter | Cold cream cheese | Soften to room temp first |
| Cracked Tops | Over mixing eggs | Mix on low speed just until combined |
| Sinking Centers | Over baking | Pull out when centers still jiggle |
Mix Up the Flavors
If you want a more festive look, try adding a teaspoon of lemon zest to the batter for a bright, citrusy vibe. For those who love chocolate, you can swap 2 tablespoons of graham crumbs for cocoa powder. These mini graduation desserts are great for experimenting because the risk is low.
If you're planning a larger spread, these go great next to a Homemade Butter Birthday Cake recipe for a full dessert table. You can also top these with fresh berries or a dollop of whipped cream right before serving.
Dietary Swap Ideas
For a gluten-free version, use gluten-free graham crackers or almond flour mixed with a bit of honey. If you need a lower sugar option, you can use a monk fruit sweetener, but be aware it can change the browning of the crust slightly.
Decision Shortcut
- If you want a tart flavor, add 1 tbsp of lemon juice.
- If you want a richer base, use crushed Oreos instead of graham crackers.
- If you're short on time, use a store-bought cheesecake crust mix.
Scaling Your Batch
To double this recipe for a larger crowd, you'll need more pans, but the timing stays mostly the same. Don't try to crowd the oven with too many pans at once, as it can mess with the airflow. I recommend baking in batches if you have more than two pans.
When scaling up, keep the sugar and vanilla the same, but you can increase the salt slightly if you're adding a custom flavor like chocolate. For those wanting a smaller batch, just halve everything. If the recipe calls for one egg, beat one egg in a cup and use half of it by weight.
Truths About Mini Baking
Some people think you need a water bath for every cheesecake to prevent cracks. While that's true for a 9 inch cake, mini cheesecakes bake so quickly that the moisture doesn't evaporate as fast. A water bath is unnecessary for this size.
Another common thought is that you can serve these immediately after they cool to room temperature. Don't do it. The structure of a cheesecake relies on the fats solidifying in the cold, and without the 4 hour chill, they'll be too soft to hold their shape.
Storage and Leftover Tips
Keep these in an airtight container in the fridge for up to 5 days. They actually taste better on day two as the flavors meld. For longer storage, you can freeze them for up to 2 months. Just thaw them in the fridge overnight before serving.
For other treats that keep well in the fridge, you might like my Classic Banana Bread which stays moist for days. To avoid waste, if you have leftover graham crumbs, mix them into your morning yogurt or use them as a coating for fried ice cream.
Best Ways to Serve
For an easy graduation dessert platter, arrange the mini cheesecakes on a white ceramic tray. Alternate them with fresh strawberries, blueberries, and maybe some mint leaves for a pop of color.
If you're serving them for a formal event, remove the paper liners carefully after the chill. They should slide right out. A tiny dot of jam on top of each one makes them look like they came from a professional bakery.
This Bite Size Graduation Dessert with Mini Cheesecakes is the kind of treat that looks high effort but keeps your kitchen stress free.
Recipe FAQs
Can I use cold cream cheese for the filling?
No, use room temperature cream cheese. Cold cheese creates lumps that are nearly impossible to beat out without overmixing the batter.
How to prevent the tops from cracking during baking?
Mix the eggs on the lowest speed just until combined. Overbeating incorporates too much air, which causes the cheesecakes to rise and then collapse or crack.
How to tell when the mini cheesecakes are finished baking?
Check for set edges and a slight center jiggle. The edges should look matte and firm, while the center should move slightly when the pan is shaken.
Is it true that I should bake them until the centers are completely firm?
No, this is a common misconception. Baking until firm leads to overcooking and a rubbery texture; they must set during the 4-hour refrigeration period.
How to store the cheesecakes for a party a few days away?
Place them in an airtight container in the fridge for up to 5 days. They actually taste better on day two as the flavors meld.
Can I make these gluten-free?
Yes, swap the graham cracker crumbs for a gluten-free alternative. If you enjoy the texture of gluten free baked treats, you will find a similar crumb success here.
Why did my crust crumble when I took a bite?
Press the crumb mixture down more firmly. Use your thumb or a small spoon to create a compact base before adding the filling to prevent it from falling apart.
Mini Graduation Cheesecakes