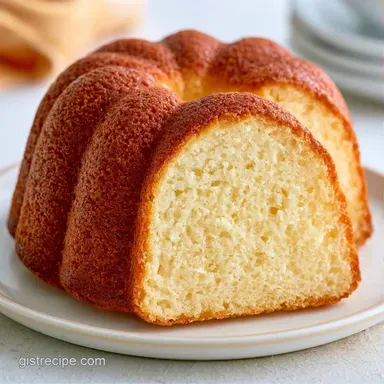
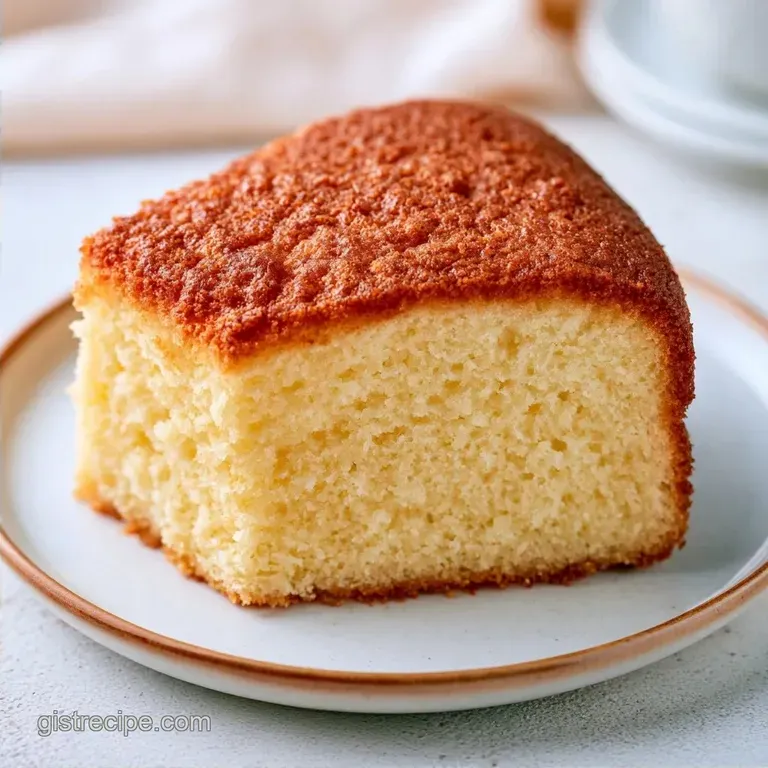
Fluffy Milk and Butter Cake: Silky and Rich
- Time:15 minutes active + 30 minutes bake = Total 45 minutes
- Flavor/Texture Hook: Pillowy, silky crumb with a rich buttery finish
- Perfect for: Last minute guests, afternoon tea, or a simple weeknight treat
- Easy Fluffy Milk and Butter Cake
- Secrets to the Pillowy Texture
- Ingredient Deep Dive
- Pantry and Shopping Guide
- Required Baking Tools
- Step-by-Step Baking Process
- Fixing Common Baking Blunders
- Flavor Twists and Swaps
- Adjusting the Batch Size
- Debunking Cake Myths
- Saving and Reheating Tips
- The Best Side Pairings
- Recipe FAQs
- 📝 Recipe Card
That smell of steaming milk and melted butter hitting a hot pan is honestly one of my favorite things in the world. It is that specific, cozy aroma that tells you the house is about to smell like a professional bakery, but without any of the actual stress.
I remember one rainy Tuesday when I had a sudden craving for something sweet but absolutely zero patience for a complex recipe. I didn't want to spend twenty minutes beating butter and sugar into a pale paste. I just wanted a slice of something tender and warm.
That's when I leaned into this specific method, and it's been my go to ever since because it's a total win for the time you put in.
You can expect a crumb that is incredibly soft, almost like a cloud, but with the depth of a traditional butter cake. This Fluffy Milk and Butter Cake doesn't require any fancy equipment, just a couple of bowls and a pot. Trust me on this, it's the most rewarding "low effort, high reward" bake in my current rotation.
Easy Fluffy Milk and Butter Cake
The secret to this cake is the way we handle the fats. Instead of the usual creaming method where you beat cold butter, we use a hot liquid infusion. This changes the entire structure of the cake, making it feel more like a high end pastry and less like a dense pound cake. If you've ever tried a Traditional Vanilla Layer Cake, you'll notice this one is much more effortless to put together.
The result is a slice that feels silky on the tongue. It's the kind of cake that doesn't even need frosting if you're in a rush, though a dusting of powdered sugar makes it look a bit more polished.
Since we aren't fighting with cold butter, the batter comes together in minutes, leaving you more time to actually enjoy the eating part.
Right then, let's get into why this specific approach works so well. It's all about how the ingredients interact when they hit the oven.
Secrets to the Pillowy Texture
I used to think all cakes were created equal, but the "hot milk" approach is different. It's not about fancy chemistry, just a few smart moves with temperature.
- Fat Distribution: Melting the butter into the milk ensures the fat is evenly dispersed, which prevents those dense pockets of butter.
- Air Integration: Beating the eggs and sugar first creates a stable foam that holds the cake up.
- Starch Softening: The heat from the milk helps the flour hydrate faster, leading to a more tender crumb.
- Quick Rise: The baking powder reacts quickly with the warm liquid, giving it an immediate boost in the oven.
The difference between this and a standard cake is really about how the structure is built. In a typical cake, you're trapping air in solid fat; here, you're trapping air in eggs and then folding in a liquid emulsion.
| Method | Bake Time | Texture | Best For |
|---|---|---|---|
| Oven Bake | 30 minutes | Airy and gold | Classic slices |
| Stovetop Steam | 50 minutes | Dense and moist | Custard like feel |
| Slow Cooker | 2 hours | Heavy and moist | Set and forget |
Since most of us have an oven, that's the way to go for that classic, pillowy lift.
Ingredient Deep Dive
I've found that using room temperature eggs is the only way to get that thick, pale volume we need. If they're cold, the sugar won't dissolve as well, and the cake won't rise as high.
| Ingredient | Science Role | Pro Secret |
|---|---|---|
| All purpose flour | Structure | Sift it twice for maximum lightness |
| Granulated sugar | Tenderness | Beat with eggs until pale and thick |
| Unsalted butter | Flavor/Moisture | Melt with milk to avoid over mixing |
| Whole milk | Hydration | Use full fat for a silkier mouthfeel |
It's simple stuff, but the quality of the butter really shows through here. Don't bother with the low-fat versions; you'll lose that velvety finish.
Pantry and Shopping Guide
Here is everything you need. I've kept it to basics you probably already have in your kitchen.
- 2 cups (250g) All purpose flour Why this? Balanced protein for a sturdy but soft lift (Substitute: Cake flour for an even softer crumb)
- 1 1/2 cups (300g) Granulated sugar Why this? Provides sweetness and moisture (Substitute: Caster sugar for faster dissolving)
- 1 tbsp (12g) Baking powder Why this? Primary leavening agent (Substitute: 1/2 tsp baking soda + 1 tbsp cream of tartar)
- 1/2 tsp (3g) Fine sea salt Why this? Balances the sweetness (Substitute: Kosher salt, but use a slightly larger pinch)
- 3 large (150g) Eggs, room temperature Why this? Provides structure and air (Substitute: 3 flax eggs for vegan, but texture will be denser)
- 1 tsp (5ml) Pure vanilla extract Why this? Classic aromatic base (Substitute: Almond extract for a nutty twist)
- 1/2 cup (115g) Unsalted butter Why this? Richness and flavor (Substitute: Coconut oil for a dairy-free option)
- 1 cup (240ml) Whole milk Why this? Creates the velvety crumb (Substitute: Oat milk for a similar creamy consistency)
Required Baking Tools
You don't need a professional kitchen for this. A few basic items will do the trick.
- 9 inch round cake pan or square dish (the size is key for the 30 minute timing)
- Parchment paper (don't skip this, or you'll be scrubbing the pan for an hour)
- Large mixing bowl
- Small saucepan (for the butter and milk)
- Hand mixer or stand mixer (such as KitchenAid)
- Rubber spatula (for folding)
- Fine mesh sifter
Step-by-step Baking Process

Let's crack on with the actual making. Keep an eye on your temperatures and don't rush the egg beating part.
- Preheat oven to 350°F (175°C). Grease your 9 inch pan and line the bottom with parchment paper. Note: This ensures the cake slides out without breaking
- Sift the all purpose flour, baking powder, and fine sea salt into a bowl. Note: This removes clumps and aerates the flour
- Beat granulated sugar and room temperature eggs on high speed. Continue until the mixture is pale and has doubled in volume.
- Stir in the pure vanilla extract.
- Melt the unsalted butter and whole milk in a saucepan over low heat. Stir until steaming but not boiling.
- Slowly pour the hot milk and butter into the egg mixture, whisking gently. Note: Pour slowly so you don't deflate the air in the eggs
- Gradually fold in the sifted dry ingredients using a spatula. Mix only until no flour streaks remain.
- Pour batter into the pan and bake for 30-35 minutes. Bake until a toothpick comes out clean and edges pull slightly away from the pan.
Chef's Tip: If you want a deeper flavor, add a tiny pinch of espresso powder to the flour. It doesn't make it taste like coffee, but it makes the butter flavor pop.
Fixing Common Baking Blunders
Even for experienced cooks, cakes can be finicky. Most issues come down to temperature or over mixing.
Mid Cake Sinking
If the center dips, it's usually because the oven door was opened too early or the baking powder is old. Avoid peeking before the 25 minute mark.
Dense Crumb Issues
A heavy cake usually means the eggs weren't beaten enough or the flour was over mixed. Stop folding the moment the flour disappears.
Batter Separation
If the hot milk causes the eggs to curdle, don't panic. A quick whisk usually brings it back, but pouring the milk in a slow stream prevents this.
| Problem | Root Cause | Solution |
|---|---|---|
| Sunk center | Oven door opened early | Wait until 30 mins before checking |
| Rubbery texture | Over mixing flour | Fold gently with a spatula |
| Pale top | Oven temp too low | Check oven with a thermometer |
Quick Success Checklist:
- ✓ Eggs are truly room temperature (not just "lukewarm")
- ✓ Flour is sifted to avoid lumps
- ✓ Butter/milk is steaming, not boiling
- ✓ Pan is lined with parchment paper
- ✓ Oven is fully preheated before the cake goes in
Flavor Twists and Swaps
This recipe is a blank canvas. Once you've mastered the basic Fluffy Milk and Butter Cake, you can start playing with the flavors.
If you want something more celebratory, you can follow the logic of a Homemade Butter Birthday Cake recipe by adding a layer of buttercream frosting and sprinkles. For a more adult version, try adding zesty lemon peel to the batter.
Decision Shortcut:
- If you want a citrus kick, add 1 tbsp lemon zest to the sugar.
- If you want a spice cake, replace 1 tbsp of flour with cinnamon and nutmeg.
- If you want it richer, swap the milk for heavy cream.
Adjusting the Batch Size
You don't always need a full 9 inch cake. Here is how to scale this without ruining the chemistry.
Cutting the recipe in half: Use a 6 inch pan. Since you can't easily use 1.5 eggs, beat one egg in a small bowl and use half of it by weight. Reduce the baking time by about 20%, checking at 22 minutes.
Doubling the recipe: Use two 9 inch pans rather than one deep pan. I suggest lowering the oven temp to 325°F (160°C) and extending the time by 5-10 minutes to ensure the middle cooks through without burning the edges.
Only increase the salt and vanilla to 1.5x to avoid overpowering the butter.
| Scaling | Pan Size | Temp Adjustment | Time Change |
|---|---|---|---|
| 1/2 Batch | 6 inch | No change | -20% time |
| Double | 2x 9 inch | -25°F (15°C) | +10 mins |
Working in batches is always safer than trying to bake one giant, deep cake.
Debunking Cake Myths
There are a lot of "rules" in baking that are actually just suggestions. Let's clear some up.
Myth: You must cream butter and sugar for 5 minutes. Truth: Not for this recipe. By melting the butter into the milk, we skip the creaming process entirely and still get a light result through the aerated eggs.
Myth: Sifting flour is a waste of time. Truth: In a cake this light, sifting is huge. It prevents those little pockets of dry flour that can ruin a silky crumb.
Myth: You can't use a square pan. Truth: You can, but keep an eye on the corners. They tend to cook faster than the center, so check for doneness early.
Saving and Reheating Tips
To keep this cake from drying out, storage is everything. Once it's cool, wrap it tightly in plastic wrap or store it in an airtight container.
Storage Guidelines: - Fridge: 4-5 days (keep it wrapped so it doesn't absorb fridge smells) - Freezer: 2 months (slice it first, then freeze individual pieces with parchment paper between them)
Reheating: The best way to bring it back to life is a quick 10 second zap in the microwave. This softens the butter in the crumb, making it feel fresh baked.
Zero Waste Tip: If you have leftover cake scraps, don't toss them. Crumble them up, toast them in a pan with a bit of butter, and use them as a topping for yogurt or ice cream. It turns "waste" into a crunchy cake crumble.
The Best Side Pairings
Because this cake is rich and buttery, it pairs best with something that cuts through that fat with acidity or freshness.
Fresh Fruit Pairings: Fresh raspberries or sliced strawberries are a no brainer. The tartness of the berries balances the sweetness of the sugar and the richness of the milk.
Creamy Additions: A dollop of lightly sweetened whipped cream or a scoop of vanilla bean ice cream makes this feel like a restaurant dessert. If you're feeling fancy, a drizzle of salted caramel sauce adds a great contrast to the silky cake.
Recipe FAQs
Does milk make a cake fluffier?
Yes, it adds essential moisture. Whole milk helps create a tender crumb and supports the cake's overall lightness.
What makes a cake extra fluffy?
Beating the eggs and sugar until they double in volume. This process traps air that expands in the oven to create a light, airy structure.
How to make cake soft and fluffy?
Fold in the dry ingredients gently with a spatula. This prevents the trapped air bubbles from escaping and keeps the cake from becoming dense.
How to make a small birthday cake?
Halve the ingredients and use a 6 inch pan. Bake at 350°F (175°C) for a shorter duration, checking for doneness with a toothpick.
Why must the eggs be at room temperature?
They incorporate air more easily. Room temperature eggs create a stable, thick foam when beaten with sugar, which ensures a better rise.
Is it true that you must boil the milk and butter?
No, this is a common misconception. The mixture should be steaming but not boiling to prevent the eggs from curdling when combined.
Can I use this batter for a different pan shape?
Yes, any 9 inch pan works. If you enjoyed the simple mixing method here, see how the same principle works in our white bread.
Fluffy Milk And Butter Cake