Guilt-Free Layered Graduation Dessert Cups: Tangy and Fresh
- Time: 30 min active + 2 hours chilling
- Flavor/Texture Hook: Tangy Greek yogurt cream with a crumbly, toasted cake base
- Perfect for: College graduation parties or high school celebrations
The smell of toasted coconut sugar hitting a hot oven is honestly the best part of this process. I remember my first attempt at a party treat where I tried to make individual cakes, but they all stuck to the pan and looked like sad little lumps.
It was a disaster until I realized that crumbling a single sheet cake into cups is the way to go.
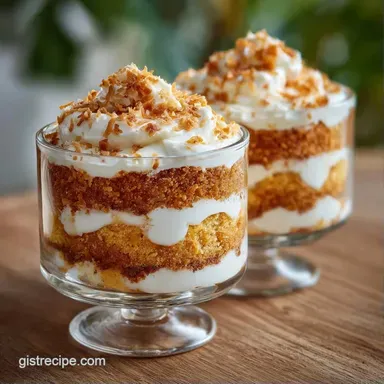
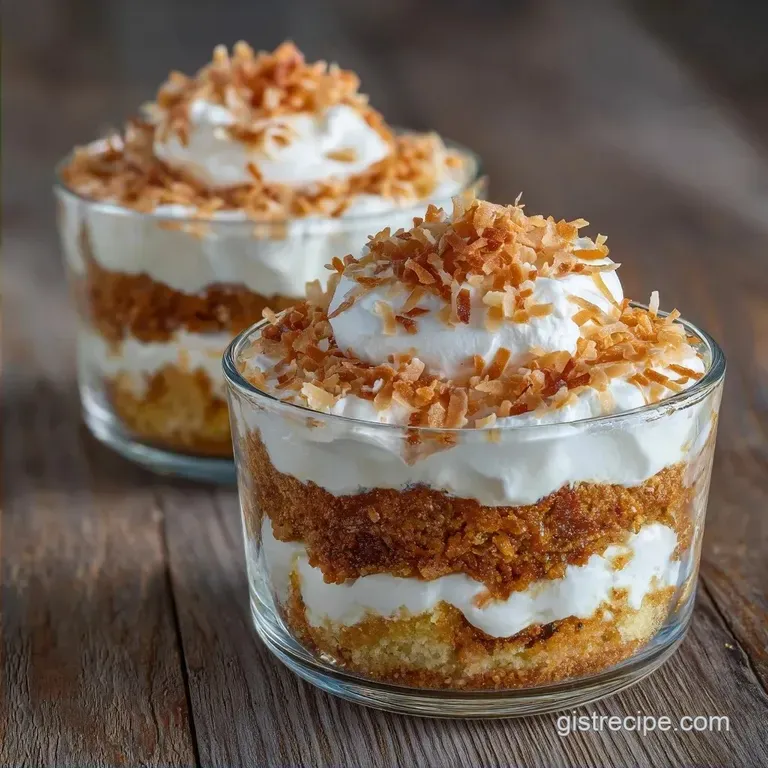
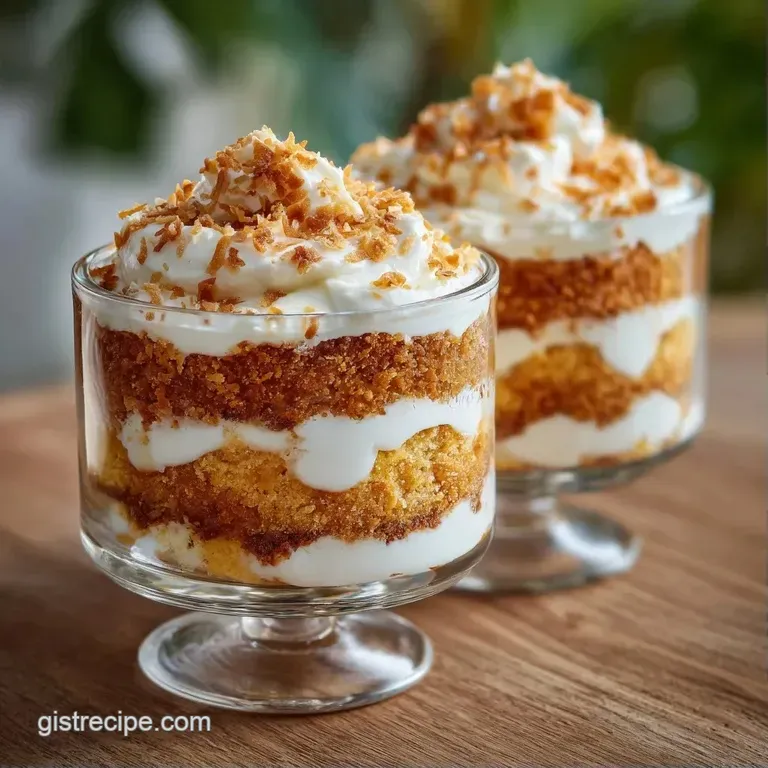
These Layered Graduation Dessert Cups give you that high end look with way less stress. You get the variety of a trifle but in a portable size that guests can actually carry while chatting.
You'll find that this recipe focuses on a balance of flavors. The whole wheat pastry flour gives the base a deeper taste than white flour, and the lemon zest cuts through the richness of the cream.
Layered Graduation Dessert Cups
The trick here is the Greek yogurt. Most whipped creams collapse after an hour, but adding yogurt creates a stable structure that holds up during a long party. I've found that this prevents the dreaded "soup" at the bottom of the cup.
Greek Yogurt Stability: The acidity and thickness of the yogurt act as a stabilizer for the whipped cream, keeping it fluffy for hours.
Whole Wheat Pastry Flour: This flour has less protein than regular whole wheat, so the cake stays tender but has a nuttier profile.
Citrus Brightness: Lemon juice prevents the berries from oxidizing and adds a sharp contrast to the maple syrup.
| Style | Prep Effort | Texture | Best For |
|---|---|---|---|
| Fresh Berries | Medium | Bright and juicy | Fresh, seasonal vibes |
| Jam Shortcut | Low | Dense and sweet | Long term storage |
| Frozen Berries | Low | Syrupy and soft | Budget friendly options |
What Each Ingredient Does
| Ingredient | What It Does | Best Swap |
|---|---|---|
| Whole Wheat Pastry Flour | Adds structure and a nutty taste | Spelt flour |
| Greek Yogurt | Thickens the cream layer | Labneh |
| Coconut Oil | Keeps the cake moist | Melted butter |
| Heavy Cream | Provides the airy lift | Coconut cream (chilled) |
Everything You Need
- 1.5 cups (190g) whole wheat pastry flour Why this? Lighter than regular whole wheat.
- 0.5 cup (100g) coconut sugar Why this? Adds a caramel like depth.
- 1 tsp (5g) baking powder
- 0.5 tsp (3g) salt
- 1 cup (240ml) unsweetened almond milk Why this? Keeps the base light.
- 2 tbsp (28g) melted coconut oil
- 1 cup (240g) plain Greek yogurt
- 0.5 cup (120ml) chilled heavy cream Why this? Essential for the airy peaks.
- 2 tbsp (30g) maple syrup
- 1 tsp (5ml) vanilla extract
- 1 cup (150g) fresh raspberries
- 1 cup (150g) fresh blueberries
- 1 tbsp (15ml) lemon juice
- 1 tsp (5g) lemon zest
The Right Tools
You'll need an 8 inch square baking pan for the base. For the cream, a chilled metal bowl and a hand mixer work best. You will also need 12 clear plastic or glass dessert cups (about 5-8 oz each) and a piping bag if you want the layers to look sharp.
Step by step Flow
- Preheat the oven to 350°F (175°C). Mix the whole wheat pastry flour, coconut sugar, baking powder, and salt in a bowl.
- Stir in the unsweetened almond milk and melted coconut oil until the batter is smooth. Spread it evenly into your 8 inch square pan.
- Bake for 20 minutes until a toothpick comes out clean. Let it cool completely, then crumble it into small pieces with your hands.
- Beat the heavy cream in a chilled bowl until soft peaks form. Note: Don't overbeat or it will turn into butter.
- Gently fold in the Greek yogurt, maple syrup, and vanilla extract. Use a slow folding motion to keep the air in the mix.
- Toss the raspberries, blueberries, lemon juice, and lemon zest together in a separate bowl.
- Layer the crumbled cake, the silky whipped cream mixture, and the berries into your 12 cups.
- Chill in the fridge for 2 hours before serving.
Chef's Note: If you're struggling to get the cream into the cups without smudging the sides, use a piping bag or even a Ziploc bag with the corner snipped off. It makes the Layered Graduation Dessert Cups look way more polished.
Fixing Common Issues
It's common for the cream to get a bit too soft if your kitchen is hot. This usually happens because the heavy cream wasn't cold enough before whipping. If the cream looks grainy, you've likely gone too far with the mixer.
Troubleshooting Common Issues
| Issue | Solution |
|---|---|
| Why Your Cream Is Runny | If the mixture doesn't hold a peak, it usually means the bowl wasn't cold or the yogurt was too watery. You can fold in a bit more chilled heavy cream and whip it again briefly. |
| Why The Cake Is Dry | Overbaking by even 2 or 3 minutes can dry out a whole wheat base. Check it at the 18 minute mark. |
| Why Layers Are Mixing | This happens when the cake is still warm or the cream is too thin. Always let the cake cool for at least 30 minutes. |
Customizing the Flavor
If you want to switch things up, you can change the berry mix to mango and kiwi for a tropical vibe. For a more chocolatey version, fold 2 tablespoons of cocoa powder into the cake batter. If you're looking for other cake ideas for your party, these Sourdough Coffee Cake Muffins are a great way to use up sourdough discard.
Decision Shortcut:
- If you want a richer base, use melted butter instead of coconut oil.
- If you want less sweetness, cut the maple syrup to 1 tablespoon.
- If you need them to last longer, use a seedless jam instead of fresh berries.
For a lower sugar option, you can replace the coconut sugar with a monk fruit sweetener, though the cake will be slightly less brown. To lighten the cream, use a 50/50 mix of Greek yogurt and whipped topping.
Scaling the Recipe
Scaling Down (Half Recipe): Use a loaf pan instead of a square pan and bake for about 15-17 minutes. You'll get 6 cups. Since there is no egg in this cake, you don't have to worry about splitting one.
Scaling Up (Double Recipe): Use two 8 inch pans rather than one giant one to ensure the center cooks through. Only increase the salt and baking powder by 1.5x to avoid a metallic taste.
Work in batches when whipping the cream, as most home mixers can't handle 2 cups of cream and 2 cups of yogurt at once.
Common Baking Myths
Some people think whole wheat flour always makes a "healthy" tasting, dense cake. That's not true if you use pastry flour, which has a lower protein content and keeps things light.
Another myth is that you need to sift coconut sugar. While it can be clumpy, stirring it vigorously into the flour usually does the trick without the extra step.
Storage and Leftovers
Store these Layered Graduation Dessert Cups in the fridge for up to 3 days. Keep them covered with plastic wrap to stop the cream from picking up fridge smells. They don't freeze well because the fresh berries turn mushy and the cream can separate.
To avoid waste, if you have leftover berries, simmer them with a splash of water and a pinch of sugar to make a quick compote for pancakes. Any leftover cake crumbles can be tossed into a smoothie for extra fiber.
The Best Pairings
Since these cups are tangy and sweet, they pair well with something salty. A platter of Classic Deviled Eggs provides a great contrast on a party table. For a full dessert spread, I often serve these alongside Mini Graduation Party Cakes to give guests a few different options.
Presentation Ideas:
- Top each cup with a single fresh mint leaf for a pop of green.
- Use small gold spoons to make them feel more festive.
- Tie a ribbon around the stem of the glass cups in the school's colors.
These Layered Graduation Dessert Cups are a reliable way to handle a crowd. They look impressive, taste fresh, and don't require you to be a professional baker. Just remember to keep your cream cold and your berries fresh, and you're all set.
Recipe FAQs
How far in advance can I make these dessert cups?
Up to 3 days. Keep them covered with plastic wrap in the refrigerator to prevent the cream from picking up odors from other foods.
How to prevent the whipped cream from becoming runny?
Chill your bowl and heavy cream thoroughly. If the mixture fails to hold a peak, fold in a bit more chilled heavy cream and whip briefly.
How to avoid dry cake crumbles?
Check for doneness at the 18-minute mark. Overbaking a whole wheat base by even 2 or 3 minutes can quickly dry out the texture.
Is it true that these dessert cups can be frozen for later use?
No, this is a common misconception. Freezing causes the fresh berries to turn mushy and the cream to separate upon thawing.
How to keep the layers from mixing together?
Cool the cake completely for at least 30 minutes. Adding cake while it is still warm will melt the cream and cause the layers to bleed.
How to assemble the dessert cups for a clean look?
Layer the crumbled cake, cream mixture, and berries sequentially. If you enjoyed mastering the textural contrast here, see how the same principle works in our strawberry crunch cake.
Can I make these dessert cups as a budget friendly graduation treat?
Yes, they are very cost effective. Utilizing simple pantry staples like whole wheat pastry flour and seasonal berries makes this an inexpensive option for large crowds.
Layered Graduation Dessert Cups