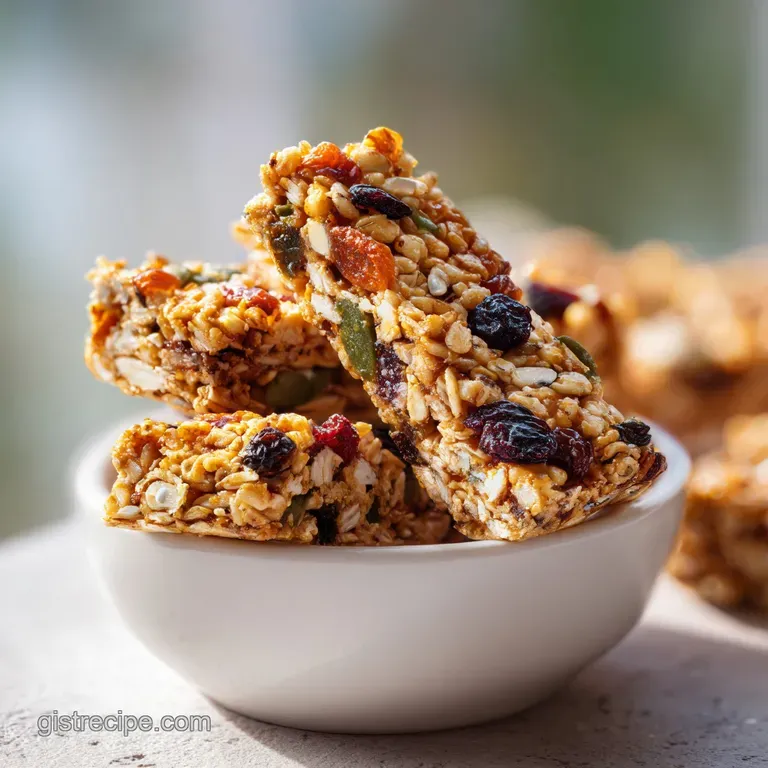
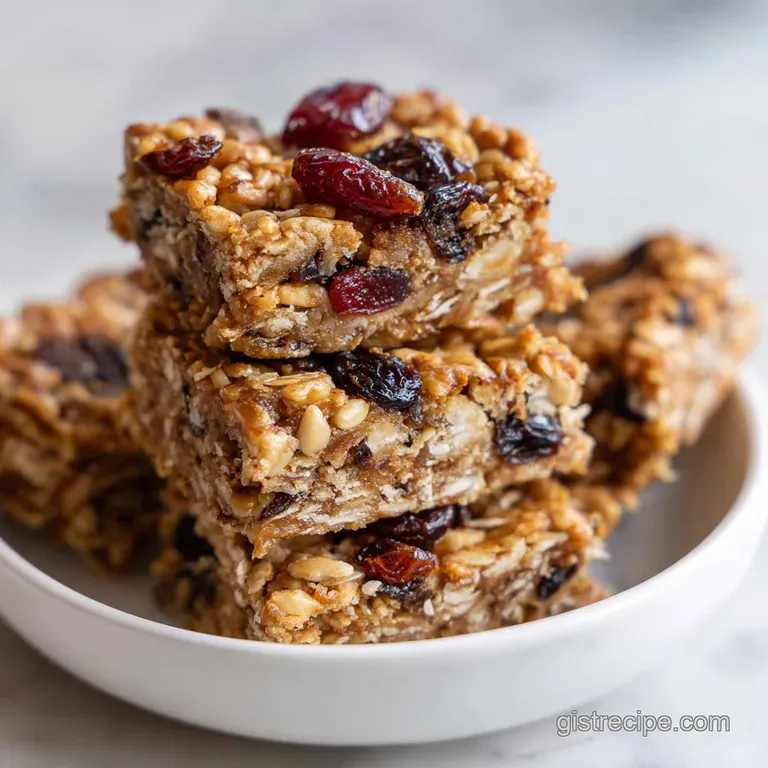
Chewy Trail Mix Granola Bars
- Time: Active 15 minutes, Passive 2 hours, Total 2 hours 15 mins
- Flavor/Texture Hook: Toasted, salty sweet, and satisfyingly chewy
- Perfect for: Hiking trips, pre workout fuel, or quick school lunches
- Master the Ultimate Trail Mix Granola Bars
- The Physics of the Bind
- Essential Timing for Fast Prep
- Sourcing Quality Ingredients for Energy
- Minimal Tools for Easy Clean
- Blueprint for Perfect No Bake Bars
- Fixing Common Granola Bar Blunders
- Swaps for Dietary Needs
- Storing Fuel for the Week
- Serving Your Homemade Energy Bars
- Recipe FAQs
- 📝 Recipe Card
Master the Ultimate Trail Mix Granola Bars
The aroma of toasted oats hitting a warm pan is one of those kitchen scents that immediately signals "something good is happening." I remember the first time I tried making these, I was rushing to pack for a weekend camping trip. I threw everything into a bowl, barely pressed it into the pan, and hoped for the best.
By the time we hit the trailhead, I didn't have bars; I had a bag of very expensive, very sticky loose crumbs. It was a mess, but the flavor was so much better than anything wrapped in foil from the grocery store.
That failure taught me the most important lesson about making Trail Mix Granola Bars: the "press" is just as vital as the ingredients. You aren't just mixing; you are constructing a foundation.
Since then, I’ve refined the ratio of liquid honey to creamy peanut butter to ensure these bars survive a backpack, a gym bag, or a toddler’s lunchbox without shattering into a million pieces. They have become my go to "emergency energy" that I keep in the fridge at all times.
We are going for a texture that is substantial but not tooth cracking. By using a mix of old fashioned rolled oats and crispy rice cereal, we get a structural integrity that stays flexible. These aren't those rock hard bars that hurt your jaw.
They are soft, slightly salty, and packed with enough protein to actually keep you moving. Let's get into how to make these work every single time.
The Physics of the Bind
- Sugar Recrystallization: Heating the honey and coconut oil briefly helps the sugars dissolve and then "reset" as they cool, creating a firm, candy like matrix that holds the oats.
- Lipid Emulsification: The fats in the creamy peanut butter act as a bridge between the dry oats and the liquid honey, preventing the bars from becoming brittle or crumbly.
- Hydration Control: Old fashioned oats absorb a tiny amount of moisture from the honey over the 2 hour set time, which softens their raw edge without making them soggy.
| Method | Time | Texture | Best For |
|---|---|---|---|
| Stovetop Bind | 10 mins | Chewy & Soft | Maximum speed and minimal cleanup |
| Oven Toasted | 20 mins | Nutty & Firm | Deep flavor and longer shelf life |
While some people swear by the oven, I prefer the stovetop method for this specific recipe. It keeps the dark chocolate chips from melting into a brown puddle and preserves the bright, tart snap of the dried cranberries.
Essential Timing for Fast Prep
When you are looking for quick fuel, you don't want to spend all morning in the kitchen. This recipe is designed for efficiency. The 15 minutes of active work is mostly just measuring and stirring, while the 2 hours of waiting is where the magic happens in the fridge.
- Active Prep: 15 minutes
- Setting Time: 2 hours
- Total Time: 2 hours 15 mins
- Yield: 12 bars
Sourcing Quality Ingredients for Energy
- 2.5 cups old fashioned rolled oats: These provide the bulk and the fiber. Don't swap for quick oats, or the bars will turn into mush.
- 0.5 cup creamy peanut butter: This is your primary fat and protein source. I use the kind you have to stir for the best flavor.
- 0.5 cup liquid honey: The "glue" of the recipe. It needs to be liquid enough to pour easily.
- 0.5 cup hemp hearts: Adds a subtle nutty flavor and a massive boost of plant based protein.
- 0.5 cup crispy rice cereal: The secret to a lighter, less "dense" bar that still has structure.
- 0.5 cup raw almonds, roughly chopped: Provides the essential "shatter" and crunch.
- 0.33 cup dried cranberries: For a hit of acid to balance the heavy fats.
- 0.33 cup dark chocolate chips: Because every trail mix needs a little reward.
- 0.25 cup pepitas (pumpkin seeds): Adds a lovely green color and extra minerals.
- 1 tablespoon coconut oil: Helps the bars stay solid at room temperature.
- 1 teaspoon pure vanilla extract: Rounds out the sweetness.
- 0.5 teaspoon fine sea salt: Critical for making the chocolate and honey flavors pop.
| Ingredient | Science Role | Pro Secret |
|---|---|---|
| Old Fashioned Oats | Structural Base | Toast them in a dry pan for 5 minutes to unlock a popcorn like aroma |
| Liquid Honey | Primary Adhesive | Heat it until it just starts to bubble to ensure a tighter bond |
| Coconut Oil | Texture Stabilizer | Use refined oil if you want the benefits without the coconut taste |
The balance of these components is what makes this a high protein trail mix bars option. If you find yourself craving something even more dessert like after trying these, you might enjoy the layers in my Salted Caramel Apple recipe, which uses a similar fruit and grain logic but with a more indulgent twist.
| Original Ingredient | Substitute | Why It Works |
|---|---|---|
| Honey (0.5 cup) | Brown Rice Syrup (0.5 cup) | Stickier than honey; makes the bars even more durable for travel |
| Peanut Butter (0.5 cup) | Almond Butter (0.5 cup) | Similar fat profile but offers a more neutral, nutty base |
| Hemp Hearts (0.5 cup) | Ground Flaxseed (0.5 cup) | Provides similar binding properties and Omega-3s, though less protein |
Minimal Tools for Easy Clean
You really only need a few basics for this recipe. I’m a big fan of the "one bowl" philosophy to keep Monday mornings from becoming a sink full-of dishes disaster.
- Large mixing bowl: Plenty of room to stir without throwing oats across the counter.
- Small saucepan: To gently melt the honey and peanut butter.
- 8x8 inch baking pan: This gives you the perfect thickness for 12 bars.
- Parchment paper: Don't skip this. It's the only way to get the bars out cleanly.
- Heavy flat bottomed glass: My favorite tool for pressing the mixture into the pan.
Blueprint for Perfect No Bake Bars
- Line the pan. Fit a piece of parchment paper into your 8x8 inch pan, leaving an inch of overhang on the sides. Note: This creates "handles" to lift the bars out later.
- Combine dry goods. In your large bowl, toss together the 2.5 cups oats, 0.5 cup hemp hearts, 0.5 cup rice cereal, pepitas, and chopped almonds.
- Heat the binder. In a small saucepan over medium low heat, whisk the 0.5 cup honey, 0.5 cup peanut butter, 1 tbsp coconut oil, and salt until the mixture is silky and bubbles at the edges.
- Add aromatics. Remove the pan from heat and stir in the 1 teaspoon vanilla. Note: Adding vanilla at the end preserves its delicate flavor.
- Merge the mixtures. Pour the warm honey mixture over the dry oats. Stir vigorously until every single oat is coated in a glossy sheen.
- Cool slightly. Let the mixture sit for 5 minutes before adding the 0.33 cup cranberries and 0.33 cup chocolate chips. Note: This prevents the chocolate from melting entirely.
- Transfer to pan. Dump the mixture into your prepared 8x8 pan, spreading it out to the corners.
- The Great Press. Using a flat bottomed glass or a firm spatula, press down with significant force until the surface is flat and tightly packed.
- Chill and set. Place the pan in the refrigerator for 2 hours until the block feels solid to the touch.
- Slice and serve. Lift the parchment "handles" to remove the block, then use a sharp knife to cut into 12 even bars.
Chef's Tip: If the mixture is sticking to your hands or the glass while you press, lightly dampen them with water. The moisture creates a barrier that lets you pack the bars down tight without the mess.
Fixing Common Granola Bar Blunders
Why Your Bars Are Crumbling
If your bars fall apart the moment you pick them up, the culprit is usually a lack of compression. If you just "spread" the mixture into the pan, it won't hold. You have to treat it like you're packing a snowball. Another reason could be the honey wasn't heated enough.
Heating the honey slightly reduces its water content, making it tackier.
Why Your Bars Are Too Sticky
Sticky bars usually happen if they haven't spent enough time in the cold. Coconut oil and honey both need a low temperature to solidify. If they are still tacky after 2 hours, try moving them to the freezer for 20 minutes.
It's also possible you used a very "oily" natural peanut butter without stirring it well first.
| Problem | Root Cause | Solution |
|---|---|---|
| Chocolate smeared | Added to hot oats | Wait 5 mins for oats to cool to roughly 100°F before adding chips |
| Bars feel greasy | Too much coconut oil | Measure the 1 tbsp precisely; don't eyeball it |
| Oats feel tough | Used Steel Cut oats | Only use Old Fashioned Rolled oats for the correct texture |
Common Mistakes Checklist ✓ Using "Quick Oats" (they turn into a paste and lose the trail mix feel) ✓ Skipping the salt (the bars will taste flat and overly sweet) ✓ Pressing too lightly (the most common reason for crumbling) ✓ Using cold honey (it won't incorporate evenly
into the peanut butter) ✓ Cutting them while still warm (they need the full 2 hour chill to bond)
Swaps for Dietary Needs
Making these homemade trail mix granola bars means you can tweak them for whatever your body needs. If you are packing these for a school lunch, you'll need to ditch the peanut butter to keep it nut free.
- The School Safe Swap: Replace the peanut butter with Sunflower Seed Butter and swap the chopped almonds for extra pepitas or sunflower seeds.
- The Tropical Vegan Pivot: Use maple syrup instead of honey (though you may need to boil the syrup for 2 minutes first to thicken it) and use dried mango and coconut flakes as add ins.
Scaling the Recipe
If you want to stock up, doubling this recipe is easy. Use a 9x13 inch pan and keep the liquid ratios the same. For a half batch, use a loaf pan to maintain the thickness of the bars. Reducing the thickness usually leads to bars that break more easily.
If you find yourself loving the no bake life, you should definitely try a No Bake Cheesecake recipe next. It uses the same "press and chill" logic but for a much more velvety, decadent result.
| Servings | Pan Size | Honey Amount | Setting Time |
|---|---|---|---|
| 6 Bars | 9x5 Loaf Pan | 0.25 cup | 1 hour 30 mins |
| 12 Bars | 8x8 Square | 0.5 cup | 2 hours |
| 24 Bars | 9x13 Rect. | 1.0 cup | 3 hours |
Storing Fuel for the Week
Storage: These bars are happiest in the refrigerator. Wrap them individually in wax paper or store them in an airtight container with parchment paper between layers. They will stay fresh and chewy for up to 10 days.
At room temperature, they might get a bit soft if it's a warm day, but they are perfectly safe to keep in a backpack for a few hours.
Freezing: You can freeze these for up to 3 months. Wrap them tightly in plastic wrap and then place them in a freezer bag. I actually love eating them straight from the freezer on a hot day they have a fantastic, firm snap that reminds me of a candy bar.
Zero Waste: Don't throw away those little crumbs left in the bottom of the pan after slicing! Save them in a jar and use them as a "granola" topping for your morning yogurt or oatmeal. If you have leftover pepitas or hemp hearts, toss them into a salad for an easy crunch.
Serving Your Homemade Energy Bars
There is a common myth that "healthy" granola bars have to be dry and flavorless. That is usually because commercial brands over process the grains to extend shelf life. When you make these easy trail mix granola bars at home, you're getting fresh oils from the nuts and seeds that haven't oxidized.
Another myth is that you need corn syrup to get that "chewy" texture. As we've seen, honey and a good press do the job perfectly well.
I like to serve these alongside a big piece of fruit or a hard boiled egg for a complete breakfast. They aren't just for mornings, though. Because of the high protein trail mix bars profile, they are an incredible mid afternoon bridge when you're starting to feel that 3:00 PM slump.
If you're feeling adventurous, try dipping the bottom of the set bars into some extra melted dark chocolate and letting them set again. It makes them feel like a premium treat while still giving you all the energy you need to get through the day.
Trust me, once you see how simple these are, you'll never look at the granola bar aisle the same way again. Stay fueled!

Recipe FAQs
Can I substitute quick oats for the old fashioned rolled oats?
No, stick with old fashioned. Quick oats absorb moisture too readily, which will turn your bars into a mushy, soft consistency instead of a chewy structure.
How to ensure the bars hold together and don't crumble?
Press the mixture down with significant, firm force. Use a flat bottomed glass to compact the ingredients tightly into the pan to create a solid foundation during chilling.
Is it true that I must use a double boiler to heat the honey and peanut butter?
No, this is a common misconception. Heating the binder gently in a small saucepan over medium low heat until bubbles form at the edges is sufficient for a proper bond.
What is the maximum time these trail mix bars can be stored safely?
Store them in the refrigerator for up to 10 days. They maintain the best chewy texture when kept chilled in an airtight container between layers of parchment paper.
How to make these bars safe for school lunches without peanuts?
Replace the peanut butter with sunflower seed butter. Also, swap the chopped almonds for extra pepitas or sunflower seeds to maintain the crunch factor.
Why are my dark chocolate chips melting into the entire mixture?
You added the chocolate chips while the oat mixture was too hot. Allow the warm honey mixture to cool for at least 5 minutes before stirring in the chips and dried fruit.
How to achieve a tighter, candy like structure using a different sweetener?
Substitute the honey with brown rice syrup. Brown rice syrup is naturally stickier than honey and will result in an even more durable bar for intense travel.
Trail Mix Granola Bars

Ingredients:
Instructions:
Nutrition Facts:
| Calories | 298 kcal |
|---|---|
| Protein | 9.3 g |
| Fat | 15.3 g |
| Carbs | 35.8 g |
| Fiber | 3.8 g |
| Sugar | 17.8 g |
| Sodium | 98 mg |
