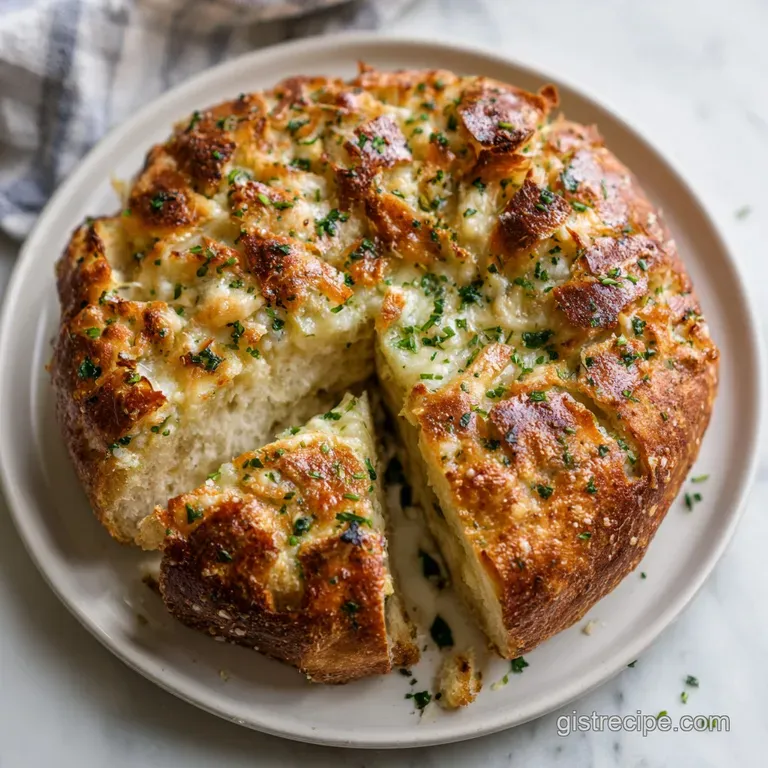
The Best Garlic Bread: Shattering Crust and Roasted Heart
- Time: Active 10 minutes, Passive 12 minutes, Total 22 minutes
- Flavor/Texture Hook: Shattering golden crust with a buttery, garlic infused interior
- Perfect for: Weeknight pasta nights, backyard barbecues, or comforting family dinners
- The Secrets Behind the Best Garlic Bread Recipe
- Why This Works
- Vital Statistics for This Simple Side
- Essential Components for High Flavor Impact
- Essential Tools for a Crispy Loaf
- Step by Step Toward Golden Perfection
- Solving Common Problems with Garlic Bread
- Simple Adjustments for Different Dietary Needs
- Practical Tips for Storing Your Bread
- Perfect Main Dishes to Serve Alongside
- Myths About Making Garlic Bread
- Recipe FAQs
- 📝 Recipe Card
The Secrets Behind the Best Garlic Bread Recipe
You've probably heard that you need a $10 artisanal sourdough loaf or some complicated clarified butter to make a decent side dish, but honestly, forget all that. The biggest myth in the bread world is that "fancy" equals "better" when it comes to garlic bread.
I used to spend way too much money on specialty loaves, only to realize that a standard, soft crumb Italian loaf from the supermarket actually absorbs the garlic butter far better than a crusty, hole filled boule.
The magic happens when the kitchen starts to fill with that warm, sharp aroma of microplaned garlic hitting the heat. We're not just throwing some garlic powder on toast here. We are creating an emulsified, pale green paste that looks more like cake frosting than condiment.
When this hits the oven at 400°F, the water in the butter evaporates to create steam (lift), while the olive oil fries the surface of the bread to a golden shatter. It is simple, it is comforting, and it is a total classic for a reason.
I've made the mistake of using too much dried herb in the past, which just ends up tasting like dusty hay. Trust me, the fresh flat leaf parsley is non negotiable here. It provides a bright, peppery contrast to the heavy fats and the pungent garlic.
This is the version of garlic bread that makes people stop talking and start reaching for the last piece before the pasta even hits the table.
Why This Works
To understand why this method produces such a superior result, we have to look at how fat and heat interact with the starch in the bread. Most people just melt butter and brush it on, but that often leads to a greasy, soggy bottom. Our approach is different.
- Fat Emulsification: Mixing butter and olive oil creates a spread that stays stable at room temperature, allowing for a more even application that doesn't just soak through the bread instantly.
- Microplane Surface Area: Grating garlic into a fine paste releases more essential oils than mincing, ensuring the flavor is distributed into every single pore of the crumb.
- Starch Dehydration: The 400°F (200°C) temperature quickly pulls moisture from the exterior of the bread, creating that signature "shatter" crunch while the interior remains soft.
- Aeration Technique: Whipping the butter and oil together incorporates air, which helps the spread expand slightly as it heats, coating the bread more thoroughly.
| Method | Total Time | Texture | Flavor Profile |
|---|---|---|---|
| Fast Method (This Recipe) | 22 minutes | Shattering crust, soft center | Fresh, sharp, and herbal |
| Classic Roasted Garlic | 1 hour 15 mins | Very soft, spreadable | Sweet, mellow, and nutty |
| Stovetop Toasted | 15 minutes | Chewy and oily | Heavy fat, less depth |
Choosing between these methods usually depends on how much time you have. While the roasted garlic version is lovely, the fresh punch of this 22 minute recipe is what most of us actually crave on a Tuesday night. The high heat ensures you don't end up with that "rubbery" texture that often plagues slower cooked bread.
Vital Statistics for This Simple Side
Before we get into the heavy lifting, let's look at the numbers. Precision is what separates a soggy loaf from a legendary one. We are working with specific ratios here because too much oil makes it heavy, while too much butter can make it burn too quickly.
| Component | Science Role | Pro Secret |
|---|---|---|
| Unsalted Butter | Provides "mouthfeel" and dairy richness | Use grass fed for a higher yellow fat content and deeper flavor |
| Olive Oil | Raises the smoke point and adds crispness | Use Extra Virgin for those fruity, peppery notes that balance garlic |
| Fresh Garlic | Primary aromatic and flavor driver | Microplane it so it "melts" into the bread instead of staying in chunks |
| Sea Salt | Enhances every other flavor component | Don't use table salt; the larger flakes provide tiny pops of seasoning |
When you look at the way these ingredients interact, it's clear why we don't just use one type of fat. The butter provides the flavor we all love, but the olive oil is the workhorse that handles the 400°F heat without smoking. If you're looking for another great way to use these flavors, you might notice the garlic profile is very similar to my crispy potatoes, which also rely on that over high heat fat combination.
Essential Components for High Flavor Impact
The ingredients for this bread are simple, but because there are so few of them, quality matters. You want a loaf of bread that has some body to it but isn't so tough that it hurts the roof of your mouth.
- 1 lb (450g) Crusty Italian Bread: Why this? The airy crumb absorbs fat perfectly while the crust provides a necessary structural snap.
- Substitute: A sourdough baguette works well if you want a tangier, chewier result.
- 4 tbsp (56g) Unsalted Grass fed Butter: Why this? Grass fed butter has a higher fat to water ratio, meaning more flavor and less sogginess.
- Substitute: Regular unsalted butter is fine, just ensure it is completely softened to room temperature.
- 4 tbsp (60ml) Extra Virgin Olive Oil: Why this? It prevents the butter from burning and adds a sophisticated, grassy undertone.
- Substitute: Avocado oil is a neutral alternative, though you lose the specific Mediterranean flavor profile.
- 6 cloves Fresh Garlic: Why this? Fresh garlic provides a sharp, spicy kick that pre minced jarred garlic lacks.
- Substitute: 1.5 teaspoons of garlic powder in a pinch, though the texture and "bite" will change significantly.
- 1/4 cup (10g) Fresh Flat Leaf Parsley: Why this? It adds a vibrant green color and cuts through the richness of the fats.
- Substitute: Fresh basil or oregano for a different herbal twist.
- 1/2 tsp (3g) Sea Salt: Why this? It sharpens the garlic and brings out the sweetness of the bread.
- Substitute: Kosher salt (use about 3/4 tsp if using Diamond Crystal brand).
- 1/4 tsp Cracked Black Pepper: Why this? Adds a very subtle heat and earthiness to the background.
- Substitute: A pinch of red pepper flakes if you want a noticeable "zing."
- 1/4 cup (25g) Freshly grated Parmigiano Reggiano: Why this? The salty, nutty umami creates a thin, savory crust on the edges.
- Substitute: Pecorino Romano for a saltier, funkier punch.
Essential Tools for a Crispy Loaf
You don't need a professional bakery setup, but two specific tools make a massive difference in the outcome of this recipe. First, a serrated bread knife is non negotiable. If you try to use a chef's knife, you will squish the airy crumb of the loaf, and it won't be able to hold the butter properly.
Second, a microplane or fine grater is the secret to that "melt in-your mouth" garlic flavor. When you mince garlic with a knife, you get small bits that can sometimes taste bitter if they brown too fast. A microplane turns the garlic into a literal paste that emulsifies with the butter.
Beyond that, a standard rimmed baking sheet and a small mixing bowl are all you need to get the best garlic bread recipe on the table.
step-by-step Toward Golden Perfection
1. Create the Emulsified Paste
In a small bowl, whip together the 4 tbsp softened butter, 4 tbsp olive oil, 6 microplaned garlic cloves, and 1/4 cup minced parsley. Use a fork or a small whisk to beat the mixture until it looks like a pale green, fluffy cloud.
Note: This aeration helps the mixture spread further and prevents it from soaking too deeply into one spot.
2. The Precise "Hasselback" Cut
Place your 1 lb bread loaf on a cutting board and use a serrated knife to slice it into 1.5 inch thick rounds. Be very careful to cut only 3/4 of the way through the loaf.
Note: Keeping the bottom crust intact allows the loaf to stay together in the oven and acts as a "bowl" for any melting butter.
3. The Deep Application
Using a small offset spatula or a butter knife, generously slather the garlic herb paste between every single slice. Don't be shy here; you want to get all the way down to the bottom of the cut. Spread the remaining paste across the top of the loaf to ensure the top crust gets that golden finish.
4. The Cheese Integration
If you are using the 1/4 cup Parmigiano Reggiano, gently pull the slices apart and tuck the cheese deep into the crevices. Note: Putting the cheese inside the slices protects it from burning while still allowing it to melt and bond the bread together.
5. The over High heat Roast
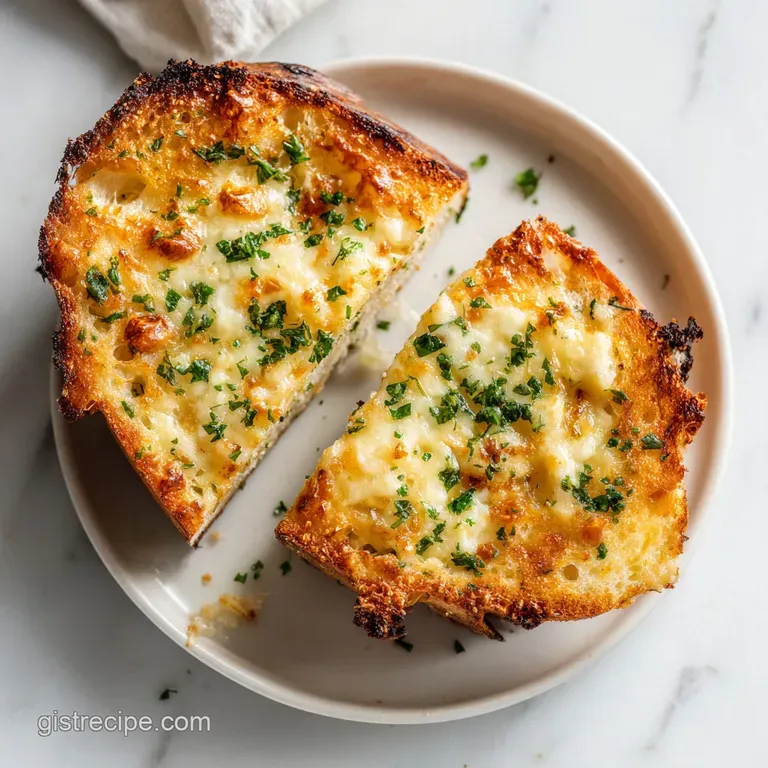
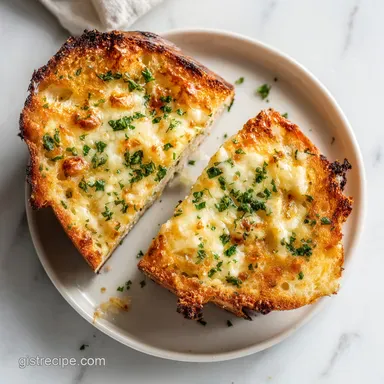
Place the loaf on a baking sheet lined with parchment paper or foil. Slide it into the center of the oven and bake at 400°F (200°C) for 10 to 12 minutes until the edges are golden.
6. The Visual Check
At the 10 minute mark, check the loaf. You are looking for a shattering, crisp exterior and a visible sizzle from the butter between the slices. If the top is browning too fast but the middle isn't melted, move it to a lower rack.
7. The Resting Period
Remove the bread from the oven and let it sit on the tray for exactly 2 minutes. Note: This short rest allows the oils to settle back into the crumb so they don't run out when you finish the slices.
8. Final Serving
Finish the cuts all the way through the bottom crust and serve immediately. The bread should be hot enough that the steam carries the scent of garlic across the room.
Solving Common Problems with Garlic Bread
Even a simple recipe can go sideways if the temperature or the bread quality isn't just right. One of the most common issues is a "soggy middle," which usually happens when the oven isn't hot enough or the butter had too much water content.
Why Your Garlic Bread Is Bitter
If your bread has a sharp, almost metallic bitterness, it’s usually the garlic. This happens if the garlic is old and has a green germ in the center, or if the microplaned bits actually burned in the oven.
| Problem | Root Cause | Solution |
|---|---|---|
| Bitter Flavor | Burned garlic or old cloves | Use fresh garlic and tuck it deeper between slices |
| Soggy Bottom | Too much oil or low heat | Ensure oven is preheated to 400°F and use a rimmed tray |
| Dry / Hard Bread | Sliced too thin or overbaked | Keep slices at least 1.5 inches thick to retain moisture |
Chef's Tip: If you find the garlic flavor is too aggressive, you can microwave the garlic butter mixture for 20 seconds before spreading it. This "pre cooks" the garlic slightly and mellows out the harsh bite.
Common Mistakes Checklist
- ✓ Never use "cold" butter; it won't emulsify with the oil and will result in greasy clumps.
- ✓ Avoid pre minced garlic in a jar; the preservatives give it a sour taste that ruins the bread.
- ✓ Don't skip the olive oil - it's the key to the crispy texture without burning the dairy solids.
- ✓ Make sure your oven is fully preheated; putting bread in a cold oven makes it chewy and tough.
- ✓ Check the "best by" date on your Parmigiano; pre shredded cheese often has cellulose that prevents melting.
Simple Adjustments for Different Dietary Needs
When you're scaling this recipe, keep in mind that bread volume varies. If you are doing a massive 2 lb loaf for a party, don't just double everything blindly. You’ll want to increase the salt and herbs at a 1.5x ratio first, then taste the paste before adding more.
Scaling Down for Two
If you're just cooking for yourself or a partner, use a small French baguette (half pound). Cut the ingredients exactly in half. Since the loaf is smaller, reduce the bake time by about 2-3 minutes. You want to watch for that golden sizzle rather than relying strictly on the clock.
Making It Plant Based
For a vegan version, use a high-quality vegan butter stick (like Miyoko’s) and increase the olive oil by 1 tablespoon to make up for the lack of dairy fat. Replace the Parmigiano Reggiano with 2 tablespoons of nutritional yeast or a vegan parmesan alternative.
The nutritional yeast provides that "nutty" umami that you would otherwise miss.
gluten-free Options
Garlic bread is actually one of the easier things to make gluten-free because the fat and garlic are the stars. Buy a gluten-free baguette (Udi's or Schär work well) and increase the butter by 1 tablespoon.
gluten-free bread tends to be drier, so the extra fat helps prevent it from becoming crumbly or sandy in the oven.
Practical Tips for Storing Your Bread
If you happen to have leftovers (a rare occurrence!), you need to handle them carefully. Bread is a magnet for moisture, and the high fat content in this recipe means it will get "limp" very quickly if left at room temperature.
- Fridge
- Wrap the cooled bread tightly in foil. It will stay good for up to 3 days. To reheat, keep it in the foil and bake at 350°F (180°C) for 10 minutes.
- Freezer
- You can actually freeze the loaf before baking. Slather the bread with the garlic paste, wrap it tightly in plastic wrap and then foil, and freeze for up to 2 months. Bake directly from frozen at 375°F (190°C) for 20-25 minutes.
- Zero Waste Tip
- If the bread gets too hard, don't throw it away! Cut it into 1 inch cubes and toss them in a pan over medium heat for the ultimate garlic croutons. You can also pulse the stale bread in a food processor to make incredible "garlic breadcrumbs" for topping mac and cheese or a creamy chicken dish.
Perfect Main Dishes to Serve Alongside
Garlic bread is the ultimate supporting actor. It thrives next to anything with a sauce that needs "mopping." The classic pairing is obviously a big bowl of spaghetti pomodoro or lasagna, where the acidity of the tomatoes cuts right through the garlic butter.
However, don't sleep on serving this with a hearty soup. A creamy tomato basil or a chunky minestrone is made ten times better with a side of bread that has a shattering crust. The structural integrity of our Hasselback cut means you can dip the bread into the soup without it falling apart instantly.
If you’re looking for a full Mediterranean spread, this bread is a fantastic companion to grilled meats. The charred flavor of a steak or a lemon herb roasted chicken plays beautifully with the fresh parsley and Parmigiano.
It’s also a low stress way to bulk up a meal when you have unexpected guests - everyone loves a warm loaf of bread in the center of the table.
| If you want... | Then do this... |
|---|---|
| Extra Gooey Texture | Use 1/2 cup Shredded Mozzarella instead of Parmesan |
| A Milder Flavor | Use 4 garlic cloves instead of 6 |
| A Spicy Kick | Add 1/2 tsp Dried Red Chili Flakes to the butter paste |
Myths About Making Garlic Bread
There’s a common belief that you should sauté the garlic in the butter before putting it on the bread. People think this "unlocks" the flavor. In reality, doing this often leads to overcooked, bitter garlic by the time the bread is actually crispy.
The 10-12 minutes in a 400°F oven is exactly the right amount of time to mellow the raw garlic without losing its soul.
Another myth is that you must use only butter. Pure butter contains about 15-20% water. When that water hits the bread, it can make the crumb soggy before the crust has a chance to crisp up.
By cutting the butter with olive oil, we reduce the total water content and introduce a fat that is liquid at room temperature, which helps the bread achieve that "shatter" texture we are after.
Finally, don't believe the idea that "more garlic is always better." There is a tipping point where the sulfur compounds in the garlic become overwhelming and mask the taste of the bread and the herbs.
Six cloves for a one pound loaf is the "Goldilocks" zone enough to be bold, but not enough to ruin your breath for three days. It’s about balance, not just intensity.

Recipe FAQs
How to make really good homemade garlic bread?
Whip your butter, oil, garlic, and herbs into an aerated paste before spreading. This technique ensures uniform flavor distribution across every slice, a skill you can also master to achieve the perfect consistency in our creamy dip recipe.
What is the trick to garlic bread?
Use room temperature grass fed butter to create a stable emulsion with the olive oil. Cold butter remains clumpy and fails to coat the bread pores, leading to greasy spots rather than a crisp, golden crust.
What makes restaurant garlic bread so good?
The use of microplaned garlic and freshly grated Parmigiano Reggiano. Microplaning releases the essential oils of the garlic for a more potent punch, while fresh cheese melts cleanly without the anti caking agents found in pre-shredded varieties.
What kind of bread makes the best garlic bread?
Select a crusty Italian bread or a high-quality sourdough baguette. These loaves have a sturdy crumb that holds the butter herb mixture without turning soggy, providing that signature shattering crust when baked at 400°F.
Is it true I can use pre-minced jarred garlic to save time?
No, this is a common misconception. Jarred garlic contains preservatives that introduce a sharp, sour acidity that clashes with the richness of the butter and fresh parsley.
How to ensure the bread doesn't turn out chewy or tough?
Preheat your oven fully to 400°F before inserting the loaf. Placing bread in a cold oven causes the internal moisture to steam the crumb before the crust can crisp up, resulting in a tough texture.
How to properly apply the butter mixture to the loaf?
Slice the bread 3/4 of the way through, then slather the paste into the gaps and over the top. Leaving the bottom crust intact keeps the loaf structure stable and prevents the bottom from becoming overly greasy during the 10 12 minute bake time.
The Best Garlic Bread
Ingredients:
Instructions:
Nutrition Facts:
| Calories | 278 kcal |
|---|---|
| Protein | 6.3 g |
| Fat | 14.1 g |
| Carbs | 30.4 g |
| Fiber | 1.4 g |
| Sugar | 1.1 g |
| Sodium | 482 mg |
