Gluten Free Doughnuts: Soft and Airy Baked Treats
- Time: Active 45 minutes, Passive 85 minutes, Total 130 minutes
- Flavor/Texture Hook: Shatter crisp glaze with a velvety, spiced crumb
- Perfect for: Weekend brunch or a rewarding baking project
- Making the Softest Possible Gluten Free Doughnuts
- Why This Dough Stays Fluffy Without Wheat
- Essential Timeline for a Perfect Batch
- Looking Closer at the Essential Ingredients
- The Gear You Need for Frying Success
- Moving Through the Mixing and Frying Process
- Fixing Texture Issues and Common Frying Mistakes
- Changing Ingredients for Different Dietary Needs
- Saving Your Treats for Later Enjoyment
- Toppings and Pairings for the Best Experience
- Recipe FAQs
- 📝 Recipe Card
Making the Softest Possible gluten-free Doughnuts
The smell of hot oil hitting cold dough is something that never gets old in my kitchen. There is this specific moment when the dough drops into the quart of vegetable oil and you hear that immediate, aggressive sizzle. It is the sound of breakfast being born.
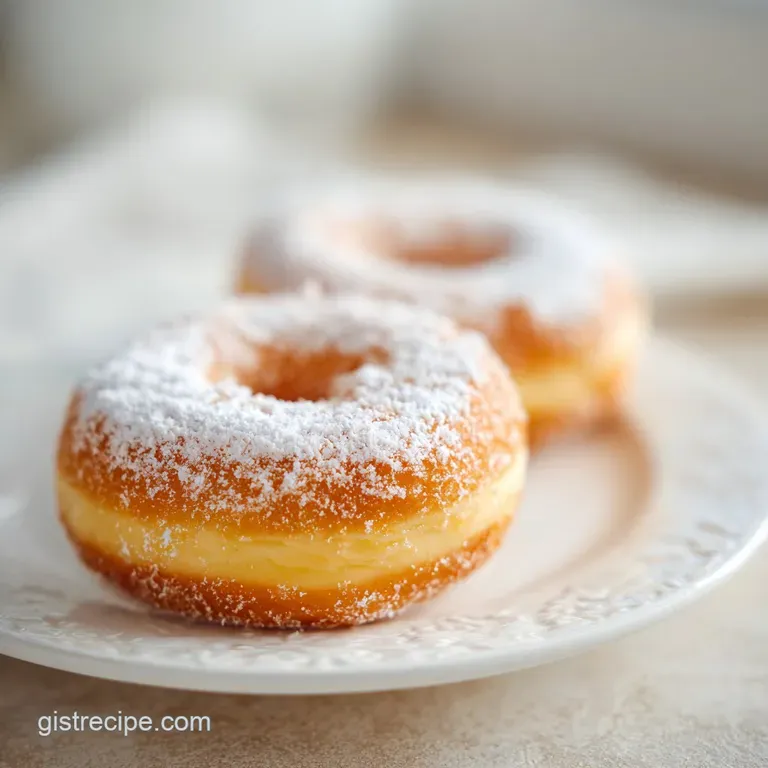
Within seconds, the pale rings start to puff up, turning into golden pillows that smell faintly of nutmeg and sweet yeast. When you finally pull them out and dip them into a thick vanilla glaze, the way the sugar sets into a thin, crackly shell is pure magic.
I used to think that making yeast raised treats without gluten was going to be a total disaster. My first few attempts were either bricks or dissolved into oil soaked sponges the moment they hit the pan. But once you understand how the flour behaves, it becomes so much easier.
These aren't those dense, cakey things you often find in the frozen aisle. These are real, honest to goodness fried rings that have that specific "squish" when you bite into them. You get that initial shatter from the glaze, followed by a crumb that is soft enough to melt but sturdy enough to hold its shape.
We are going for a mahogany brown finish here, not a light tan. That deeper color means the outside has developed enough of a crust to contrast with the silky interior. It is a simple process once you get the flow down, and the gist of it is really just patience while the yeast does its work.
Whether you are making these for a birthday or just because it is a rainy Tuesday, the reward of a warm, home fried treat is something everyone deserves to experience at least once.
Why This Dough Stays Fluffy Without Wheat
Understanding how these ingredients interact is the secret to moving past the "GF brick" phase of baking. Since we don't have gluten to create that elastic web, we have to build our own scaffolding using a few clever tricks that most people skip.
- Structural Scaffolding: Psyllium husk powder creates a gel like network that mimics gluten, allowing the yeast bubbles to stay trapped instead of escaping.
- Hydration Timing: Giving the flour 90 minutes to rest allows the starches to fully drink up the milk and melted butter, preventing a gritty or sandy texture.
- Thermal Activation: Keeping the milk at exactly 105°F (40°C) provides the perfect environment for yeast to bloom without the risk of heat killing the culture.
- Fat Distribution: Melted butter coats the flour particles, which keeps the crumb tender and prevents the rings from becoming tough or chewy like bread.
| Method | Time | Texture | Best For |
|---|---|---|---|
| Deep Frying | 15 minutes | Shatter crisp crust, airy center | Authentic bakery experience |
| Air Frying | 12 minutes | Drier exterior, more bread like | A lighter, everyday treat |
| Oven Baking | 10 minutes | Cake like, soft and uniform | Quick morning snacks |
Choosing the right method depends on what you are after. While the air fryer is great for a quick fix, nothing beats the traditional fry for that specific mahogany color and authentic mouthfeel. If you decide to go the frying route, just make sure your oil stays consistent so the dough doesn't absorb too much grease.
| Ingredient | Science Role | Pro Secret |
|---|---|---|
| Psyllium Husk | Binder/Elasticity | Use the powder form for a smoother dough that doesn't feel grainy. |
| Instant Yeast | Leavening | Whisk it into warm milk first to ensure it is alive and kicking. |
| Nutmeg | Flavor Depth | A tiny pinch tricks the brain into thinking "classic bakery" immediately. |
Nutmeg is the unsung hero of any fried dough. Without it, the flavor can feel a bit flat or overly sweet. Even if you aren't a fan of spice heavy desserts, that 1/4 teaspoon provides a nostalgic background note that balances the richness of the eggs and butter perfectly.
Essential Timeline for a Perfect Batch
Frying is all about the rhythm. If you rush the rise, you get dense rings. If you rush the fry, you get raw centers. I like to think of this as a 130 minutes project where most of the time is just you drinking coffee while the dough does its thing.
- Prep Time: 115 minutes (includes 90 minutes for the rise and 25 minutes for mixing/shaping)
- Cook Time: 15 minutes
- Total Time: 130 minutes
If you are looking for a different kind of project that takes a bit longer but uses a machine, you might like this gluten-free Bread Machine Recipe for your weekly sandwiches. But for today, we are sticking to the stovetop and the rolling pin.
Looking Closer at the Essential Ingredients
- 420g gluten-free 1:1 flour blend: Make sure it has xanthan gum already in it. Why this? It provides the base protein and starch balance for a soft crumb.
- 1 tbsp psyllium husk powder: Don't use the whole husks. Why this? It acts as the "glue" that keeps the doughnut from falling apart.
- 240ml warm whole milk (105°F/40°C): Whole milk adds necessary fat. Why this? The temperature is critical for yeast health and flour hydration.
- 7g instant yeast: One standard packet. Why this? It provides the lift and that classic fermented aroma.
- 65g granulated sugar: Just enough to feed the yeast and sweeten the dough.
- 55g unsalted butter: Melted and cooled so it doesn't scramble the eggs.
- 2 large eggs: Room temperature is best. Why this? Eggs provide structure and help the dough brown in the oil.
- 1 tsp fine sea salt: To sharpen all the other flavors.
- 1/4 tsp ground nutmeg: The "bakery" secret ingredient.
- 240g powdered sugar: Sifted to avoid lumps in the glaze.
- 4 tbsp whole milk: For the glaze consistency.
- 1 tsp vanilla bean paste: Those little black specks look beautiful.
- 1 quart vegetable oil: For frying.
| Original Ingredient | Substitute | Why It Works |
|---|---|---|
| Whole Milk | Oat Milk (Full Fat) | Similar creamy consistency. Note: Adds a slight toasted grain flavor. |
| Unsalted Butter | Refined Coconut Oil | Solid at room temp, melts well. Note: Ensure it is refined to avoid coconut scent. |
| Vanilla Bean Paste | Pure Vanilla Extract | Same flavor profile. Note: You lose the visual flecks but the taste remains. |
Using the right flour is the biggest hurdle. I have found that blends using rice flour and potato starch tend to work best for frying because they get that crispy exterior we want.
If your blend doesn't have xanthan gum, you will need to add about 1 teaspoon to this recipe, otherwise, the doughnuts will simply dissolve in the oil.
The Gear You Need for Frying Success

You don't need a professional kitchen, but a few tools make the 130 minutes process much smoother. A heavy bottomed pot, like a Dutch oven, is my go to because it holds heat so well. When you drop cold dough into the oil, the temperature naturally dips.
A heavy pot minimizes that dip, keeping the sizzle consistent.
You will also want a 3 inch round cutter and a smaller one for the holes. If you don't have a doughnut cutter, a wide mouth mason jar lid and a soda bottle cap work surprisingly well in a pinch. Just make sure to flour the edges of whatever you use so the dough doesn't stick and stretch out of shape.
Finally,, a wire rack set over a baking sheet is non negotiable. If you put hot, glazed doughnuts directly onto a plate, the bottom becomes soggy and the glaze pools into a mess. The rack allows air to circulate, helping the glaze set into that velvety, crackly finish we are aiming for.
Moving Through the Mixing and Frying Process
- Whisk the 240ml warm milk, 7g instant yeast, and a pinch of the 65g granulated sugar in your stand mixer bowl. Let it sit for 5-8 minutes until foamy and smelling like bread. Note: If it doesn't foam, your yeast might be dead; start over with fresh yeast.
- Add the remaining sugar, 55g melted butter, 2 large eggs, 1 tsp salt, and 1/4 tsp nutmeg to the yeast mixture. Mix with the paddle attachment on medium speed until fully incorporated and smooth.
- Add the 420g flour blend and 1 tbsp psyllium husk powder. Mix on low until the dust settles, then crank it to medium high for 3 minutes until the dough looks shiny and slightly stretchy.
- Cover the bowl and let the dough rest and rise in a warm spot for approximately 90 minutes until it has nearly doubled in size.
- Turn the dough out onto a lightly floured surface and roll to about 1/2 inch thickness. Shape doughnuts using a 3 inch cutter and let them rest for another 15 minutes while you heat the oil.
- Heat 1 quart of vegetable oil in a heavy pot to 350°F (180°C). Fry the rings in batches of 2 or 3 for approximately 2 minutes per side until they are a deep mahogany brown.
- Use a slotted spoon to move the fried rings to a paper towel lined plate for just 30 seconds to drain the excess oil.
- Whisk 240g powdered sugar, 4 tbsp milk, and 1 tsp vanilla bean paste in a shallow bowl until the glaze is smooth and thick.
- Dip the still warm doughnuts into the glaze, turning to coat both sides. Move them to a wire rack until the glaze sets into a thin shell.
Chef's Tip: Use a digital thermometer to track your oil. If the oil drops below 325°F (165°C), the dough will absorb too much fat and become greasy.
If it goes above 375°F (190°C), the outside will burn before the inside is cooked through.
Fixing Texture Issues and Common Frying Mistakes
The biggest heartbreak in gluten-free baking is spending two hours on a recipe only to have it come out gummy in the middle. Usually, this happens because the dough was too wet or the oil was too hot, causing the outside to cook too fast.
Preventing Oil Soaked Doughnuts
If your doughnuts feel heavy and greasy, it is almost always an oil temperature issue. When the oil isn't hot enough, it can't create that immediate steam barrier that keeps the fat out. Always wait for the oil to come back up to 350°F (180°C) between every single batch.
Fixing a Dense Gummy Center
A gummy center usually means the dough didn't get enough time to rise or the flour didn't hydrate. Make sure you aren't skipping that 90 minutes rest. If you find the centers are still wet, try frying them for an extra 30 seconds on each side at a slightly lower temperature (340°F/170°C).
| Problem | Root Cause | Solution |
|---|---|---|
| Doughnuts are flat | Dead yeast or cold milk | Check yeast expiration and ensure milk is exactly 105°F (40°C). |
| Outside is burnt, inside raw | Oil is too hot | Lower heat to 350°F (180°C) and use a thermometer to verify. |
| Dough is too sticky to roll | Insufficient psyllium | Add 1 more teaspoon of psyllium husk powder or chill dough for 30 mins. |
Common Mistakes Checklist
- ✓ Check that your yeast foams up before adding the flour (don't waste your ingredients!).
- ✓ Use a thermometer for the oil guessing the temp is the fastest way to fail.
- ✓ Don't overcrowd the pot; frying more than 3 at a time drops the temperature too fast.
- ✓ Let the fried rings drain on paper towels for a few seconds before glazing so the glaze sticks.
- ✓ Sift your powdered sugar to ensure the glaze is velvety and professional looking.
Changing Ingredients for Different Dietary Needs
You can easily tweak this recipe to fit other needs. If you want to move away from the traditional fried version, you can follow the steps for Transitioning to Easy gluten-free Baked Donuts. For a baked version, you'll put the dough into a greased doughnut pan and bake at 350°F (180°C) for about 12-15 minutes. They won't have that same mahogany crust, but they are still a wonderful simple treat.
For those who need to avoid dairy, the oat milk and coconut oil swaps mentioned in the table earlier work perfectly. I actually find that coconut oil gives the dough a very subtle sweetness that pairs beautifully with the nutmeg. If you are looking for a fruitier treat that is also gluten-free, my Banana Bread Recipe gluten-free is a great way to use up extra pantry staples while keeping things wheat free.
Crafting a dairy-free Version
When swapping the milk, choose a "barista blend" of oat or soy milk. These have higher fat and protein content, which helps the dough brown. For the glaze, you can use any nut milk, but add a tiny bit more vanilla to mask any "earthy" flavors from the milk.
Infusing Seasonal Flavors
If you want to get creative, swap the nutmeg for cinnamon or pumpkin pie spice in the fall. You can also replace the vanilla in the glaze with maple syrup or a splash of lemon juice for a bright, tangy finish. The gist of the recipe remains the same; you are just changing the "accessories."
Saving Your Treats for Later Enjoyment
Fried dough is at its absolute peak about 10 minutes after it comes out of the oil. However, life happens, and sometimes you have leftovers.
- Fridge: Store in an airtight container for up to 2 days. The glaze may soften slightly due to moisture.
- Freezer: You can freeze unglazed doughnuts for up to 2 months. Wrap them individually in plastic wrap and then place in a freezer bag.
- Reheating: To get that "just fried" feel, pop a doughnut in the microwave for 8-10 seconds, or in a 350°F (180°C) oven for 3-4 minutes. This softens the starches and makes the crumb velvety again.
Zero Waste Tip: Don't throw away the "holes"! Fry the little center cut outs for about 60 seconds. Toss them in a bag with cinnamon sugar while they are still hot for a quick snack while the main batch is cooling.
If you have stale doughnuts left over after a few days, chop them up and use them as the base for a decadent bread pudding.
Toppings and Pairings for the Best Experience
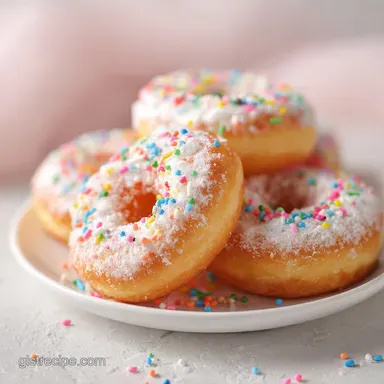
While a classic vanilla glaze is hard to beat, there are so many ways to finish these. You can do a simple dusting of granulated sugar mixed with cinnamon while they are still hot from the oil. The heat helps the sugar crystals stick to the surface, creating a crunchy, sparkling coating.
If you want something richer, a chocolate ganache dip is incredible. Just melt some dark chocolate with a splash of heavy cream and dip the tops. For a bit of crunch, crushed toasted pecans or sprinkles should be added immediately after glazing before the coating sets.
As for pairings, a strong, bitter black coffee is the traditional partner for a sweet fried treat. The acidity of the coffee cuts through the richness of the butter and oil, cleaning your palate for the next bite.
If you are serving these for kids, a cold glass of milk or even a warm spiced cider in the winter makes it feel like a real occasion.
"Searing the dough" in the oil doesn't actually lock in moisture; the moisture stays inside because the psyllium and flour have properly hydrated during that 90 minutes rise. The oil's job is simply to cook the outside fast enough to create structure before the inside dries out.
Also, don't worry about the dough being "too soft" to handle a soft dough in the bowl means a soft doughnut on the plate. Trust the process and keep your hands lightly floured!

Recipe FAQs
Do Krispy Kreme or Dunkin' offer gluten-free doughnuts?
No, both major chains do not offer certified gluten-free doughnuts. Cross contamination in their shared fryers makes these locations unsafe for those with celiac disease or severe gluten sensitivities.
Is it true that gluten-free donuts are impossible to make at home?
No, this is a common misconception. With the right ratio of gluten-free 1:1 flour blend and psyllium husk powder, you can achieve a professional, airy texture at home.
How to ensure the dough rises properly?
Verify the yeast foams within 5-8 minutes after mixing it with warm milk. If the mixture remains flat, your yeast is likely inactive, which will prevent the dough from developing the necessary structure.
How to maintain the correct frying temperature?
Use a dedicated kitchen thermometer to keep the oil steady at 350°F (175°C). Never overcrowd the pot; frying more than three doughnuts at once causes the oil temperature to drop rapidly, resulting in greasy rather than crisp pastries.
How to get a smooth, professional glaze finish?
Sift your powdered sugar before whisking it with the milk and vanilla bean paste. This removes any lumps, ensuring the final glaze is velvety and perfectly coats the warm doughnuts. If you enjoy achieving this type of textural consistency in your desserts, you will find similar attention to ingredient quality in our fruit based bakes.
How to prevent the glaze from sliding off the doughnut?
Drain the freshly fried rings on paper towels for a few seconds before dipping. This brief rest removes excess surface oil, allowing the glaze to adhere firmly to the doughnut instead of dripping away.
How to tell when the doughnuts are fully cooked?
Fry them for exactly 2 minutes per side until they reach a deep mahogany brown. Relying on this precise timing ensures the center is fully cooked without burning the exterior.
Soft gluten-free Doughnuts
Ingredients:
Instructions:
Nutrition Facts:
| Calories | 372 kcal |
|---|---|
| Protein | 3.7 g |
| Fat | 15.8 g |
| Carbs | 55.4 g |
| Fiber | 1.8 g |
| Sugar | 26.1 g |
| Sodium | 218 mg |
