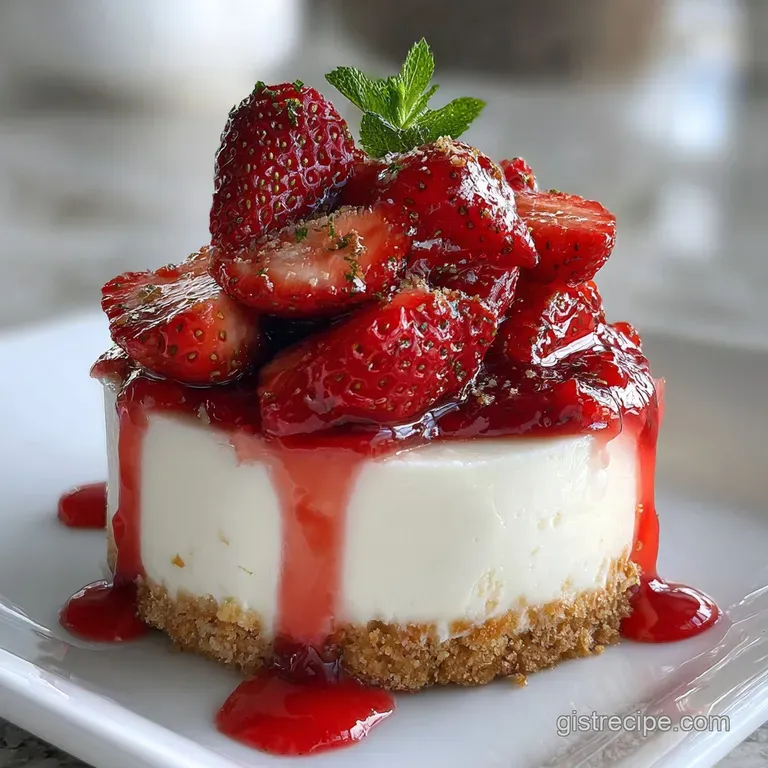
No Bake Cheesecake with Graham Cracker Crust and Fresh Strawberries
- Time: Active 25 minutes, Passive 6 hours, Total 6 hours 25 minutes
- Flavor/Texture Hook: Velvety, tangy filling against a salty sweet graham cracker shatter
- Perfect for: Summer cookouts, beginner bakers, or last minute dinner parties
- No Bake Cheesecake with Graham Cracker Crust and Fresh Strawberries
- The Secret Behind This Creamy Filling
- Components Analysis for Success
- Ingredients Needed for Your Strawberry Treat
- Essential Tools for a Smooth Prep
- Step-By-Step Assembly for the Best Results
- Solve Common Cheesecake Problems Easily
- Tasty Variations and Simple Ingredient Swaps
- Myths About No Bake Desserts
- Storing and Preserving Your Leftover Slices
- Gorgeous Ways to Plate Your Dessert
- Recipe FAQs
- 📝 Recipe Card
No Bake Cheesecake with Graham Cracker Crust and Fresh Strawberries
There is something truly magical about the moment you unclip the side of a springform pan and reveal those clean, creamy layers. I remember the first time I tried making a cheesecake like this during a heatwave in July. I was so worried it wouldn't hold its shape without gelatin, but the first bite was a revelation.
It wasn't heavy or cloying like the baked versions can sometimes be, it was light, airy, and tasted exactly like summer.
This recipe delivers a simple, delicious no bake cheesecake with graham cracker crust and fresh strawberries. You don't need to worry about water baths or cracking tops here. We are going for pure, unadulterated creaminess that melts the second it hits your tongue.
It's the kind of treat you bring out when you want everyone to think you spent hours in a hot kitchen, even though you were mostly just hanging out by the fridge.
We have all been there, staring at a recipe that feels too fussy for a Tuesday night. This isn't that. We are keeping things straightforward because the gist of great home cooking is knowing when to let the ingredients do the heavy lifting.
By the time we're done, you'll have a dessert that looks like it belongs in a bakery window but feels like home.
The Secret Behind This Creamy Filling
The magic happens through a few key scientific interactions that ensure your filling stays upright without being rubbery.
- Fat Stabilization: Using full fat cream cheese and heavy cream creates a stable emulsion that holds air bubbles firmly in place once chilled.
- Cold Aeration: Whipping the heavy cream to stiff peaks builds a structural skeleton of fat coated air cells that supports the weight of the cheese.
- Acid Denaturation: The lemon juice reacts with the dairy proteins, tightening the structure just enough to provide a clean slice while enhancing the tang.
| Servings | Ingredient Adjustments | Pan Size | Chill Time |
|---|---|---|---|
| 6 people | Half all quantities; use 1 egg if scaling up (N/A here) | 6 inch springform | 4 hours |
| 12 people | Standard recipe amounts listed below | 9 inch springform | 6 hours |
| 24 people | Double all quantities; work in batches | Two 9 inch pans | 8 hours |
Getting the texture right is all about the balance of moisture. If you’ve ever made a Fudgy Brownie Recipe and noticed how the fat content changes the chew, you'll appreciate how the heavy cream here mimics that richness without the density. It’s all about creating that velvety mouthfeel that contrasts so sharply with the sandy, buttery crust.
Components Analysis for Success
| Ingredient | Science Role | Pro Secret |
|---|---|---|
| Cream Cheese | Provides structural base and fat | Always use blocks, never the spreadable tub version for stability. |
| Heavy Cream | Incorporates air and lightness | Keep it ice cold until the very second you are ready to whip it. |
| Powdered Sugar | Sweetens and stabilizes | The cornstarch in powdered sugar helps absorb excess moisture in the filling. |
| Lemon Juice | Breaks down proteins (tang) | Use fresh juice only; bottled juice lacks the bright enzymatic punch. |
Ingredients Needed for Your Strawberry Treat
For the crust: 200g graham cracker crumbs (approx. 1.5 cups) Why this? Provides the classic honey wheat crunch that anchors the dessert. 115g unsalted butter (1/2 cup), melted and cooled Why this? The glue that turns crumbs into a solid, sliceable base. 50g granulated sugar (1/4 cup) 0.5 tsp kosher salt
For the filling: 680g full fat cream cheese (24 oz / 3 blocks), softened Why this? Room temp cheese ensures a silky batter without any lumps. 150g powdered sugar (1.25 cups), sifted 360ml heavy whipping cream (1.5 cups), chilled 120g sour cream (1/2 cup), room temperature 1 tbsp fresh
lemon juice 2 tsp vanilla paste
For the topping: 450g fresh strawberries, hulled and sliced 2 tbsp apricot jam or honey, melted
Substitutions can be a lifesaver when the pantry is looking thin. If you don't have graham crackers, digestive biscuits or vanilla wafers work beautifully. For the vanilla paste, you can use an equal amount of pure vanilla extract, though you’ll miss those tiny, gorgeous bean flecks.
| Original Ingredient | Substitute | Why It Works |
|---|---|---|
| Sour Cream | Greek Yogurt (full fat) | Similar acidity and thickness. Note: Adds a slightly sharper tang to the finish. |
| Powdered Sugar | Granulated Sugar (blitzed) | Blending sugar into a fine powder prevents a gritty texture in the no bake filling. |
| Apricot Jam | Red Currant Jelly | Offers a similar high shine glaze without altering the strawberry flavor profile. |
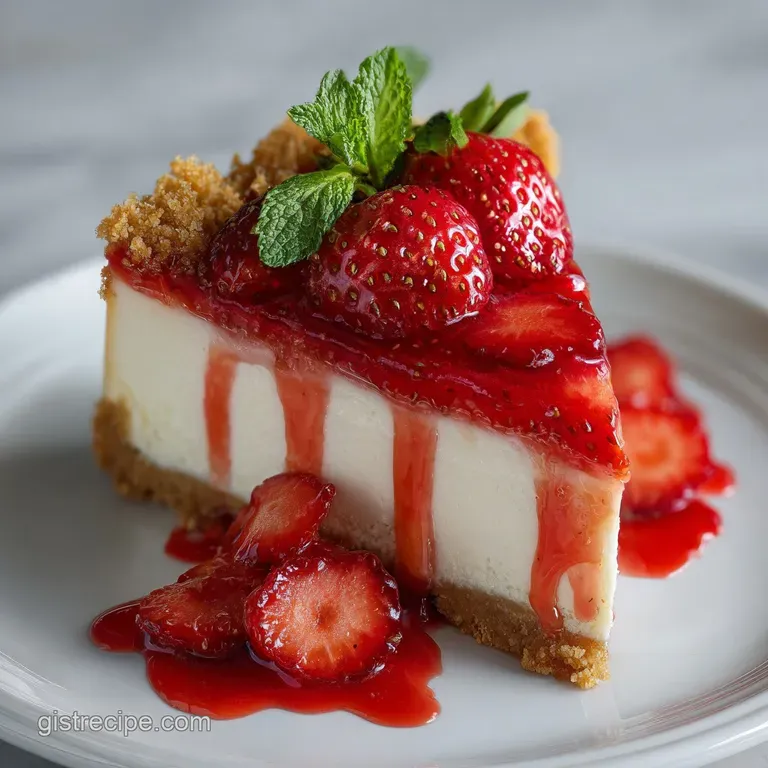
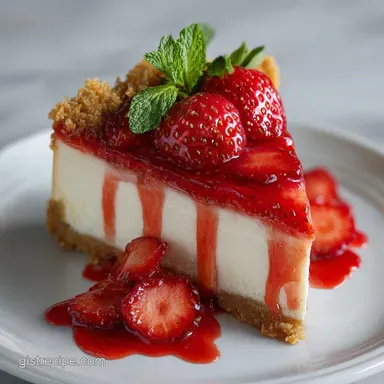
A quick tip for the berries: always wait to top the cake until right before serving. This prevents the juices from the fruit from bleeding into the white filling, keeping that visual contrast sharp and clean.
It’s a small detail, but it’s what makes the difference between a "home experiment" and a "masterpiece."
Essential Tools for a Smooth Prep
- 9 inch springform pan: Essential for removing the cake without destroying the sides.
- Electric hand mixer or stand mixer: You need the power to whip the cream to stiff peaks.
- Large mixing bowls: Use metal or glass for the whipped cream to keep it cold.
- Offset spatula: Helps create that perfectly flat, professional looking top.
- Food processor: The easiest way to get uniform graham cracker crumbs.
Chef's Tip: If you don't have a food processor, toss the crackers into a gallon sized freezer bag and go to town with a rolling pin. It’s a great way to release some stress, and the slightly uneven crumbs actually add a nice rustic texture to the crust.
step-by-step Assembly for the Best Results
1. Construct the Foundation
Mix 200g graham cracker crumbs, 115g melted butter, 50g sugar, and 0.5 tsp salt in a bowl. Press the mixture firmly into the bottom and 1 inch up the sides of a 9 inch springform pan until compact and even. Note: Use the bottom of a flat measuring cup to get a tight, level base.
2. Aerate the Cream
In a chilled bowl, beat 360ml heavy whipping cream until stiff peaks form. Note: Stop as soon as the beaters leave a clear, standing trail to avoid making butter.
3. Build the Cream Cheese Base
Beat 680g softened cream cheese and 150g sifted powdered sugar in a separate large bowl until completely smooth and velvety.
4. Incorporate the Aromatics
Add 120g sour cream, 1 tbsp lemon juice, and 2 tsp vanilla paste to the cheese mixture. Mix on medium speed until fully combined and glossy.
5. The Gentle Fold
Carefully fold the whipped cream into the cream cheese mixture using a silicone spatula. Perform this until no white streaks remain. Note: Be gentle to keep the air in the mixture.
6. Fill the Pan
Pour the filling over the prepared crust. Smooth the top with an offset spatula until it looks like a sheet of glass.
7. The Set and Chill
Cover the pan loosely and refrigerate for at least 6 hours (ideally overnight). This is non negotiable until the center feels firm to a light touch.
8. The Strawberry Crown
Just before serving, toss 450g sliced strawberries with 2 tbsp melted apricot jam. Arrange them on top until the surface is beautifully covered.
Much like perfecting a Creamy Mashed Potatoes recipe, the secret here is in the mixing. Over mixing the whipped cream will cause it to collapse, but under mixing the cream cheese will leave you with tiny pebbles of cheese in an otherwise smooth filling. It's a balance of power and patience.
Solve Common Cheesecake Problems Easily
The Lumpy Batter Syndrome
This usually happens when the cream cheese is still too cold when you start mixing. The fat stays in solid little nuggets that refuse to incorporate into the sugar. To fix this, you can place your mixing bowl over a pot of steaming water for 30 seconds to slightly soften the bottom, then keep beating.
The Soggy Bottom
If your crust is falling apart or feels wet, it’s usually because the butter was too hot when mixed or the crust wasn't pressed firmly enough. Always let your melted butter cool to room temperature before adding it to the crumbs.
| Problem | Root Cause | Solution |
|---|---|---|
| Filling is runny | Cream wasn't whipped enough | Beat to stiff peaks; fold gently to preserve the air structure. |
| Cracks on top | Filling dried out in fridge | Cover the pan with plastic wrap or a lid during the 6 hour chill. |
| Crust sticks to pan | Not enough butter or cold pan | Run a thin knife dipped in hot water around the edges before releasing. |
The Slow Slump
If the cheesecake starts to lose its shape after an hour on the table, it’s a temperature issue. No bake cheesecakes rely on cold fats to stay solid. Always serve this straight from the fridge and never leave it out in the sun at a BBQ for more than 20 minutes.
Common Mistakes Checklist
- ✓ Ensure the cream cheese is truly room temperature (leave it out for 2 hours).
- ✓ Use full fat ingredients; low-fat versions have higher water content and won't set.
- ✓ Sift your powdered sugar to avoid tiny white clumps in the filling.
- ✓ Chill the mixing bowl and beaters before whipping the heavy cream.
- ✓ Give the cheesecake the full 6 hours to set; rushing it leads to a "pudding" texture.
Tasty Variations and Simple Ingredient Swaps
If you want to change things up, the base recipe is incredibly forgiving. For a chocolate version, swap the graham crackers for crushed Oreo cookies and omit the extra sugar in the crust. You can also fold in a half cup of mini chocolate chips to the filling for a bit of texture.
Flavor Twists
- Lemon Berry: Increase the lemon juice to 2 tablespoons and add the zest of two lemons to the filling for a bright, citrusy punch.
- Nutty Base: Replace 50g of the graham cracker crumbs with finely ground toasted pecans or walnuts for an earthy flavor.
Dietary Swaps
- gluten-free: Use certified gluten-free graham crackers; they behave exactly the same way in this recipe.
- Lower Sugar: You can reduce the powdered sugar to 100g, but be aware the filling will be slightly less stable.
| Method | Time | Texture | Best For |
|---|---|---|---|
| Chilled Crust | 15 minutes | Sandy and buttery | Maximum ease and no heat kitchens. |
| Toasted Crust | 8 mins (oven) | Nutty and firm | Extra structural integrity for cleaner slices. |
| Stovetop Crust | 5 mins (pan) | Golden and crisp | Getting that "baked" flavor without the oven. |
Myths About No Bake Desserts
One common myth is that you must use gelatin to get a no bake cheesecake to slice cleanly. This simply isn't true if your fat ratios are correct. The combination of high fat cream cheese and properly whipped heavy cream creates a natural structure that is plenty firm for a standard 9 inch cake.
Another misconception is that you can substitute whipped topping (like Cool Whip) for heavy cream. While it works in a pinch, it changes the flavor significantly, adding a chemical sweetness and a "filmy" mouthfeel that masks the natural tang of the cheese. Stick to the real cream for that velvety finish.
Finally,, some people think you can't freeze no bake cheesecakes. You actually can! It turns the texture into something resembling a premium ice cream cake. Just be sure to thaw it in the fridge for an hour before you want to eat it so the crust isn't a brick.
Storing and Preserving Your Leftover Slices
This cheesecake keeps remarkably well in the fridge for up to 5 days. However, the strawberries will start to release their juices after about 24 hours, which can soften the top of the filling.
If you’re making this for a multi day treat, store the sliced berries separately and add them to each slice as you serve.
For longer storage, you can freeze the cheesecake (without the fruit) for up to 3 months. Wrap the entire pan in a double layer of plastic wrap and then a layer of foil. When you're ready to eat, let it thaw in the refrigerator overnight. It’s actually a great way to save leftovers, much like how you might freeze a Classic Banana Bread recipe for a rainy day.
Zero Waste Tip: If you have leftover graham cracker crumbs, don't toss them! Toast them in a dry pan for 2 minutes and sprinkle them over yogurt or oatmeal for a quick breakfast crunch.
Leftover strawberry tops can be steeped in water with a bit of sugar to make a simple strawberry syrup for cocktails or iced tea.
Gorgeous Ways to Plate Your Dessert
Presentation is where you turn a simple treat into something special. Instead of just piling the berries in the center, try arranging the sliced strawberries in concentric circles starting from the outside edge. It creates a "rose" effect that looks incredibly professional.
- The Shine Factor: That apricot jam glaze isn't just for flavor; it keeps the berries looking fresh and prevents them from shriveling in the fridge.
- Added Greenery: A few small sprigs of fresh mint tucked between the strawberries add a pop of color that makes the red of the fruit really sing.
- The Perfect Slice: To get those clean, sharp edges you see in photos, dip your knife in a tall glass of hot water and wipe it dry between every single cut. The heat from the blade will glide through the cold fat like a dream.
If you want X, do Y
- If you want a thicker crust, increase the crumbs to 250g and butter to 140g.
- If you want a tangier filling, increase the sour cream by 50g and reduce the heavy cream by the same amount.
- If you want individual portions, press the crust into a muffin tin with liners and fill using a piping bag.
Whether you're serving this at a fancy dinner or just attacking the pan with a spoon at midnight, the result is the same: pure, creamy joy. It's the gist of what good dessert should be simple, rewarding, and gone before you know it.

Recipe FAQs
Can I use frozen strawberries for the topping?
No, stick with fresh. Frozen berries release excess moisture and can bleed color into the creamy filling, affecting both appearance and texture.
How long does the cheesecake need to chill to set?
Chill for at least 6 hours, or preferably overnight. This extended chilling time is crucial for the filling to firm up properly, ensuring clean slices.
What's the best way to get a smooth cheesecake filling without lumps?
Ensure your cream cheese is fully softened to room temperature. Cold cream cheese won't incorporate smoothly, leading to a lumpy batter; it needs to be pliable and spreadable.
My crust feels soggy, what went wrong?
The butter might have been too hot when mixed, or the crust wasn't pressed firmly enough. Always let melted butter cool to room temperature before combining it with the crumbs, and press the mixture tightly into the pan.
Can I make this cheesecake ahead of time?
Yes, it's best made ahead. Prepare the entire cheesecake up to 2 days in advance; this allows ample time for it to set properly and flavors to meld.
How do I get clean slices without the cheesecake falling apart?
Use a sharp knife dipped in hot water and wiped dry between each cut. This technique helps the blade glide through the cold, firm cheesecake, ensuring crisp, clean edges.
Is it true that no-bake cheesecakes need gelatin to set?
No, this is a common misconception. A properly made no-bake cheesecake relies on the fat content of cream cheese and the structure from whipped heavy cream to set firm, without any added gelatin.
No Bake Strawberry Cheesecake
Ingredients:
Instructions:
Nutrition Facts:
| Calories | 542 kcal |
|---|---|
| Protein | 5.8 g |
| Fat | 42.1 g |
| Carbs | 37.6 g |
| Fiber | 1.0 g |
| Sugar | 20.5 g |
| Sodium | 293 mg |
