Gluten Free Bread for Bread Maker: Honey-Kissed Loaf
- Time: Active 15 minutes, Passive 180 minutes, Total 195 minutes
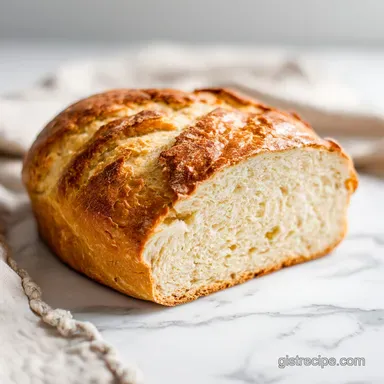
- Flavor/Texture Hook: Spongy, honey kissed crumb with a thin, golden crust
- Perfect for: Stress free morning toast or budget conscious weekly meal prep
- Soft Gluten Free Bread for Bread Maker
- Understanding the Recipe Specs
- Budget Friendly Ingredient Science
- Necessary Equipment and Tools
- Step by Step Baking Guide
- Ingredients & Substitutes
- Fixing Common Baking Issues
- Flavor Swaps and Variations
- Storing and Freezing Bread
- Perfect Slicing and Presentation
- Debunking Bread Maker Myths
- Recipe FAQs
- 📝 Recipe Card
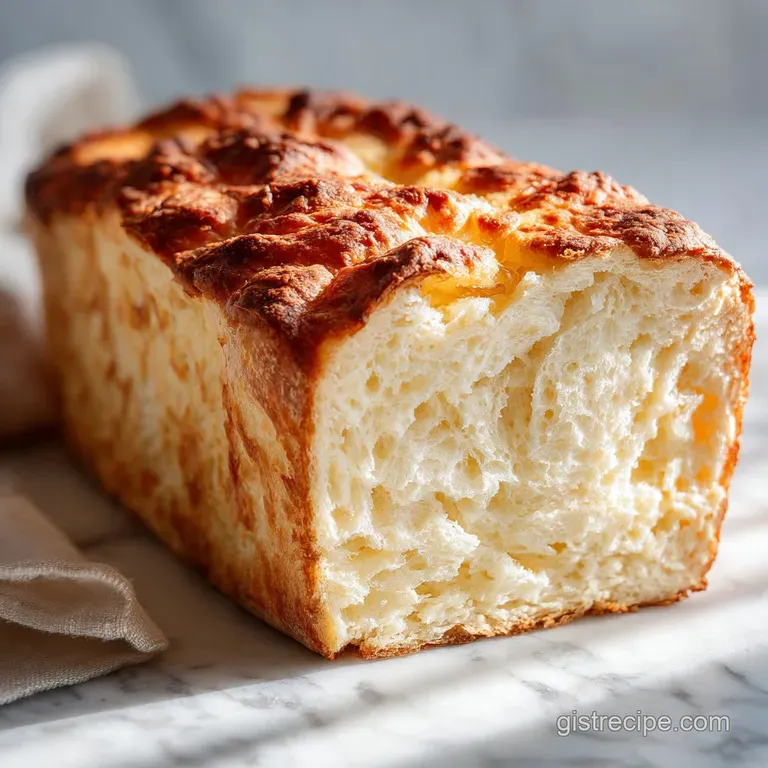
Soft gluten-free Bread for Bread Maker
The aroma of warm honey and blooming yeast hitting a heated bread pan is one of those kitchen scents that instantly makes a house feel like a home. I remember the first time I pulled a successful loaf out of the machine; the steam rose in a gentle curl, and the crust had that specific tawny glow that only honey can provide.
Discover your new favorite gluten-free bread maker recipe, perfectly sweetened with honey.
We are focusing on honey today because it is the secret weapon for budget conscious bakers who want high end results. Unlike granulated sugar, honey helps retain moisture long after the bread has cooled, meaning your loaf stays flexible and soft for sandwiches the next day rather than turning into a literal brick.
It also provides a deeper, more complex floral note that masks the sometimes "beany" aftertaste found in cheaper gluten-free flour blends.
This process is designed to be approachable and rewarding, stripping away the fuss that usually surrounds gluten-free baking. You don't need fancy proofing baskets or a degree in chemistry.
We are leaning on the bread machine to do the heavy lifting, but I’ll show you exactly when to step in for two minutes to ensure the texture is spot on. It's about working smarter with the tools you already have in your pantry.
Understanding the Recipe Specs
Acidity Boost: The apple cider vinegar reacts with the baking powder to create immediate carbon dioxide bubbles, giving the heavy gluten-free batter the lift it needs.
Hydration Balance: gluten-free flours require significantly more liquid than wheat; the three eggs provide structural protein while the 1.5 cups of warm water ensure the starches swell completely.
Temperature Control: Using warm water (around 105°F) "wakes up" the instant yeast quickly, which is vital since most bread machine gluten-free cycles are shorter than standard cycles.
| Method | Time | Texture | Best For |
|---|---|---|---|
| Bread Machine | 195 minutes | Uniform, soft crumb | Hands off daily use |
| Oven Baked | 120 minutes | Thick, rustic crust | Weekend brunch |
| Stovetop Skillet | 45 minutes | Dense, flatbread style | Quick side dish |
Choosing the bread machine method is the most cost effective way to get a consistent loaf without heating up the entire house or monitoring an oven. The controlled environment of the machine helps the dough rise evenly, which is often the biggest struggle with gluten-free batters.
Budget Friendly Ingredient Science
| Ingredient | Science Role | Pro Secret |
|---|---|---|
| Honey | Humectant & Food | Attracts water molecules to keep the crumb supple for days. |
| Apple Cider Vinegar | pH Regulator | Strengthens the protein bonds in eggs to prevent the loaf from collapsing. |
| Milk Powder | Maillard Reaction | Provides the sugars and proteins needed for a golden brown crust. |
| Xanthan Gum | Structural Glue | Mimics gluten by creating a mesh that traps air bubbles during the rise. |
The milk powder is a sneaky budget win here. Instead of buying expensive specialty flours, adding a bit of non fat dry milk powder gives the bread a rich, "bakery style" flavor and helps the crust brown beautifully at a fraction of the cost of milk based liquid substitutions.
Necessary Equipment and Tools
The most important tool is, of course, your bread machine. While high end models have specific "gluten-free" settings, even a basic machine can work if you know the tricks. You will also need a silicone spatula. This is non negotiable for the "spatula assist" phase.
gluten-free batter is more like a thick cake batter than a traditional dough, and it tends to clump in the corners of the square pan where the paddle can't reach.
A medium mixing bowl and a whisk are needed for the initial wet ingredient step. Whisking the eggs and honey into the water before they hit the pan ensures everything is emulsified. If you just dump them in, you might end up with "egg pockets" in your finished bread.
A wire cooling rack is the final piece of the puzzle. Letting the bread sit in the pan for more than five minutes after it's done will cause "sweating," which leads to a soggy bottom and a tough crust.
step-by-step Baking Guide
Whisk together the 1.5 cups warm water, 3 large room temperature eggs, 3 tbsp honey, 1 tsp apple cider vinegar, and 0.25 cup melted butter in a medium bowl until well combined. Note: This ensures the honey is fully dissolved and the eggs are broken down.
Pour the liquid mixture into the bread machine pan fitted with the kneading paddle. Watch for any leaks around the paddle seal.
Carefully layer the 3.25 cups gluten-free flour blend, 0.25 cup milk powder, 1.5 tsp fine sea salt, and 1 tsp baking powder on top of the liquids. Note: The dry ingredients should form a complete "raft" over the liquid.
Make a small well in the center of the dry ingredients and add the 2.25 tsp instant yeast, ensuring it does not touch the liquid layer yet. Keep the yeast dry to prevent premature activation.
Place the pan in the bread machine and select the 'gluten-free' cycle.
During the first 5-10 minutes of the mixing cycle, use a silicone spatula to scrape down the sides of the pan to ensure all flour is incorporated. Until the batter looks like thick, smooth buttercream.
Allow the machine to complete its 180 minutes cook cycle. Avoid opening the lid during the rise or bake phases.
Once the baking cycle is complete, remove the pan immediately and let the bread sit for 5 minutes. Until the edges slightly pull away from the pan.
Transfer the loaf to a wire cooling rack and let it cool completely before slicing. Note: Slicing while hot will cause the steam to escape too fast, leaving a gummy interior.
Chef's Tip: If your gluten-free flour blend doesn't include xanthan gum, you must add 1.5 teaspoons of it to the dry ingredients, or the bread will simply crumble into dust when you slice it.
Ingredients & Substitutes

- Warm Water (1.5 cups): Use unsweetened almond milk for a creamier texture. Why this? Hydrates the starches to prevent a sandy mouthfeel.
- Large Eggs (3): Try 3/4 cup of aquafaba (chickpea liquid) for a vegan ish option. Why this? Provides the essential protein structure for the bread to rise.
- Honey (3 tbsp): Maple syrup works well but adds a distinct woody flavor. Why this? Acts as a natural preservative and keeps the bread moist.
- Apple Cider Vinegar (1 tsp): White vinegar or lemon juice can be used in a pinch. Why this? Reacts with leaveners to create a lighter, airier loaf.
- Melted Butter (0.25 cup): Melted coconut oil is a great budget friendly dairy-free swap. Why this? Softens the crumb and adds a rich, velvety mouthfeel.
- gluten-free Flour Blend (3.25 cups): Look for a "1 to-1" blend that contains rice flour and potato starch. Why this? The starch balance is key for a bread that isn't too heavy.
- Non fat Dry Milk Powder (0.25 cup): Coconut milk powder is a good alternative. Why this? Enhances browning and provides a subtle, savory depth.
- Fine Sea Salt (1.5 tsp): Standard table salt works fine; just use slightly less. Why this? Tightens the protein structure and balances the honey's sweetness.
- Baking Powder (1 tsp): No direct substitute, ensure it is fresh for best results. Why this? Provides an extra "oomph" of lift during the initial heating phase.
- Instant Yeast (2.25 tsp): Active dry yeast can work if bloomed in the water first. Why this? The primary engine for the 195 minutes total rise and bake.
Fixing Common Baking Issues
To Fix a Sunken Top
If your bread looks like a cratered moon once it cools, the culprit is usually too much liquid or over proofing. gluten-free dough doesn't have the "elastic" strength of wheat, so if it rises too high, the air bubbles burst and the whole thing collapses. Try reducing the water by 1 tablespoon next time.
To Avoid a Gummy Texture
A "wet" or gummy center usually happens when the bread is sliced too soon. The residual steam inside the loaf continues to "set" the starches as it cools on the rack. If you cut it open while it's steaming, that moisture stays trapped in the crumb. Wait at least 1 hour before diving in.
| Problem | Root Cause | Solution |
|---|---|---|
| Crumbly texture | Not enough binder | Add 1/2 tsp extra xanthan gum or an extra egg. |
| Dry, hard crust | Over baking | Remove from machine 5 minutes early if using "dark" setting. |
| Yeast didn't rise | Water too hot | Ensure water is "bathwater warm," not boiling or cold. |
If you're looking for more ways to use your gluten-free pantry, this zucchini bread recipe is a fantastic way to use up summer produce.
Common Mistakes Checklist
- ✓ Use room temperature eggs to avoid "shocking" the yeast and slowing the rise.
- ✓ Weigh your flour if possible; a "cup" can vary by 20% depending on how you scoop it.
- ✓ Never skip the scraping step; flour pockets in the corners will ruin the loaf.
- ✓ Ensure your yeast is fresh; check the expiration date before starting.
- ✓ Let the bread cool on a wire rack, never on a flat plate where steam can collect.
Flavor Swaps and Variations
For an Herb Infused Savory Loaf, add 1 tablespoon of dried rosemary and 1 teaspoon of garlic powder to the dry ingredients. This version is incredible when toasted and rubbed with a raw garlic clove. It turns the simple gluten-free Bread for Bread Maker into a gourmet side dish for pasta nights.
For a High Fiber "Wholemeal" Style, swap 1/2 cup of the gluten-free flour for sorghum flour or flaxseed meal. Note that this will make the loaf slightly denser and may require an extra tablespoon of water to account for the increased absorption of the fiber.
If you have extra fruit on hand, you might enjoy making this banana bread recipe which uses similar pantry staples but offers a much sweeter finish.
Storing and Freezing Bread
Storing this bread properly is the difference between a great sandwich and a sad, dry snack. Because we used honey, it will stay fresh on the counter in an airtight container for about 2 to 3 days. Do not store it in the refrigerator!
The fridge actually accelerates "retrogradation," which is just a fancy way of saying it makes the bread go stale and hard faster.
For long term storage, slicing the loaf before freezing is a total game changer. Place pieces of parchment paper between the slices so they don't stick together, then seal them in a heavy duty freezer bag. You can pull out a single slice and pop it directly into the toaster.
It will stay good in the freezer for up to 2 months.
Zero waste tip: If you do end up with a few dry ends, don't toss them! Cut them into cubes, toss with olive oil and salt, and bake at 350°F (180°C) for 10 minutes. You’ll have the best gluten-free croutons you’ve ever tasted.
Perfect Slicing and Presentation
The visual appeal of a homemade loaf is all in the slice. Use a long, serrated bread knife and a sawing motion rather than pressing down. Because this bread is soft, pressing down will squish the delicate air pockets we worked so hard to create.
For a beautiful presentation, I like to brush the top of the loaf with a little extra melted butter right when it comes out of the machine; it gives the crust a satiny finish.
Serving this bread at a brunch? Slice it thick and serve it alongside a small bowl of honey whipped butter. The way the honey in the bread echoes the honey in the butter is subtle but feels incredibly intentional.
If you're making sandwiches, a light toast helps "revive" the texture, making it indistinguishable from traditional wheat bread to the untrained palate.
| Serving Count | Ingredient Adjustment | Pan Size | Cook Time |
|---|---|---|---|
| 7 Servings (Half) | Use 1.5 eggs (beat 1 then half) | Small (1 lb) | Reduce by 15 mins |
| 14 Servings (Full) | Follow Schema exactly | Standard (2 lb) | 180 minutes |
| 28 Servings (Double) | Work in two separate batches | Standard (2 lb) | 180 mins each |
Debunking Bread Maker Myths
Many people believe that you can't use "regular" yeast in a bread machine. In truth, instant yeast and bread machine yeast are virtually the same thing; they are both finely granulated and designed to dissolve quickly.
The only yeast you should avoid "dumping" in is active dry yeast, which needs to be dissolved in water first to activate.
Another common myth is that salt kills yeast on contact. While salt can inhibit yeast growth in high concentrations, in a bread machine pan, they can sit near each other for hours without issue.
The layering technique (liquids, then dry, then yeast in a well) is mostly to prevent the yeast from getting wet and starting to grow before the machine actually begins the cycle, which is especially important if you're using a delay timer.
Finally,, some say gluten-free bread doesn't need a "rise" time. While it doesn't need a "punch down" and second rise like wheat bread, it absolutely needs that first long rise to allow the starches to hydrate and the air bubbles to expand.
Cutting the rise time short will result in a heavy, lead like loaf that won't be pleasant to eat. Trust the 195 minutes total time it's there for a reason!

Recipe FAQs
Can you bake gluten-free bread in a bread maker?
Yes, it is highly effective. You must ensure you select the specific 'gluten-free' cycle, as this cycle is optimized for the shorter rise times required by gluten-free doughs.
What does honey do for gluten-free bread?
It provides essential food for the yeast and improves moisture retention. Beyond flavor, the honey helps the bread stay soft for 2 to 3 days on your counter.
Can you put honey in a bread maker?
Yes, it is perfectly safe. Always whisk the honey into the warm water, eggs, apple cider vinegar, and melted butter until fully dissolved before adding it to the bread pan.
What does adding honey do to bread?
It aids in browning and fermentation. The sugar in the honey interacts with the yeast to ensure a proper rise, which is critical since you are working with a gluten-free flour blend.
How to ensure the loaf is fully mixed without flour pockets?
Use a silicone spatula to scrape down the sides of the pan during the first 5-10 minutes of the mixing cycle. If you enjoyed learning this technique, you can apply similar hands-on attention to the dough consistency in our gluten-free Banana Loaf.
Is it true I must store the bread in the refrigerator to keep it fresh?
No, this is a common misconception. Storing it in the fridge actually accelerates retrogradation, causing the starches to recrystallize and making the bread go hard much faster.
How to store the bread for longer than 3 days?
Slice the loaf completely and freeze it with parchment paper between each piece. This method prevents slices from sticking together and allows you to thaw exactly what you need without wasting the rest of the loaf.
gluten-free Honey Bread
Ingredients:
Instructions:
Nutrition Facts:
| Calories | 191 kcal |
|---|---|
| Protein | 3.9g |
| Fat | 4.6g |
| Carbs | 31.9g |
| Fiber | 1.1g |
| Sugar | 3.7g |
| Sodium | 248mg |
