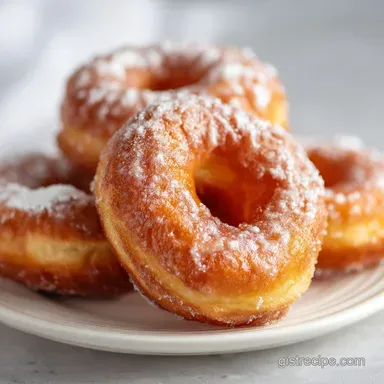
Gluten Free Donut Recipe: Velvety Cake Crumb

- Time: Active 10 minutes, Passive 12 minutes, Total 22 minutes
- Flavor/Texture Hook: Velvety crumb with a warm nutmeg aroma and a glassy, sweet finish.
- Perfect for: Lazy Sunday mornings, birthday brunches, or a quick kid friendly baking project.
- Create the Best Homemade Gluten Free Donut Recipe
- The Real Reasons This Particular Batter Works
- Quick Breakdown of Time and Nutrition
- Selecting Quality Components for Your Kitchen
- Minimal Tools Required for This Easy Bake
- Step by Step Guide to Perfect Textures
- Fixing Every Potential Problem Like a Pro
- Creative Toppings and Glazes to Try
- How to Keep These Donuts Fresh Longer
- Perfect Drinks to Serve with Baked Goods
- Recipe FAQs
- 📝 Recipe Card
Create the Best Homemade gluten-free Donut Recipe
The kitchen is quiet, except for the soft rhythmic clicking of the cooling rack and the faint, sweet scent of warm nutmeg hanging in the air. I remember the first time I tried to tackle a gluten-free donut recipe. It was a disaster.
I ended up with something that had the structural integrity of a brick and the flavor of wet cardboard. I sat on my kitchen floor, staring at a tray of "donuts" that wouldn't even bounce if I dropped them.
It was a humbling moment, but it’s exactly why I spent months obsessing over hydration levels and flour blends.
We want that specific, nostalgic bakery smell to fill your house, followed by the sight of golden rings that spring back when you touch them. This isn't about making a "good for being gluten-free" treat; it's about making a treat that stands on its own.
Whether you're making these for a kid with an allergy or just because you want a shortcut to a sweet breakfast, the goal is the same: a tender crumb that doesn't crumble into dust the moment you take a bite.
Right then, let's get into what actually works. I've stripped away the fussy steps and the weird ingredients you can only find in specialty shops. We’re using basic pantry staples and one or two clever tricks to get that velvety texture.
You don’t need a deep fryer or a culinary degree just a bowl, a whisk, and about twenty minutes of your time. Trust me, once you see that glaze hit the warm surface and set into a perfect, crackly shell, you’ll never go back to the boxed stuff.
The Real Reasons This Particular Batter Works
The secret to this batter isn't just luck; it's about managing how moisture interacts with the starches. When we remove gluten, we lose the "elastic" web that holds air bubbles. To fix this, we use a few specific mechanisms that keep the structure intact without making it tough. If you've ever struggled with a gluten-free Bread recipe, you know that moisture management is everything.
- The Double Leavening: Using both baking powder and baking soda creates a two stage rise. The soda reacts immediately with the acidic buttermilk to create initial lift, while the powder kicks in during the heat of the oven to "set" the height.
- Acidic Tenderizing: Buttermilk doesn't just add tang; the acid breaks down the starches in the flour blend, ensuring the final result isn't gummy or dense.
- Starch Hydration: Allowing the batter to sit for just a few minutes before piping lets the rice flour in the blend absorb the liquids, which completely eliminates that "sandy" mouthfeel common in gluten-free treats.
- Fat Suspension: The combination of melted butter and egg yolks creates an emulsion that coats the starch particles, acting as a lubricant for a silky, melt in-your mouth experience.
Stovetop vs Oven Comparison
| Method | Time | Texture Outcome | Best For |
|---|---|---|---|
| Baked (Oven) | 12 minutes | Soft, cake like, light | Healthy everyday treats |
| Fried (Stovetop) | 3 mins/batch | Crispy exterior, dense | Authentic fairground style |
| Air Fryer | 8 minutes | Chewy, slightly drier | Quick single servings |
The baked method wins for ease of cleanup and consistent texture. While frying gives you that golden crust, the oven allows for a much more controlled rise that keeps the donut from becoming an oil soaked sponge. Plus, you won't spend the rest of the day smelling like a fast food kitchen.
The Science of the Crumb
The magic here lies in the Maillard Reaction combined with Starch Gelatinization. As the heat hits 180°C (350°F), the sugars and proteins on the surface of the donut begin to brown, creating flavor compounds that taste like toasted nuts and caramel.
Inside, the starches absorb the buttermilk and butter, swelling up to form a stable structure. Because there is no gluten to get "tough," the result stays tender even after it cools down completely.
Quick Breakdown of Time and Nutrition
When you're planning your morning, you need to know exactly how long you'll be standing at the counter. This recipe is designed for efficiency. We are skipping the yeast, which means no waiting for hours for dough to rise. It's a "dump and whisk" situation that respects your time.
| Component | Metric | Detail |
|---|---|---|
| Active Prep | 10 minutes | Whisking and piping |
| Baking Time | 12 minutes | Total oven duration |
| Cooling Time | 5 minutes | Essential for glazing |
| Total Yield | 12 donuts | Standard donut pan size |
Chef's Note: If you're in a rush, you can skip the piping bag and just spoon the batter into the tins, but piping gives you that professional, smooth ring shape that looks much better on a platter.
Precision Checkpoints for Success
- Internal Temperature: The donuts are perfectly done when they hit 195°F (91°C) in the thickest part.
- Batter Consistency: It should be thick enough to hold its shape in a spoon for 3 seconds before falling.
- Oven Heat: Ensure your oven is truly at 350°F (180°C) by using a secondary thermometer; even a 10 degree dip can cause the donuts to be heavy.
Selecting Quality Components for Your Kitchen
I've tested this with several brands, and the quality of your flour matters more than anything else. You want a 1:1 blend that already contains xanthan gum. If your blend doesn't have it, you'll need to add 1/2 teaspoon yourself, or you'll end up with a pile of crumbs.
Component Analysis
| Ingredient | Science Role | Pro Secret |
|---|---|---|
| 1:1 GF Flour | Structural Base | Use a blend with rice flour and potato starch for the best lift. |
| Almond Flour | Moisture & Fat | Super fine blanched almond flour prevents a "gritty" texture. |
| Buttermilk | Chemical Leavener | Room temperature buttermilk reacts faster with the baking soda. |
| Nutmeg | Flavor Profile | Freshly grated nutmeg provides that "old-fashioned" bakery scent. |
Shopping List Essentials
- 2 cups (280g) 1:1 gluten-free Flour Blend: Why this? Provides the main structure and mimic wheat's protein to starch ratio.
- 1/2 cup (50g) Super fine blanched almond flour: Why this? Adds healthy fats that keep the donut moist for days.
- 3/4 cup (150g) Granulated sugar: Why this? Sweetens and helps the edges caramelize slightly.
- 2 tsp Baking powder: Why this? The primary engine for a tall, airy rise.
- 1/2 tsp Baking soda: Why this? Reacts with buttermilk for immediate bubbles.
- 1 tsp Fine sea salt: Why this? Balances the sugar and intensifies the vanilla notes.
- 1/2 tsp Ground nutmeg: Why this? The "secret" ingredient for authentic donut flavor.
- 2 Large eggs: Why this? Binds the ingredients and adds rich color.
- 3/4 cup (180ml) Full fat buttermilk: Why this? Adds moisture and the necessary acid for leavening.
- 1/4 cup (56g) Unsalted butter: Why this? Melted butter provides a velvety mouthfeel.
- 2 tsp Pure vanilla extract: Why this? Enhances the sweetness without adding more sugar.
Glaze Ingredients
- 1 1/2 cups (180g) Confectioners' sugar: The base for a smooth, white glaze.
- 3 tbsp Heavy cream: Creates a thicker, more opaque finish than milk.
- 1 tsp Vanilla bean paste: Why this? Those little black flecks make it look gourmet.
| Original Ingredient | Substitute | Why It Works |
|---|---|---|
| Buttermilk | 3/4 cup milk + 1 tsp lemon juice | The acid curdles the milk, mimicking buttermilk's chemistry. |
| Butter | Refined coconut oil (melted) | Similar fat content. Note: Ensure it's refined to avoid coconut flavor. |
| Heavy Cream | Full fat coconut milk | Thick and creamy. Note: Adds a very slight tropical undertone. |
Minimal Tools Required for This Easy Bake

You don't need a stand mixer for this. In fact, using a stand mixer often incorporates too much air, which can make the donuts explode or deflate. A simple hand whisk is your best friend here. It gives you more control and, honestly, there’s less to wash at the end.
- Two 6 cavity donut pans: Non stick is best, but we’re still going to grease them.
- Large mixing bowl: For the dry ingredients.
- Medium mixing bowl: For the wet ingredients.
- Silicone whisk: To blend everything without over mixing.
- Large piping bag: Or a heavy duty gallon sized Ziploc bag with the corner snipped off.
- Wire cooling rack: Critical for letting the glaze set without the bottom getting soggy.
Chef's Note: If you don't have a piping bag, don't sweat it. Snipping the corner off a freezer bag works perfectly. Just make sure the hole is about half an inch wide so the batter flows steadily.
step-by-step Guide to Perfect Textures
- Prep the oven. Preheat to 350°F (180°C) and liberally grease your donut pans with butter or non stick spray. Note: Don't skip the grease, even on non stick pans.
- Combine dry ingredients. Whisk the GF flour, almond flour, sugar, baking powder, baking soda, salt, and nutmeg in the large bowl. Note: Whisking for 30 seconds helps aerate the flour.
- Mix wet ingredients. In the medium bowl, beat the eggs, then whisk in the buttermilk, melted butter, and vanilla until smooth.
- Create the batter. Pour the wet mixture into the dry and whisk gently until no large lumps remain. Note: A few tiny lumps are fine; don't overwork it.
- Let it rest. Set the batter aside for 5 minutes. Watch for the batter to slightly thicken. This is the hydration phase.
- Fill the bag. Transfer the batter to your piping bag or Ziploc bag.
- Pipe the rings. Pipe the batter into the prepared pans, filling each cavity about 3/4 full. Stop before they are flush with the top.
- Bake the donuts. Bake for 10-12 minutes until the tops spring back when lightly touched.
- Cooling phase. Let them sit in the pan for 5 minutes, then flip them onto a wire rack.
- Glaze and set. Whisk the glaze ingredients, dip the warm (not hot) donuts, and return to the rack until the glaze is matte and firm.
Fixing Every Potential Problem Like a Pro
Baking without gluten can be temperamental. If things don't go perfectly the first time, it's usually a small adjustment in temperature or timing. Most issues happen because of the flour blend's specific thirstiness.
Why Your Donuts Are Gummy
If the center feels like wet dough, it's likely they are underbaked or your buttermilk was too cold. Cold ingredients slow down the leavening process, and the starches don't get hot enough to set. Always use room temperature eggs and buttermilk.
Why They Stuck to the Pan
gluten-free batter is stickier than wheat batter because of the xanthan gum and starches. Even if your pan says "non stick," you need a barrier. Use a pastry brush to get butter into every corner of the donut ring.
Troubleshooting Table
| Problem | Root Cause | Solution |
|---|---|---|
| Flat donuts | Expired baking powder | Check your leaveners; they should bubble when put in hot water. |
| Gritty texture | Skipped the 5 minute rest | Always let the batter sit so the rice flour can fully hydrate. |
| Dark bottoms | Pan was too close to the heat | Move the rack to the middle position and use a light colored pan. |
Common Mistakes Checklist
- ✓ Never pack your flour into the measuring cup; always spoon and level it.
- ✓ Ensure the butter is melted but not boiling hot when adding to eggs.
- ✓ Don't overfill the cavities, or the "hole" will close up during baking.
- ✓ Dip the donuts in glaze while they are still slightly warm to help it "grip."
- ✓ Use a wire rack; cooling on a flat plate creates steam and makes the bottoms mushy.
Creative Toppings and Glazes to Try
Once you've nailed the base recipe, the world is your oyster. You can take this simple vanilla ring and turn it into something completely different with just a few swaps. I love making a batch of these whenever I have guests because I can customize each one.
- Chocolate Lover's: Add 2 tablespoons of cocoa powder to the dry ingredients for a gluten-free Banana recipe.
- Cinnamon Sugar: Skip the glaze. Instead, brush the warm donuts with melted butter and roll them in a mix of 1/2 cup sugar and 1 tablespoon cinnamon.
- Lemon Poppy Seed: Add the zest of one lemon and 1 tablespoon of poppy seeds to the batter. Use lemon juice instead of cream in the glaze.
- Maple Bacon: Use maple extract in the glaze and top with crispy, crumbled bacon bits for that savory sweet hit.
Decision Shortcut
- If you want a crispier edge: Brush the pan with a mix of melted butter and sugar before piping.
- If you want a lighter, fluffier donut: Separate the eggs and fold in the whipped egg whites at the very end.
- If you want to save time: Use a store-bought GF yellow cake mix and add 1/4 tsp nutmeg for a "cheat" version.
How to Keep These Donuts Fresh Longer
gluten-free baked goods tend to dry out faster because they lack the protein structure to hold onto moisture. However, the almond flour in this recipe acts as a natural insurance policy. The fats from the almonds keep the crumb soft for much longer than a standard rice only blend.
- Countertop: Store in an airtight container for up to 2 days. Don't use a paper bag, as it will suck the moisture right out of them.
- Fridge: I don't recommend the fridge; it actually accelerates the staling process (retrogradation of starches).
- Freezer: These freeze beautifully! Wrap individual un glazed donuts in plastic wrap and freeze for up to 2 months. Thaw at room temperature and glaze just before serving.
- Zero Waste Tip: If you have leftovers that have gone a bit stale, cube them up and use them as the base for a bread pudding. The nutmeg and sugar already in the donuts make for an incredible dessert.
Perfect Drinks to Serve with Baked Goods
A donut is only as good as the drink you pair it with. Since these have a warm nutmeg profile, you want something that either cuts through the sweetness or leans into the spice.
- Black Coffee: A medium roast with nutty undertones balances the sugary glaze perfectly.
- Spiced Chai: The cardamom and ginger in the tea highlight the nutmeg in the donut.
- Cold Milk: Nothing beats the classic. A glass of cold almond or oat milk is the ultimate nostalgia trip.
- Fruit Smoothies: If you're having these for a full brunch, a tart berry smoothie provides a nice acidic contrast to the rich batter.
If you find yourself with extra bananas on the counter, you might want to try this gluten-free Banana recipe which uses a very similar moisture locking technique. Both recipes rely on that perfect balance of fat and acid to stay soft!
Debunking Baking Misconceptions
One common myth is that "gluten-free donuts are always dry." This usually happens when people use too much flour or skip the fat. In this recipe, the buttermilk and almond flour provide a heavy dose of moisture that counters the "thirst" of the GF flour. Another myth is that you need yeast for a good donut.
While raised donuts are great, "cake" donuts have been a bakery staple for a century, and they are naturally easier to make gluten-free because they don't rely on a gluten stretching rise.
Finally, people often think they can just swap 1:1 flour into any old recipe and get the same result. You can't. Regular wheat recipes don't account for the hydration needs of rice and potato starches. This recipe is specifically built around those needs, ensuring your result is always velvety, never gritty.
Now, get that oven preheated your kitchen is about to smell incredible!

Recipe FAQs
Do gluten-free donuts require a binding agent like xanthan gum?
Yes, unless your blend includes it. Most quality 1:1 gluten-free flour blends already contain xanthan gum, which mimics the elasticity gluten provides.
How to achieve a non-gritty texture in a baked gluten-free donut?
Allow the batter to rest for 5 minutes before piping. This resting period lets the rice flour and starches fully absorb the liquid, eliminating the characteristic sandy mouthfeel.
Can I substitute the buttermilk for regular milk?
No, stick with buttermilk or an acidic substitute. The acid in the buttermilk is crucial as it reacts with the baking soda to create the initial lift needed for a soft crumb.
How to tell when these baked donuts are finished cooking?
Gently touch the top center; it should spring back instantly. The internal temperature should register 195°F (91°C), ensuring the starches are fully set and not gummy.
Is it true that deep frying yields a superior texture compared to baking?
False. While frying provides a crispier exterior, baking results in a more consistently soft, cake like donut that absorbs significantly less oil, making it lighter overall.
How do I prevent the glaze from dissolving into the donut?
Dip the donuts while they are still slightly warm, but not hot. This residual heat helps the sugar crystals adhere and set quickly into a matte, firm shell.
What is the function of adding almond flour to the standard GF blend?
Almond flour adds essential fats that keep the crumb tender. This fat content acts as a lubricant for the starches, which is vital for moisture retention in gluten-free baking; a similar principle ensures tenderness in our Velvety GF Banana recipe.
gluten-free Donut Recipe
Ingredients:
Instructions:
Nutrition Facts:
| Calories | 281 kcal |
|---|---|
| Protein | 3.5 g |
| Fat | 8.7 g |
| Carbs | 47.8 g |
| Fiber | 1.4 g |
| Sugar | 27.6 g |
| Sodium | 158 mg |
