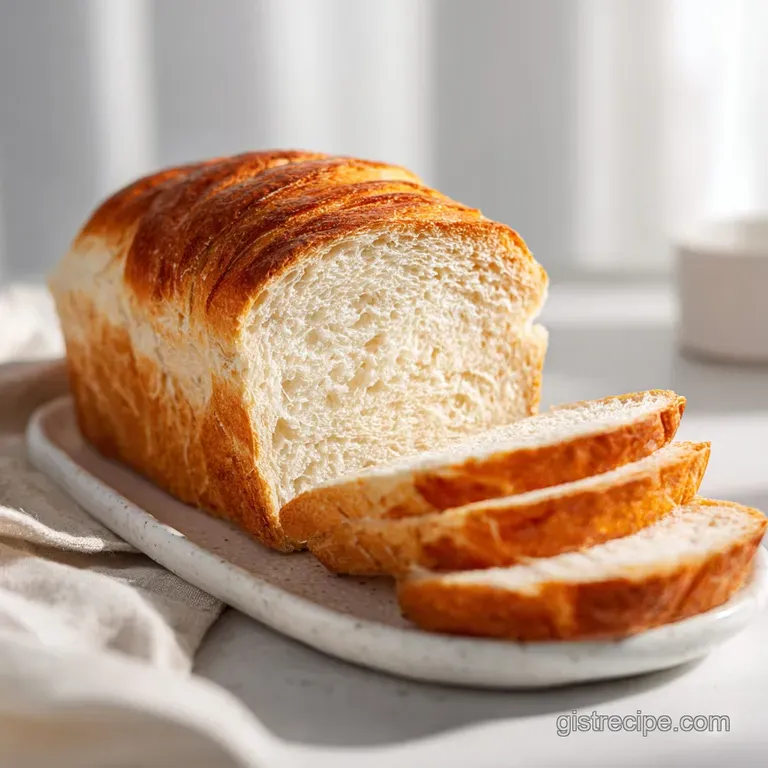
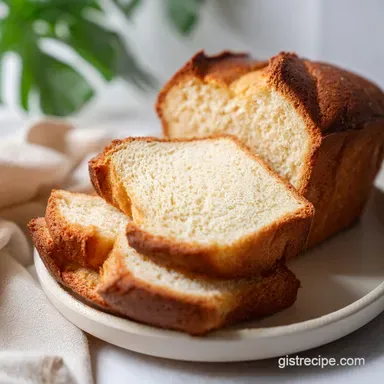
Gluten Free Bread Machine Recipe
- Time: Active 10 mins, Passive 2 hours 20 mins, Total 2 hours 30 mins
- Flavor/Texture Hook: Yeasty, slightly sweet aroma with a velvety soft center
- Perfect for: Daily sandwiches, morning toast, and beginner bakers
- Mastering This Gluten Free Bread Machine Recipe
- Recipe Specs and Success Metrics
- Essential Ingredients and Science
- Tools for a Better Bake
- Step by Step Baking Guide
- Solving Common Baking Problems
- Customizing the Base Loaf
- Storage and Waste Prevention
- Myths and Serving Ideas
- Recipe FAQs
- 📝 Recipe Card
Mastering This gluten-free Bread Machine Recipe
You know that heartbreaking sound? The one where you tap the top of a fresh loaf and it sounds like a literal cinder block? I've been there more times than I care to admit. For years, I avoided my bread machine because every gluten-free attempt came out as a gummy, sunken mess that even the birds wouldn't touch.
I nearly gave up on having a "normal" sandwich ever again.
But then, I started playing with the ratios of moisture to binders. I realized that this recipe isn't just about mixing flour and water; it's about mimicking the stretch that gluten usually provides. When I finally pulled a loaf out that actually had a dome - a real, beautiful, golden dome - I almost cried.
The kitchen smelled like a professional bakery, and for the first time in years, I had a piece of toast that didn't shatter into a million dry crumbs.
We're going for a bread that feels like "real" bread. It's flexible, it toasts beautifully, and it actually stays fresh for more than four hours. If you've been hurt by bad machine loaves before, trust me on this one.
We're going to get it right together, one step at a time, using the settings your machine actually likes.
Recipe Specs and Success Metrics
The Magic of Psyllium Glue: Unlike wheat, gluten-free flour has no "elasticity," so the psyllium husks act as a structural net to trap air bubbles. This mechanism allows the dough to expand upward rather than collapsing into a dense puddle.
- Single Rise Advantage: Most gluten-free bread works best with only one rise cycle because the structure is too fragile to survive a second "punch down" and rise.
- Hydration Balance: gluten-free flours are incredibly thirsty; this recipe uses more liquid than traditional bread to ensure the starches fully hydrate and soften.
- Yeast Activation: Honey provides a quick energy source for the yeast, ensuring a rapid and strong fermentation before the structure sets.
- Acidic Lift: A touch of apple cider vinegar helps strengthen the protein bonds in the flour blend, giving the crumb more "chew" and less "mush."
| Thickness of Loaf | Internal Temp | Rest Time | Visual Cue |
|---|---|---|---|
| 4 inches tall | 205°F–210°F | 1 hour | Deep golden brown crust |
| 3 inches tall | 195°F–200°F | 45 mins | Pale gold, soft sides |
| 2 inches tall | Under 190°F | 30 mins | Sunken center, gummy |
Choosing the right cycle is half the battle when working with this bread. If your machine doesn't have a specific "gluten-free" setting, look for a custom cycle where you can delete the second rise and second knead. You want one long mix and one long rise followed by the bake.
Essential Ingredients and Science
| Ingredient | Science Role | Pro Secret |
|---|---|---|
| Whole Psyllium Husks | Structural Binder | Do not use powdered; it turns the loaf purple! |
| Warm Water (105°F) | Yeast Catalyst | Use a thermometer; too hot kills the yeast instantly. |
| Large Eggs | Protein Structure | Always use room temperature to avoid shocking the yeast. |
| Apple Cider Vinegar | Dough Conditioner | The acid helps the yeast work faster and improves crumb. |
To get the best results, you'll need to gather a few specific items. I always use a high-quality gluten-free flour blend that contains rice, potato, and tapioca starches. If your blend already has xanthan gum, you can still add the psyllium husks for an even better texture.
Similar to how we balance moisture in a gluten-free Zucchini recipe, the ratio here is everything.
- 1.5 cups (355ml) warm water (105°F–110°F) Why this? Essential for yeast activation.
- 2 tbsp (42g) honey Why this? Feeds yeast and adds browning.
- 3 large eggs, room temperature Why this? Adds lift and richness.
- 1/4 cup (56g) melted butter Why this? Keeps the crumb tender.
- 1 tsp apple cider vinegar Why this? Strengthens the dough structure.
- 3 cups (450g) gluten-free flour blend Why this? The starchy base of the loaf.
- 1/4 cup (40g) whole psyllium husks Why this? Provides the "stretch" of gluten.
- 1.5 tsp fine sea salt Why this? Tightens the crumb and flavors.
- 2.25 tsp active dry yeast Why this? The engine for the rise.
Tools for a Better Bake
You don't need a fancy $300 machine to make this work, but a few specific tools make a world of difference. A digital scale is your best friend here. While I've provided cup measurements, weighing your flour ensures you don't accidentally pack too much into the cup, which leads to a dry, crumbly loaf.
Just like when I'm making a gluten-free Banana recipe, accuracy is what separates a good loaf from a great one.
Chef's Tip: Freeze your bread pan for 10 minutes before adding the ingredients if you live in a very hot climate. This prevents the yeast from blooming too quickly and collapsing before the bake cycle starts.
Make sure your bread machine paddle is firmly attached. If your machine has a habit of leaving the paddle inside the loaf, a tiny dab of vegetable oil on the peg before sliding the paddle on can help it stay in the pan when you flip the finished bread out.
step-by-step Baking Guide

- Warm the water. Use a thermometer to ensure it's between 105°F and 110°F. Note: Too cold won't wake the yeast; too hot kills it.
- Whisk wet ingredients. Combine the warm water, honey, eggs, melted butter, and vinegar in a separate bowl. until well blended and frothy.
- Pour into pan. Add the liquid mixture to the bread machine pan first. Note: Keeping liquids on the bottom prevents flour pockets.
- Add dry ingredients. Gently spoon the gluten-free flour, psyllium husks, and salt over the liquid. until the liquid is completely covered.
- Create a well. Use your finger to make a small indentation in the center of the flour, but don't go deep enough to touch the liquid.
- Add the yeast. Pour the yeast into the well. Note: Keeping yeast dry until the mixing starts prevents premature activation.
- Set the machine. Select the "gluten-free" cycle (usually about 2 hours 20 mins). until the display confirms the setting.
- Monitor the mix. After 5 minutes of kneading, check the dough; it should look like thick cake batter, not a firm wheat ball.
- Bake the loaf. Let the machine run through its cycle. until the crust is firm and golden.
- Cool completely. Remove the pan and let the bread sit for 10 minutes before shaking it out onto a wire rack.
Solving Common Baking Problems
Why Your Loaf Sunken in the Middle
This usually happens because the dough rose too fast and then ran out of "steam" or structural support before the baking set the crumb. It’s often caused by using water that's too hot or adding too much yeast. If your kitchen is very warm, even the ambient temperature can cause this over proofing.
Fixing a Dense, Heavy Crumb
If your bread feels like a brick, the culprits are usually old yeast or packed flour. If you don't use a scale, you might be adding 20% more flour than needed. Also, make sure your eggs are truly at room temperature; cold eggs can stunt the yeast's growth early in the cycle.
| Problem | Root Cause | Solution |
|---|---|---|
| Gummy center | Underbaked or sliced too hot | Use a thermometer (205°F); wait 1 hour to slice |
| Flour on sides | Incomplete mixing | Use a rubber spatula to scrape corners during first 5 mins |
| Crumbly texture | Not enough binder | Increase psyllium husk by 1 tbsp next time |
Common Mistakes Checklist
- ✓ Check yeast expiration date (stale yeast won't lift the heavy GF flours)
- ✓ Use a digital scale for the flour (volume measurements vary too much)
- ✓ Scrape the corners of the pan during the first few minutes of mixing
- ✓ Never open the lid during the rise or bake phases
- ✓ Let the bread cool entirely before slicing (starch needs to "set")
Customizing the Base Loaf
If you're looking for a dairy-free option, you can easily swap the butter for a neutral oil or a vegan butter stick. The texture will be slightly different, but the lift will remain the same.
For those who want a heartier sandwich bread, try adding 2 tablespoons of flax meal or chia seeds to the dry mix for a "multigrain" feel.
For a larger family, you might be tempted to double this recipe. Don't. Bread machines are calibrated for specific volumes, and doubling will likely result in dough hitting the lid or an underbaked center. Instead, run two separate cycles.
If you need a side dish for a crowd, it's better to pair your loaf with something like a gluten-free Stuffing recipe rather than overloading the machine.
| Original Ingredient | Substitute | Why It Works |
|---|---|---|
| Melted Butter | Avocado Oil | Maintains fat content. Note: Slightly less "buttery" flavor |
| Honey | Maple Syrup | Provides sugar for yeast. Note: Adds a darker, woody sweetness |
| 3 Large Eggs | Flax Eggs (3 tbsp meal + 9 tbsp water) | Provides binding. Note: Resulting loaf is much denser and darker |
Storage and Waste Prevention
Keep your bread at room temperature in an airtight bag for up to 2 days. Because this recipe doesn't have the preservatives of store-bought loaves, it will go stale faster. If you won't eat it all, slice it immediately after it cools and freeze the slices with bits of parchment paper between them.
Don't toss the heels or any dry scraps! I dry them out in a low oven to make the best gluten-free breadcrumbs you've ever had. You can also cube the leftovers for croutons or use them as a base for a savory breakfast strata.
Even the "mistake" loaves that come out too dense can be pulsed in a food processor and used for coating chicken or thickening soups.
Myths and Serving Ideas
One big myth I hear all the time is that you should use the "Rapid" cycle for gluten-free bread. Honestly, don't even bother with it. gluten-free flours need that extra time in the standard GF cycle to fully hydrate. If you rush it, you'll end up with a gritty texture and a middle that feels like wet sand.
Another misconception is that you need a "special" gluten-free yeast. Standard active dry yeast or "bread machine" yeast works perfectly fine. The secret isn't the yeast type; it's the environment you create for it. Give it that warm water and honey, and it will do its job.
For serving, this bread is a champion for avocado toast or a classic grilled cheese. The psyllium gives it enough structural integrity to hold up to heavy fillings without falling apart. If you want to go the sweet route, a thick slice with almond butter and honey is basically a hug in food form. If you're looking for more bread style treats, my gluten-free Bread recipe for a honey loaf is another great machine option to try next!

Recipe FAQs
Does gluten-free bread work in a bread maker?
Yes, absolutely. Bread makers are excellent tools for gluten-free baking because they provide a stable, consistent temperature environment necessary for the delicate structure of GF dough.
What is the trick to making good gluten-free bread in a machine?
Use whole psyllium husks as the primary binder. Psyllium mimics gluten's elasticity, trapping the gases produced by the yeast, which prevents the loaf from collapsing into a dense mass.
What is the best gluten-free flour to use in a bread maker?
Use a pre-mixed commercial blend that includes rice, potato, and tapioca starches. These blends are formulated for structure, but you must always supplement them with a specific binder like psyllium or xanthan gum.
Why are bread makers no longer popular?
They have been largely replaced by high powered stand mixers and Dutch oven baking methods. However, for specific needs like gluten-free baking, the contained environment of a bread maker remains superior for achieving lift without the need for complex shaping techniques.
Should I use the "Rapid" or "Quick" bread cycle for gluten-free dough?
No, avoid the rapid setting entirely. gluten-free flours require a longer hydration period than traditional wheat flour to absorb moisture fully, so use the dedicated "gluten-free" or standard cycle.
How do I stop my gluten-free loaf from having a gummy center?
Bake until the internal temperature reaches 205°F and let it cool completely before slicing. Slicing too soon traps steam, gelatinizing the starches and creating that wet, gummy texture, similar to underbaking a Classic Coleslaw Recipe that hasn't fully chilled.
Can I substitute milk for the water in this recipe?
Yes, milk can be substituted for water, but you must use room temperature milk. Cold dairy will shock the yeast, inhibiting the initial rise needed for structure; this temperature precision is key, much like controlling the cooking temperature for a Homemade Sausage Gravy and Biscuits Ready in 30 Min.
gluten-free Bread Machine
Ingredients:
Instructions:
Nutrition Facts:
| Calories | 181 kcal |
|---|---|
| Protein | 2.8 g |
| Fat | 4.3 g |
| Carbs | 31 g |
| Fiber | 3.1 g |
| Sugar | 3.2 g |
| Sodium | 258 mg |
