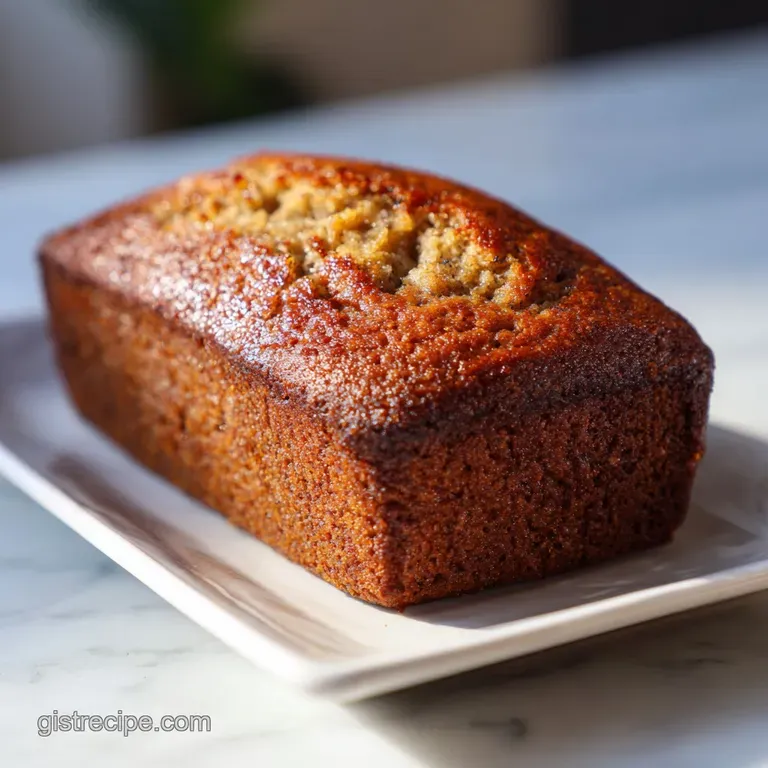
Gluten Free Banana Bread Recipe: Moist Loaf

- Time: Active 25 minutes, Passive 1 hours, Total 1 hours 25 mins
- Flavor/Texture Hook: Caramelized, moist, and fragrant with warm nutmeg and cinnamon notes
- Perfect for: Weekend brunch, budget-friendly meal prep, or a reliable gift for friends
- The Chemical Secret to a Sturdy Crumb
- Analyzing the Essential Component Science
- The Complete Ingredient Checklist
- Essential Tools for Baking Excellence
- Step-by-Step Guide to the Perfect Rise
- Avoiding Common Gluten Free Baking Errors
- Creative Ways to Personalize Your Loaf
- Keeping Your Banana Bread Fresh Longer
- The Best Ways to Enjoy Your Slice
- Common Kitchen Myths
- Recipe FAQs
- 📝 Recipe Card
The Chemical Secret to a Sturdy Crumb
1. The 10 Minute Hydration Rest
One of the biggest hurdles in gluten-free baking is the "gritty" texture that often plagues the final product. This happens because rice based flour blends take longer to absorb moisture than traditional wheat flour.
By letting the batter rest for just 10 minutes before it hits the oven, we allow the starches to fully hydrate.
2. The Moisture to Starch Equilibrium
Fructose Structure: The natural sugars in 450g overripe bananas provide structural integrity and a moist mouthfeel through caramelization. Protein Binding: The two large eggs act as the "glue" that replaces gluten, providing the necessary lift and preventing the loaf from crumbling.
3. Internal Temperature Precision
gluten-free loaves are notoriously tricky to judge by eye because the crust often looks done while the center remains a liquid mess. Using a digital thermometer is the only foolproof way to ensure you don't pull it out too early. We are aiming for a specific internal temperature to ensure the starches have set.
| Thickness | Internal Temp | Rest Time | Visual Cue |
|---|---|---|---|
| 9x5 Loaf | 205°F (96°C) | 15 mins in pan | Deep golden brown with a center crack |
| 8x4 Loaf | 208°F (98°C) | 20 mins in pan | Edges pulling slightly from the sides |
| Muffin Tin | 200°F (93°C) | 5 mins in pan | Springy to the touch in the center |
Knowing when to pull the loaf out is the difference between a velvety slice and a gummy one. If you find your oven runs hot, you might need to tent the top with foil halfway through to prevent the sugar from burning before the middle is ready.
This is a technique I use constantly for my gluten-free Banana recipe to get that perfect balance of dark crust and tender interior.
Analyzing the Essential Component Science
When we look at the components of this banana bread recipe gluten-free, every gram matters. I prefer weighing ingredients in grams because it’s much more accurate than using cups, especially with flour blends that can pack down.
If you don't have a scale, just make sure you use the "spoon and level" method for your flour so you don't end up with a dry, heavy loaf.
| Ingredient | Science Role | Pro Secret |
|---|---|---|
| 280g GF Flour | Provides structure through starch | Use a blend with xanthan gum to mimic gluten's elasticity. |
| 450g Bananas | Humectant and sweetener | Use bananas that are completely black for the highest sugar content. |
| 115g Butter | Fat for tenderizing | Melted butter creates a denser, more "pound cake" like texture. |
| 150g Brown Sugar | Hygroscopic moisture retention | The molasses in brown sugar keeps the crumb soft for days. |
The interaction between the acidic bananas and the 1 tsp baking soda is what gives us that beautiful rise. Without that reaction, the bread would stay flat and dense. I've also found that adding a touch of nutmeg alongside the cinnamon adds a complexity that makes people ask, "Wait, what's in this?" It's those little budget friendly spice additions that take a simple loaf from basic to "can I have the recipe?"
The Complete Ingredient Checklist
- 280g gluten-free all purpose flour blend: Look for one that includes xanthan gum. Why this? It provides the structural scaffolding needed to hold up the heavy banana mash.
- Substitute: 280g Oat flour (if you are okay with oats) - creates a nuttier, denser crumb.
- 1 tsp baking soda: Our primary leavening agent. Why this? Reacts with the natural acids in the bananas to create air bubbles.
- Substitute: 3 tsp baking powder - the rise will be slightly more cake like.
- 0.5 tsp fine sea salt: Enhances all the other flavors. Why this? Cuts through the sugar to prevent a "cloying" sweetness.
- Substitute: 0.5 tsp Kosher salt - provides a similar flavor profile.
- 1 tsp ground cinnamon: For that classic warm aroma. Why this? Provides the nostalgic "bakery" scent we all love.
- Substitute: 1 tsp Pumpkin pie spice - adds a more complex, ginger forward kick.
- 0.25 tsp ground nutmeg: The "secret" ingredient for depth. Why this? Nutmeg adds a subtle earthy note that balances the sweet bananas.
- Substitute: 0.25 tsp Allspice - slightly more peppery but very effective.
- 450g overripe bananas (3-4 large): The heart of the bread. Why this? Overripe bananas have the most sugar and are easiest to mash into a smooth puree.
- Substitute: 450g Applesauce - the texture will be wetter and less "banana" flavored.
- 115g unsalted butter, melted: For richness and a soft mouthfeel. Why this? Fat coats the starches, preventing them from becoming tough.
- Substitute: 115g Coconut oil - adds a very subtle tropical note and keeps it dairy-free.
- 150g light brown sugar, packed: Adds moisture and a caramel flavor. Why this? Contains molasses, which helps the bread stay moist longer.
- Substitute: 150g Coconut sugar - less sweet with a deeper, toasted flavor.
- 2 large eggs, room temperature: For binding and structure. Why this? Room temp eggs emulsify better into the fats for a smoother batter.
- Substitute: 2 Flax eggs - result will be significantly denser and less risen.
- 1 tbsp pure vanilla extract: For floral sweetness and aroma. Why this? Real vanilla rounds out the harsh edges of the flour blend.
- Substitute: 1 tbsp Maple syrup - adds a woody sweetness but less "bakery" aroma.
Essential Tools for Baking Excellence
You don't need a professional kitchen to make this work, but a few specific tools will make your life much easier. I always suggest using a light colored metal loaf pan. Dark pans tend to absorb too much heat, which can lead to the outside of your banana bread recipe gluten-free burning before the inside is even warm.
If you don't have a stand mixer, don't sweat it. A large mixing bowl and a sturdy whisk will do the job just fine. In fact, I often prefer mixing by hand because it prevents me from over aerating the eggs, which can cause the bread to rise too fast and then collapse.
One thing I do insist on is a piece of parchment paper. Lining your pan with a "sling" of parchment allows you to lift the whole loaf out effortlessly without scratching your pan or breaking the bread. It’s a cheap trick that saves so much frustration.
step-by-step Guide to the Perfect Rise
1. The Prep Phase
Preheat your oven to 350°F (180°C). Grease a 9x5-inch loaf pan and line it with parchment paper. Note: The parchment sling makes removal a breeze.
2. The Dry Base
Whisk 280g gluten-free flour, 1 tsp baking soda, 0.5 tsp salt, 1 tsp cinnamon, and 0.25 tsp nutmeg in a medium bowl. Note: Whisking thoroughly ensures no clumps of soda are left behind.
3. The Banana Integration
In a large bowl, mash 450g overripe bananas until mostly smooth with a few small chunks. Note: A few chunks add wonderful texture to the final slice.
4. The Emulsion Phase
Whisk 115g melted butter and 150g brown sugar into the bananas. Add 2 eggs and 1 tbsp vanilla, whisking until the mixture looks glossy and smooth.
5. Combining the Elements
Fold the dry ingredients into the wet ingredients using a spatula. Note: Stop as soon as no dry flour streaks remain to keep the texture light.
6. The Hydration Rest
Let the batter sit in the bowl for 10 minutes. Wait until the surface shows a few tiny bubbles before pouring it into the pan.
7. Into the Heat
Pour the batter into the prepared pan and smooth the top. Bake for 55 to 65 minutes until a skewer comes out clean or with just a few moist crumbs.
8. The Thermal Check
Check the internal temperature with a probe; it should read 205°F (96°C). Wait until the crust is a deep mahogany brown before pulling it.
9. The Initial Cool
Let the bread cool in the pan for 15 minutes. Note: This allows the structure to set so it doesn't fall apart when moved.
10. The Final Rest
Transfer to a wire rack to cool completely. Wait until the loaf is room temperature before slicing to ensure the cleanest cuts.
Avoiding Common gluten-free Baking Errors
Why Your Loaf is Gummy
The most common heartbreak with a banana bread recipe gluten-free is that "wet" layer in the middle. This usually happens for two reasons: under baking or too much moisture from the bananas. Bananas vary in size, which is why I always recommend weighing the fruit. If you have exactly 450g, you're safe.
Also, gluten-free bread needs to bake longer than wheat bread to allow the starches to gelatinize and then dry out slightly.
The Problem with Sinking Centers
If your bread looks beautiful in the oven but craters the moment you take it out, you might have too much leavening or your oven temperature is off. When the bread rises too quickly, the structure hasn't had time to "set," and it collapses under its own weight.
I've found that keeping the eggs at room temperature and not over beating them helps maintain a stable rise. If you like this style of baking, you'll see similar principles in my gluten-free Zucchini recipe, where moisture control is key.
| Problem | Root Cause | Solution |
|---|---|---|
| Gummy center | Under baked or too much fruit | Use a thermometer; bake until 205°F. |
| Crumbly texture | Lack of binder (xanthan gum) | Ensure your flour blend has gum or add 1/2 tsp. |
| Burned crust | Oven too hot or pan is too dark | Tent with foil and use light colored metal pans. |
Common Mistakes Checklist: - ✓ Don't skip the 10 minute rest; it's vital for a smooth texture. - ✓ Avoid using cold eggs; they will seize the melted butter and cause lumps. - ✓ Use a scale for the bananas; "3-4 large" can vary by 100g, which ruins the ratio.
- ✓ Let it cool completely! Slicing while hot releases steam that should stay in the crumb. - ✓ Check your baking soda for freshness by dropping a pinch in vinegar; it should fizz violently.
Creative Ways to Personalize Your Loaf
Scaling this recipe up or down is fairly straightforward, though baking two loaves at once might require a few extra minutes in the oven. If you're doubling the recipe for a bake sale, just make sure you don't overcrowd the oven rack, as this can lead to uneven airflow and "hot spots."
For a budget friendly twist, I often add a handful of toasted walnuts or chocolate chips. If you're looking for a "gluten-free Banana Bread Almond Flour" vibe, you can swap 50g of the GF flour for almond flour.
This adds a lovely buttery fat content and a bit of protein, though the loaf will be slightly shorter and denser. If you want a "gluten-free Oat Flour Banana Bread Recipe" style, using certified gluten-free oat flour adds a wonderful whole grain flavor that reminds me of oatmeal cookies.
If you are out of xanthan gum and your flour blend doesn't have it, don't panic. You can make a "gluten-free Banana Bread Without Xanthan Gum" by adding an extra egg or a tablespoon of ground flaxseed mixed with water. It won't have the exact same "bounce," but it will still be a tasty, comforting snack.
Keeping Your Banana Bread Fresh Longer
Storage Guidelines
Once the loaf is completely cool, wrap it tightly in plastic wrap or store it in an airtight container. At room temperature, it stays moist for about 3 days. After that, I recommend slicing it and storing it in the fridge for up to a week.
The cold will firm up the butter, so I always give a fridge slice 10 seconds in the microwave to bring back that velvety softness.
Freezing and Zero Waste
Banana bread freezes beautifully. I like to freeze individual slices wrapped in parchment and then placed in a freezer bag. They'll stay fresh for up to 3 months. To reheat, just pop a frozen slice directly into the toaster it gets these amazing crispy edges that are honestly better than the fresh loaf!
Zero Waste Tip: If you have banana peels that are starting to look sad, don't toss them! You can actually boil them in water to make a "banana tea" for your houseplants, or compost them to give your garden a potassium boost. If the bread does happen to get too dry, don't throw it out.
Use the cubes to make a gluten-free bread pudding or French toast. It's a brilliant way to stretch your grocery budget.
The Best Ways to Enjoy Your Slice
There is something so simple and perfect about a thick slice of this bread toasted with a bit of salted butter. But if you want to take it to the next level, try a smear of cream cheese or even a drizzle of almond butter.
My favorite way to serve this is with a side of sharp Greek yogurt; the tanginess of the yogurt perfectly cuts through the sweet, spice heavy bread.
If you're feeling fancy, you can whip up a quick maple glaze by mixing powdered sugar with a splash of maple syrup and pouring it over the cooled loaf. It makes the bread look like it’s straight out of a boutique cafe. Regardless of how you eat it, the most important part is the company.
This banana bread recipe gluten-free is meant to be shared, preferably with a hot cup of coffee and a long conversation.
Common Kitchen Myths
Myth: You can't over mix gluten-free batter. While it's true there is no gluten to "toughen," over mixing still incorporates too much air. This leads to a loaf that puffs up like a balloon and then collapses into a sad, dense crater once the air cools.
Mix until just combined for the most reliable results.
Myth: Extra bananas make the bread moister. Actually, adding too many bananas introduces too much moisture and sugar without enough starch to hold it up. This results in the "gummy" texture everyone hates. Stick to the 450g limit for the best balance of flavor and structure.
Myth: You must use expensive flour blends. Not at all! Many store brand gluten-free blends work perfectly as long as they contain a mix of rice flour and starches (like potato or tapioca). The technique like the 10 minute rest is often more important than the brand of flour you buy.
Focus on the method and you'll save plenty of money while still getting professional results.

Recipe FAQs
Can I substitute regular wheat flour for the gluten-free blend?
No, you must use a certified GF blend. Wheat flour contains gluten, which will create an unpleasantly tough and chewy texture in this specific recipe formulation.
How long must the batter rest before baking to prevent grittiness?
Let the batter rest for 10 minutes. This crucial step allows the starches in the gluten-free flours time to fully absorb the available moisture, resulting in a smoother, less gritty crumb structure.
How do I ensure the center is fully cooked without burning the crust?
Check the internal temperature; it must reach 205°F (96°C). Visual checks are unreliable for gluten-free loaves, so using a digital thermometer is the only foolproof way to confirm the starches have set throughout the center.
How to tell if my bananas are ripe enough for this recipe?
Use bananas that are completely black or heavily spotted. The darker the peel, the higher the sugar content, which provides superior moisture retention and natural sweetness to the final loaf.
Is it true that adding more bananas makes the bread moister?
False. Too many bananas lead to a gummy center. While bananas provide essential moisture, exceeding the 450g limit without adjusting the flour ratio results in too much sugar and liquid for the starches to support, causing collapse.
How can I make a dairy-free version of this banana bread?
Substitute the butter with an equal amount of melted coconut oil. This substitution works well for structure and moisture; if you are also avoiding eggs, consider using flax eggs, although the bread will be denser, similar to the structure in our gluten-free Stuffing recipe.
What is the best way to freeze extra baked loaves for later use?
Wrap individual slices tightly, then bag them for freezing. This allows for quick reheating, as you can place a frozen slice directly into a toaster for a crispy, ready-to-eat treat.
gluten-free Banana Bread Moist

Ingredients:
Instructions:
Nutrition Facts:
| Calories | 246 kcal |
|---|---|
| Protein | 2.6g |
| Fat | 8.9g |
| Carbs | 39.5g |
| Fiber | 1.8g |
| Sugar | 17.1g |
| Sodium | 213mg |
