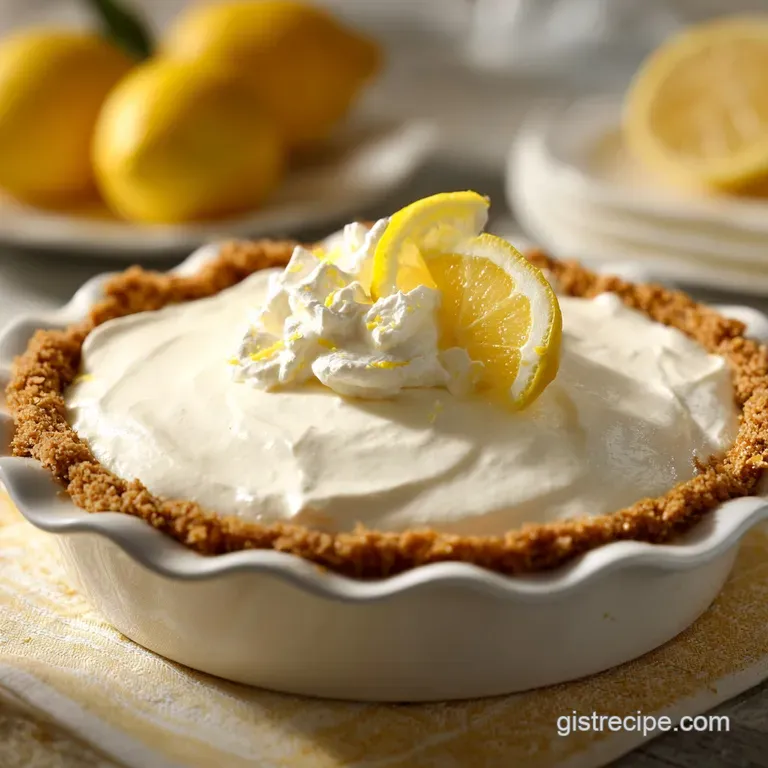
Ultra-Creamy No-Bake Lemon Pie
- Time: Active 15 minutes, Passive 4 hours, Total 4 hours 15 min
- Flavor/Texture Hook: Velvety citrus cream with a buttery, salty sweet shatter crust
- Perfect for: Potlucks, humid summer days, or when you need a high reward dessert with zero cleanup stress
- Create the Ultimate Easy No Bake Lemon Pie
- The Secret of Acid Thickening
- Understanding Your Pie Components
- Your Shopping List and Swaps
- Essential Tools for the Job
- Simple Steps for Perfect Slices
- Fixing Runny or Lumpy Pies
- Clever Ways to Scale Up
- Tasty Tweaks for Unique Flavors
- Debunking Classic No Bake Myths
- Storing and Repurposing Your Pie
- Perfect Sides for Your Dessert
- Recipe FAQs
- 📝 Recipe Card
Create the Ultimate Easy No Bake Lemon Pie
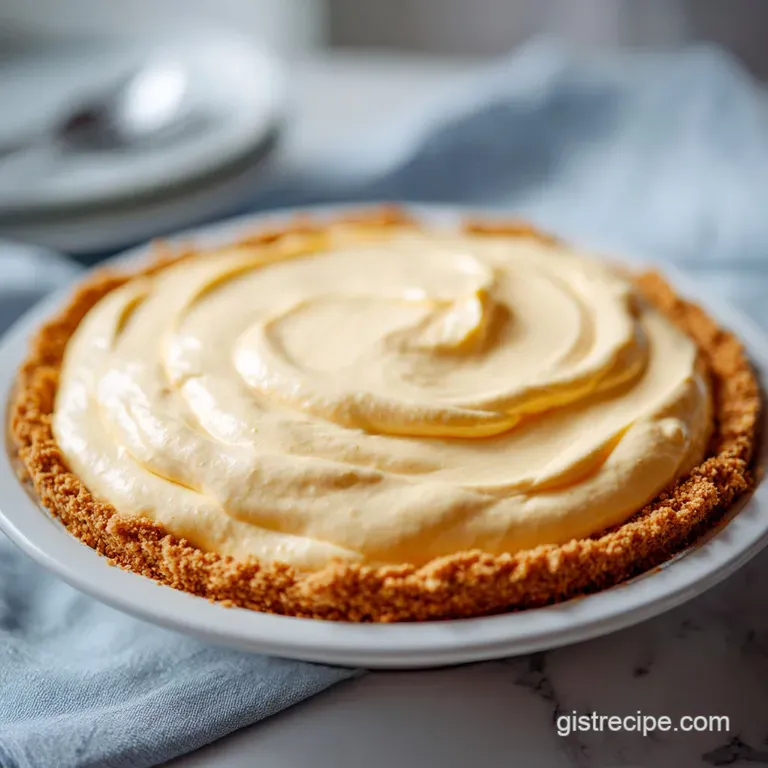
The second that bright, yellow zest hits the cutting board, the whole kitchen smells like a sunny morning in Italy. There is something almost magical about the way a few basic ingredients transform into a velvety, cloud like filling that holds its shape perfectly on a plate.
I remember the first time I made this for a backyard barbecue, I was terrified it would turn into a puddle the moment it hit the humid air. But it stood tall, cutting into clean, sharp triangles that made everyone think I’d spent hours tempering eggs and monitoring a double boiler.
The hero of this story is definitely the fresh lemon juice. While some people reach for the bottled stuff, the "gist" of a truly great lemon dessert lies in that sharp, aromatic punch you only get from hand squeezing the fruit. It doesn't just provide flavor, it actually does the "cooking" for us.
When you whisk that juice into the condensed milk and cream cheese, you can actually feel the mixture thicken under your spatula. It is a satisfying, tactile moment that never gets old, no matter how many times I make it.
You are going to love how the salty crunch of the graham cracker crust plays against the sweet, tangy filling. It’s not just a dessert, it is a mood lifter. We’ve all had those days where the thought of preheating an oven makes us want to order takeout and call it a night.
This easy no bake lemon pie is the answer to those moments. It’s simple, rewarding, and honestly, it tastes like a million bucks without the fussy techniques.
The Secret of Acid Thickening
Instead of using gelatin or eggs to set the filling, we rely on the interaction between the lemon’s citric acid and the proteins in the milk and cheese. This creates a stable structure that stays creamy but firm.
- Protein Denaturation: The citric acid in the 0.5 cup lemon juice causes the proteins in the sweetened condensed milk to bond together, thickening the mixture instantly.
- Fat Stabilization: Using full fat cream cheese provides a structural backbone that prevents the pie from sagging at room temperature.
- Aeration Retention: Folding in the whipped topping introduces tiny air bubbles, giving the pie its signature light and mousselike mouthfeel.
- Cold Setting: The 4 hours of refrigeration allows the fats to re solidify, ensuring every slice comes out clean and beautiful.
| Method | Prep Time | Texture | Result |
|---|---|---|---|
| Fast (No Bake) | 15 minutes | Light, airy, mousse like | Refreshing and cool |
| Classic (Baked) | 55 minutes | Dense, custard like | Rich and heavy |
This comparison shows why the no bake version is such a winner for busy days. You get that bright lemon hit without the density of a traditional baked custard. If you are planning a full Mediterranean themed menu, this pie follows my Greek Lemon Chicken recipe beautifully, keeping the citrus theme going from dinner to dessert.
Understanding Your Pie Components
Using the right ingredients makes a massive difference in how the pie sets and tastes. Let's look at why these specific items are on the list and what they do for your final slice.
| Component | Science Role | Pro Secret |
|---|---|---|
| Sweetened Condensed Milk | Provides sugar and protein for thickening | Use full fat for the best structural "set" |
| Full fat Cream Cheese | Acts as the stabilizing base | Must be completely soft to avoid tiny lumps |
| Fresh Lemon Juice | The primary thickening agent | Squeeze right before using for maximum acidity |
| Graham Cracker Crumbs | Creates the moisture wicking base | Press firmly to prevent a crumbly mess |
One mistake I made early on was trying to use "light" or whipped cream cheese. It just doesn't have the fat content needed to hold up the heavy condensed milk. Stick to the brick style, and make sure it sits on your counter for at least an hour before you start.
If you’re in a rush, you can pop the unwrapped block in the microwave for 10-15 seconds, but be careful not to actually melt it.
Your Shopping List and Swaps
To get started, you'll need these exact amounts. I’ve included some budget friendly swaps that won't ruin the texture of your easy no bake lemon pie.
- 1.5 cups (150g) Graham cracker crumbs
- Substitute: Crushed digestive biscuits or vanilla wafers. Why this? They provide the same dry, sandy texture needed for a firm crust.
- 0.33 cup (67g) Granulated sugar
- Substitute: Light brown sugar. Why this? Adds a slight molasses note that pairs well with butter.
- 6 tbsp (85g) Unsalted butter, melted
- Substitute: Salted butter (just omit the extra pinch of salt). Why this? Fat binds the crumbs together into a solid shell.
- 1 pinch (1g) Fine sea salt
- 14 oz (397g) Sweetened condensed milk
- 8 oz (226g) Full fat cream cheese, softened
- 0.5 cup (120ml) Freshly squeezed lemon juice
- 1 tbsp (6g) Fresh lemon zest, finely grated
- 1 tsp (5ml) Pure vanilla extract
- 2 cups (475ml) Whipped topping or heavy cream whipped to stiff peaks
- Substitute: Homemade stabilized whipped cream. Why this? Provides the "lift" and fluffiness to the filling.
Chef's Tip: Freeze your butter for 10 minutes before melting it. I know it sounds counterintuitive since we are melting it anyway, but it actually helps the milk solids stay more integrated, which makes for a sturdier crust that doesn't get greasy.
Essential Tools for the Job
You don't need a professional pastry kitchen to pull this off, but a few specific tools will make the process much smoother. I personally love using a flat bottomed measuring cup to press the crust.
It gets into the corners of the pie plate way better than your fingers ever could, and it ensures the base is even so you don't end up with thick "clumps" of graham cracker in one bite and nothing in the next.
A microplane or a very fine grater is also a must have for the zest. You want tiny, aromatic flecks, not long strings of bitter peel. When zesting, only take the yellow part; the white pith underneath is incredibly bitter and can ruin the delicate sweetness of the filling.
Also, an electric hand mixer (like a KitchenAid or Cuisinart) is your best friend here. It ensures the cream cheese is perfectly aerated, which is the secret to that velvety texture we’re after.
If you don't have a citrus juicer, you can use a sturdy fork. Twist it inside the lemon halves to break up the juice membranes, but make sure you pour the juice through a fine mesh sieve. There is nothing worse than biting into a smooth lemon pie and hitting a stray seed.
Simple Steps for Perfect Slices
- Mix the crust: In a medium bowl, combine the 1.5 cups graham cracker crumbs, 0.33 cup sugar, pinch of salt, and 6 tbsp melted butter. Stir until the mixture resembles wet sand.
- Form the base: Pour the mixture into a 9 inch deep dish pie plate. Press the crumbs firmly into the bottom and up the sides using a flat bottomed cup.
- Freeze the shell: Place the crust in the freezer for 10 minutes. Note: This locks the butter in place so the crust doesn't crumble when you pour the filling in.
- Cream the cheese: In a large bowl, beat the 8 oz softened cream cheese with a hand mixer until completely smooth. Look for a silky, lump free texture before adding anything else.
- Add the milk: Slowly pour in the 14 oz sweetened condensed milk while beating on medium speed. Stop and scrape the sides of the bowl to ensure it is fully integrated.
- Incorporate citrus: Add the 0.5 cup lemon juice, 1 tbsp zest, and 1 tsp vanilla. Beat until you see the mixture visibly thicken as the acid reacts.
- Fold in fluff: Gently fold in the 2 cups whipped topping using a rubber spatula. Use a "cut and turn" motion to keep the air in the mixture.
- Fill the pie: Pour the filling into the chilled crust and smooth the top with your spatula.
- The long chill: Refrigerate for at least 4 hours. The pie is ready when the center doesn't jiggle when you gently shake the plate.
| Serving Size | Ingredient Adjustments | Pan Size | Cook (Set) Time |
|---|---|---|---|
| 4 People | Half all ingredients (use 4 oz cheese) | 6 inch pan | 3 hours |
| 8 People | Standard recipe as listed | 9 inch pan | 4 hours |
| 16 People | Double all ingredients (2 batches) | Two 9 inch pans | 4 hours |
Fixing Runny or Lumpy Pies
One of the biggest heartbreaks is pulling a pie out after 4 hours only to find it's still "soupy." This usually happens if the lemon juice wasn't acidic enough or if the cream cheese was too cold. If your pie is runny, don't panic.
You can sometimes save it by popping it into the freezer for an hour to firm up the fats, though it will have a more "icebox" texture.
Why Your Filling Is Lumpy
If you see tiny white specks in your lemon mixture, it means the cream cheese wasn't soft enough when you started. Once the cold condensed milk hits cold cheese, those lumps are there to stay. To prevent this, always beat the cheese alone first until it looks like frosting.
Why Your Crust Is Crumbly
A crust that shatters into a pile of sand usually needs just a tiny bit more "glue." If your crumbs feel too dry, add an extra tablespoon of melted butter. Also, the 10 minute freezer stint is non negotiable it acts like a "flash set" for the butter.
| Problem | Root Cause | Solution |
|---|---|---|
| Liquid filling | Not enough lemon juice | Ensure you use exactly 0.5 cup of fresh juice |
| Greasy crust | Butter was too hot | Let melted butter cool slightly before mixing |
| Soggy base | Filling added too fast | Always freeze the crust for 10 mins first |
Common Mistakes Checklist
- ✓ Soften cream cheese for at least 60 minutes at room temperature
- ✓ Use fresh lemons; bottled juice often lacks the necessary acidity levels
- ✓ Press the graham cracker crumbs as hard as possible into the pan
- ✓ Fold the whipped topping by hand to avoid deflating the air bubbles
- ✓ Allow the full 4 hours of chill time; rushing it leads to messy slices
Clever Ways to Scale Up
If you're hosting a big party and need to double the recipe, it’s pretty straightforward. However, when doubling the filling, only increase the vanilla and salt by 1.5 times rather than a full 2x. This keeps the flavors balanced so the vanilla doesn't overwhelm the bright lemon notes.
If you find yourself with a massive amount of filling, you can also make mini "pie jars" using small mason jars and leftover crumbs.
When scaling down for a "date night" dessert, you can use a smaller 6 inch springform pan. Since the volume is lower, the pie will actually set a bit faster usually in about 3 hours.
Just remember that if you're using a smaller pan, you want to keep the crust thickness the same, so you might end up with a little extra graham cracker mix left over.
For a larger gathering where you want a different vibe, you might also consider making my No Bake Strawberry Cheesecake alongside this lemon version. They use similar techniques, and the pink and yellow color combo looks stunning on a dessert table.
Tasty Tweaks for Unique Flavors
If you want to move beyond the classic version, there are so many ways to play with the flavor profile. I love adding a "Berry Swirl" by dropping spoonfuls of raspberry jam onto the top of the filling before it sets and using a toothpick to create marbled patterns. It looks professional and adds a nice tart contrast.
- The Lime Swap: Replace the lemon juice and zest with lime for a "pseudo" Key Lime pie that is much easier than the traditional baked version.
- Ginger Crust: Swap half of the graham cracker crumbs for crushed gingersnap cookies. The spice of the ginger is incredible against the tart lemon.
- White Chocolate Drizzle: Melt some white chocolate chips and drizzle them over the top once the pie is set. It adds a luxurious sweetness.
If you are looking for a lower sugar profile, you can find sugar-free sweetened condensed milk, though the texture might be slightly less "syrupy." I honestly think the classic version is worth the splurge, but a little extra lemon zest can also help cut through the sweetness if you prefer a more puckering finish.
Debunking Classic No Bake Myths
A lot of people think you have to use gelatin for a no bake pie to stand up. That is simply not true! The chemical reaction between the acid and the milk protein is more than enough. In fact, gelatin can often give these pies a "rubbery" texture that isn't very pleasant.
By sticking to the lemon juice method, you get a creamy, melt in-your mouth feel that is far superior.
Another myth is that you can't use real heavy cream instead of whipped topping. You absolutely can, but you have to whip it to very stiff peaks first. Whipped topping contains stabilizers that help the pie stay firm for days, whereas fresh whipped cream might start to "weep" or lose volume after 24 hours.
If you’re eating the whole pie in one go, use the fresh cream! If you need it to last, the whipped topping is the safer bet.
Finally,, some say you can't freeze a no bake pie. You totally can! It actually turns into a delicious frozen "icebox cake" texture. Just let it sit on the counter for about 15 minutes before you try to slice it, or you'll be fighting the crust.
Storing and Repurposing Your Pie
This easy no bake lemon pie keeps beautifully in the fridge for up to 4 days. Just make sure to cover it loosely with plastic wrap or foil so it doesn't pick up any "fridge smells" like onions or garlic.
If you find the crust getting a bit soft on day three, that’s normal it’s just absorbing some of the moisture from the filling.
For long term storage, you can freeze this pie for up to 2 months. Wrap it tightly in two layers of plastic wrap and then a layer of foil. To thaw, just move it to the fridge the night before you want to serve it. It stays remarkably stable through the freezing and thawing process.
Zero Waste Tip: If you have leftover lemon peels after zesting and juicing, don't toss them! Put them in a jar of white vinegar for two weeks to create a natural, lemon scented kitchen cleaner.
Or, if you have extra graham cracker crust mix, sprinkle it over yogurt or vanilla ice cream for a "deconstructed pie" snack the next day.
Perfect Sides for Your Dessert
While this pie is a star on its own, a few simple additions can make it feel even more special. A pile of fresh, macerated blueberries or raspberries on top adds a pop of color and a fresh, juicy texture that balances the creamy filling.
I like to toss the berries with a teaspoon of sugar and a squeeze of lemon juice about 10 minutes before serving.
A dollop of extra whipped cream this time unsweetened can also help balance the richness of the condensed milk. If you’re feeling fancy, a few sprigs of fresh mint add a beautiful green contrast and a refreshing aroma that hits you right before you take a bite.
Trust me, once you master this basic technique, you'll be the person everyone asks to bring dessert to every event. It is just so reliable and consistently satisfying. Whether you’re serving it after a heavy meal or as a mid afternoon treat with a cup of tea, it never fails to impress.
Enjoy every zingy, creamy bite!

Recipe FAQs
Is it true I must bake the crust for it to hold together?
No, this is a common misconception. You can achieve a sturdy base by pressing the crumb mixture firmly into the plate with a measuring cup and chilling it in the freezer for 10 minutes to stabilize the butter.
How to ensure the filling reaches a thick, stable consistency?
Beat the lemon juice into the sweetened condensed milk thoroughly. The citric acid triggers a chemical reaction with the milk proteins that causes the mixture to thicken, similar to how we manage fat ratios in our moist banana bread to achieve the perfect crumb structure.
Can I use bottled lemon juice instead of fresh?
No, stick with fresh. Bottled versions often contain additives that alter the flavor profile and may prevent the filling from thickening properly due to inconsistent acidity levels.
How to tell when the cream cheese is soft enough to mix?
Press the block gently with your finger; it should indent easily with no resistance. Using room temperature cream cheese is critical to ensure it becomes completely smooth and lump free before adding the other ingredients.
How to prevent the pie from picking up other scents in the refrigerator?
Cover the pie loosely with plastic wrap or foil. Because the filling is delicate, it acts like a magnet for strong odors, so a protective barrier is essential for maintaining a clean, fresh lemon taste.
Is it possible to freeze the pie for later?
Yes, the pie freezes beautifully for up to 2 months. Wrap it tightly in two layers of plastic wrap and one layer of foil to prevent ice crystals from forming on the surface.
How to thaw a frozen pie without ruining the texture?
Move the pie from the freezer to the refrigerator the night before serving. This slow, controlled transition prevents the filling from weeping and keeps the graham cracker crust from becoming overly soggy.
Easy No Bake Lemon Pie
Ingredients:
Instructions:
Nutrition Facts:
| Calories | 550 kcal |
|---|---|
| Protein | 7.7 g |
| Fat | 35.5 g |
| Carbs | 52.3 g |
| Fiber | 0.6 g |
| Sugar | 40.1 g |
| Sodium | 150 mg |
