Crispy Roasted Mini Potatoes
- Time: Active 5 minutes, Passive 25 minutes, Total 30 minutes
- Flavor/Texture Hook: Shatteringly crispy skins with a vibrant, smoky herb finish.
- Perfect for: High energy weeknight dinners or a bold, crowd-pleasing holiday side.
- Golden Crispy Mini Potatoes With Garlic and Herbs
- Why the Cut Side Down Technique Always Wins
- Precise Metrics for Flawless Golden Brown Results
- Essential Ingredients for Bold and Vibrant Flavor
- Kitchen Tools for Achieving Maximum Textural Contrast
- Step-by-Step Guide to Shatteringly Crisp Results
- Solving Common Texture Issues and Roasting Errors
- Creative Flavor Twists and Simple Ingredient Swaps
- Smart Storage Solutions and Leftover Transformation Hacks
- Vibrant Side Dishes to Pair With This Recipe
- Recipe FAQs
- 📝 Recipe Card
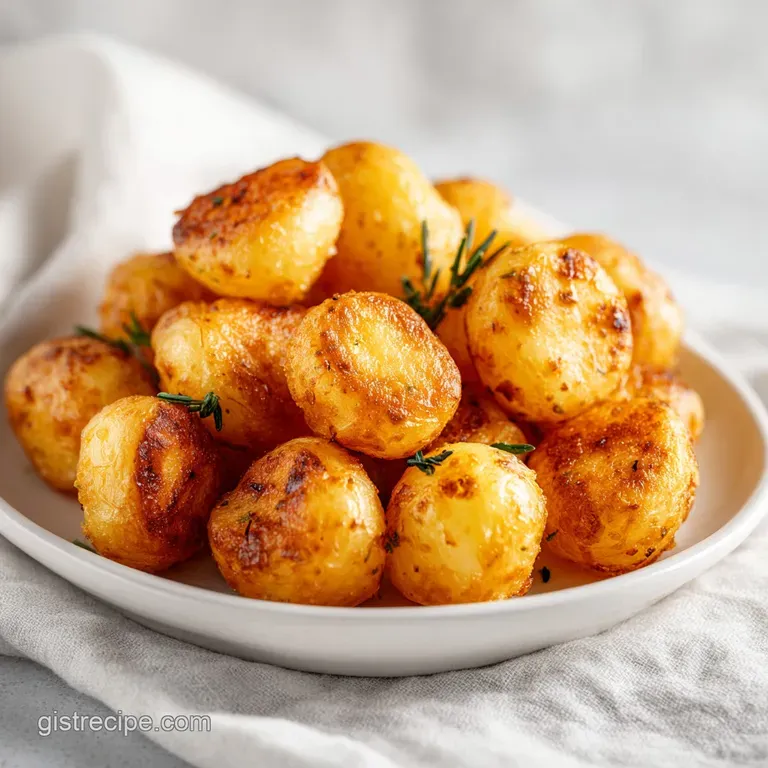
Golden Crispy Mini Potatoes With Garlic and Herbs
The first time I truly understood the power of a baby Yukon Gold, I wasn't in a fancy restaurant; I was standing over a battered rimmed baking sheet in my own kitchen, listening to the high pitched hiss of hot oil. There is a specific sensory magic that happens when a cold, starch heavy potato hits a preheated pan.
It is a bold, transformative sizzle that promises a textural contrast most side dishes can only dream of. I used to just toss them in a bowl and hope for the best, but those days of "ordinary" spuds are long gone.
We are looking for that specific, vibrant amber hue that only comes from direct metal to vegetable contact. If you’ve ever pulled a tray of Mini Potatoes out of the oven only to find them pale and sad, you likely missed the secret of the "seal." We aren't just baking these; we are shallow frying them in the oven's intense heat.
The aroma of smoked paprika and rosemary hitting the garlic in those final five minutes is enough to bring anyone running to the kitchen.
Today, we are moving past the bland and the plain. This isn't just a recipe; it’s a lesson in how to transform a humble root vegetable into the star of the plate. We’re talking about a skin so crisp it crackles, and an interior so creamy it mimics the texture of high fat butter.
Grab your heaviest sheet pan, and let’s get into why this specific method is the only way you should ever roast a small potato again.
Why the Cut Side Down Technique Always Wins
Starch Concentration: Slicing the potato in half exposes the internal starch, which, when pressed against a hot, oiled surface, undergoes a rapid browning process that creates a thick, structural crust.
Moisture Trap: The flat surface creates a temporary seal against the pan, forcing the internal moisture to stay inside the potato skin, effectively steaming the flesh from the inside out.
Conductive Heat: Metal is a far better conductor of heat than air; by maximizing pan contact, we ensure the heat transfers directly into the potato for a more intense, uniform crunch.
Fat Emulsification: As the potato releases a tiny amount of water during the roast, it mixes with the olive oil to create a micro emulsion that bastes the skin, resulting in a vibrant, glossy finish.
| Method | Time | Texture | Best For |
|---|---|---|---|
| Stovetop Sauté | 20 minutes | Patchy browning | Small, single person batches |
| Traditional Roast | 45 minutes | Chewy, thick skin | Large, whole potatoes |
| over High heat Oven | 30 minutes | Shatteringly crisp | Feeding 4 with maximum crunch |
There is a significant difference between a potato that is simply "cooked" and one that has been thermally transformed. While the stovetop is fast, it lacks the 360 degree convection of a hot oven, which is why the over high heat oven method remains the gold standard for that bold, vibrant color we crave.
| Ingredient | Science Role | Pro Secret |
|---|---|---|
| Mini Potatoes | Starch Source | Use waxy varieties like Dutch Yellow for a velvety interior that won't turn grainy. |
| Olive Oil | Heat Medium | Don't skimp; the oil acts as a frying medium on the pan surface to ensure even browning. |
| Fine Sea Salt | Moisture Drawer | Fine grains dissolve faster into the oil, drawing out surface moisture to speed up the crisping. |
| Smoked Paprika | Flavor Catalyst | The oil soluble compounds in paprika bloom in the oven, providing a bold, vibrant amber tint. |
Precise Metrics for Flawless Golden Brown Results
To achieve the results we’re after, we need to treat the oven like a laboratory but the flavors like a festival. Accuracy in your measurements ensures that every single potato half finishes with the same level of crunch.
If you cut some smaller than others, you’ll end up with a mix of burnt bits and mushy centers.
- 1.5 lbs mini potatoes: This weight is the "sweet spot" for a standard rimmed baking sheet. Any more, and you risk overcrowding, which leads to steaming rather than roasting.
- 220°C (425°F): This is the critical temperature. Anything lower and the skins will become leathery before the starch can properly brown.
- Lengthwise Slicing: Always cut along the longest axis. This maximizes the surface area touching the pan, giving you more of that "fried" crust per bite.
Essential Ingredients for Bold and Vibrant Flavor
- 1.5 lbs mini potatoes: Dutch Yellow, Baby Yukon Gold, or Fingerling. Why this? These waxy varieties hold their shape and offer a naturally buttery flavor profile.
- Substitute: Red bliss potatoes work, but they are slightly less creamy.
- 2 tbsp extra virgin olive oil: high-quality oil with a decent smoke point. Why this? It provides the fat necessary for the conductive heat transfer and rich mouthfeel.
- Substitute: Avocado oil for a more neutral flavor or melted duck fat for indulgence.
- 1 tsp fine sea salt: Essential for seasoning and texture. Why this? Small crystals coat the potatoes more evenly than bulky kosher salt flakes.
- Substitute: Table salt (use slightly less) or Pink Himalayan salt.
- 1/2 tsp freshly cracked black pepper: For a sharp, bold bite. Why this? Pre ground pepper loses its volatile oils; fresh cracking adds a vibrant punch.
- Substitute: White pepper for a more subtle, earthy heat.
- 3 cloves garlic, minced: Added late to prevent burning. Why this? Garlic provides the essential aromatic backbone that makes these potatoes irresistible.
- Substitute: 1 tsp garlic powder (toss at the beginning instead).
- 1 tsp dried rosemary or thyme: Earthy aromatics. Why this? Dried herbs withstand the high heat better than fresh ones during the final roasting stage.
- Substitute: Fresh herbs, but chop them very finely so they don't burn.
- 1/2 tsp smoked paprika: For color and depth. Why this? It adds a vibrant red hue and a hint of campfire smoke that elevates the dish.
- Substitute: Sweet paprika or a pinch of chipotle powder for extra heat.
- 2 tbsp grated Parmesan cheese: The optional salty finish. Why this? It creates a lacy, umami rich crust when it hits the hot pan.
- Substitute: Pecorino Romano or nutritional yeast for a vegan twist.
Kitchen Tools for Achieving Maximum Textural Contrast
You don't need a pantry full of gadgets, but the quality of your pan is non negotiable here. A thin, flimsy baking sheet will warp at 220°C, causing your oil to pool in the corners and leaving half your potatoes dry and the other half greasy.
I highly recommend a heavy duty, commercial grade aluminum half sheet pan. It distributes heat with incredible precision, ensuring that the potato in the middle of the pan is just as crispy as the one on the edge.
A large stainless steel or glass mixing bowl is also vital. You want enough room to aggressively toss the potatoes. If the bowl is too small, you won’t get an even coat of oil and paprika, leading to "bald" spots on your potatoes that won't brown correctly. Finally, a sharp chef's knife is your best friend here.
Clean, straight cuts mean more surface area is in direct contact with the metal, which is the secret to that "shatter" effect we are chasing.
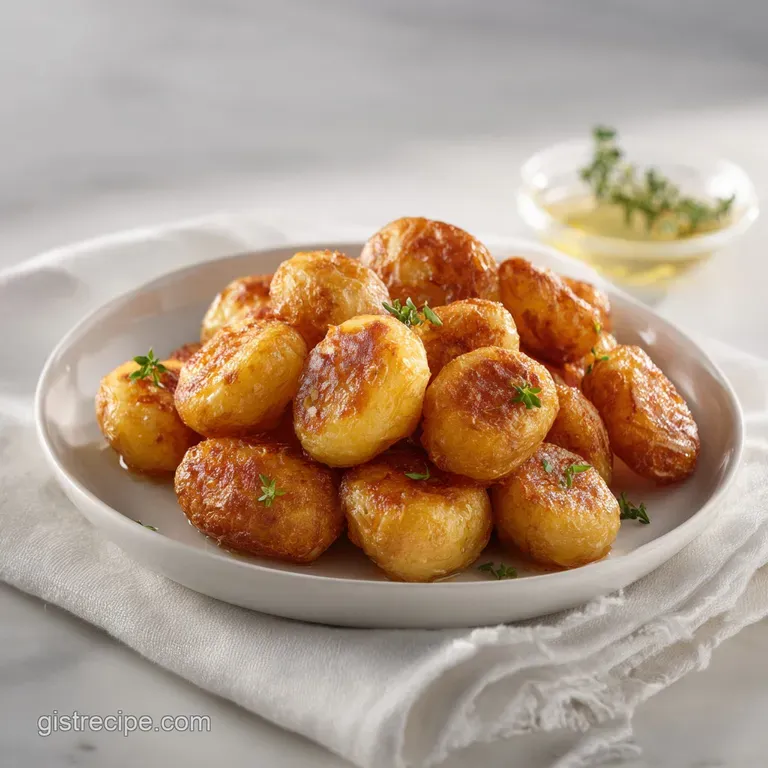
step-by-step Guide to Shatteringly Crisp Results
- Preheat the oven to 220°C (425°F). Note: This ensures the pan is hot the moment the potatoes hit the surface.
- Wash and thoroughly dry the mini potatoes. Note: Surface moisture is the enemy of crispiness; use a clean kitchen towel.
- Slice each potato exactly in half lengthwise. Do this until you have a mountain of uniform, flat sided spuds.
- Toss the halved potatoes in a large bowl with olive oil, salt, pepper, and smoked paprika. Stir until the potatoes look vibrant and orange.
- Arrange the potatoes on the baking sheet, placing every single one strictly cut side down. Ensure they are not touching to allow air circulation.
- Roast for 20 minutes until you hear a faint sizzling sound and the edges look dark.
- Remove the tray and quickly sprinkle with minced garlic, dried herbs, and Parmesan. Don't flip them yet!
- Return to the oven for 5-10 minutes until the bottoms are a deep, bold golden brown.
- Rest for 2 minutes on the pan. This allows the crust to "set" so it doesn't stick to the metal.
- Scrape them off the pan with a metal spatula and serve immediately while they still crackle.
Solving Common Texture Issues and Roasting Errors
Why Your Mini Potatoes Are Soft
If your spuds come out looking more like they were boiled than roasted, the culprit is almost always steam. This happens when the potatoes are still wet from washing or when the pan is overcrowded.
When potatoes are too close together, the moisture they release has nowhere to go, so it hangs around and softens the skins.
| Problem | Root Cause | Solution |
|---|---|---|
| Soggy Bottoms | Overcrowded pan | Use two sheets or roast in batches to allow air to flow. |
| Burnt Garlic | Added too early | Only add fresh garlic in the last 5-10 minutes of roasting. |
| Tough Skins | Temperature too low | Ensure your oven is at a true 220°C; use an oven thermometer. |
If you're dealing with a particularly stubborn batch that won't crisp up, you might be tempted to just keep roasting them. Don't do it! You'll end up with hollow, dry interiors. Instead, try a quick decision based on your current situation: If you want maximum crunch, move the rack to the bottom third of the oven.
If you want a more velvety finish, toss them with a tablespoon of melted butter right after they come out. If you're in a massive rush, you can par boil the halves for 5 minutes before roasting, though this changes the texture of the crust.
Common Mistakes Checklist
- ✓ Never skip the drying step; use a paper towel if necessary to get them bone dry.
- ✓ Avoid using a silicone mat; direct metal contact is required for the best crust.
- ✓ Don't use a glass baking dish; glass doesn't conduct heat fast enough for this "fry" effect.
- ✓ Check your paprika; if it's over six months old, it won't provide that vibrant color.
- ✓ Always place the cut side down; roasting them skin side down results in a chewy, leathery texture.
Creative Flavor Twists and Simple Ingredient Swaps
While the garlic and rosemary combo is a classic, the Mini Potatoes framework is a playground for bold flavor experimentation. If you want something more "Mediterranean," swap the rosemary for dried oregano and finish with a squeeze of fresh lemon and a crumble of feta.
The acidity of the lemon cuts through the rich oil perfectly.
For a more "vibrant" Mexican inspired side, use chili powder instead of paprika and toss the finished potatoes with fresh cilantro and a dusting of Cotija cheese. If you crave a different profile, my Garlic Parmesan Potatoes recipe is a bold alternative that leans even harder into the salty, savory crust.
Smart Storage Solutions and Leftover Transformation Hacks
Roasted potatoes are always best the moment they leave the oven, but life happens. If you have leftovers, store them in an airtight container in the fridge for up to 4 days. Whatever you do, do not use the microwave to reheat them.
The microwave will turn that glorious, shatteringly crisp skin into a rubbery, sad mess. Instead, throw them back into a hot skillet with a tiny drop of oil for 5 minutes, or use a toaster oven.
Zero Waste Tip: If you have just a handful of potatoes left, they make an incredible base for a breakfast hash. Chop them into smaller cubes and fry them up with some onions and peppers, then top with a fried egg. The pre roasted centers will be incredibly creamy against the fresh vegetables.
You can also freeze these for up to 2 months. To reheat from frozen, pop them directly into a 200°C oven until they sizzle again.
Vibrant Side Dishes to Pair With This Recipe
These potatoes are a bold addition to any plate, but they shine brightest when paired with proteins that have a bit of "juice" or sauce. A perfectly seared steak or a roasted chicken allows the creamy centers of the potatoes to soak up the meat juices, while the crispy skins maintain their integrity.
If you're looking for something lighter, they pair beautifully with a zesty arugula salad topped with a sharp vinaigrette.
For those looking for a different texture entirely on the table, you might want to consider my Easy Creamy Mashed Potatoes if you're serving a larger crowd that appreciates variety. Having both a crispy and a velvety potato option is a surefire way to make your meal feel like a professional feast. Trust me, once you master the cut side down roast, you'll find yourself reaching for that bag of mini potatoes every single time you head to the store.

Recipe FAQs
What are the tiny potatoes called?
They are commonly known as baby potatoes, though you may also see them labeled as Dutch Yellow, Baby Yukon Gold, or Fingerling potatoes. These varieties are naturally small and creamy, making them ideal for roasting whole or halved.
Can you eat potatoes with diabetes?
Yes, but portion control and preparation methods are key for blood sugar management. Because potatoes are a starch, serving them alongside a fiber rich side like crispy fried cabbage can help balance the overall meal glycemic load.
How to cook miniature potatoes?
Preheat your oven to 425°F (220°C) and slice each potato exactly in half lengthwise. Toss the halves with olive oil, salt, pepper, and smoked paprika, then arrange them cut-side down on a baking sheet to roast for 20 minutes before adding garlic and herbs for a final 5-10 minute blast.
Are potatoes ok for heart patients?
Yes, potatoes are a nutrient dense whole food that fits into a heart healthy diet when prepared without excessive saturated fats. Roasting them with extra virgin olive oil and fresh herbs provides plenty of flavor without relying on heavy butter or excessive sodium.
Is it true that the skins should be removed before roasting?
No, this is a common misconception. The skins of mini potatoes are thin and tender; leaving them on adds texture and helps keep the potato intact during the high heat roasting process.
How to ensure the potatoes get crispy bottoms?
Arrange the potatoes strictly cut-side down on the baking sheet to maximize pan contact. Ensuring the potatoes are completely dry before tossing them in oil is also critical, as any residual surface moisture will steam the potatoes rather than allowing them to brown.
How to prevent the garlic from burning in the oven?
Add the minced garlic only during the final 5-10 minutes of roasting. If you add the garlic at the beginning, the high heat required for roasting will likely scorch it, turning the flavor bitter before the potatoes are fully tender.
Crispy Roasted Mini Potatoes

Ingredients:
Instructions:
Nutrition Facts:
| Calories | 205 kcal |
|---|---|
| Protein | 4.5 g |
| Fat | 7.8 g |
| Carbs | 31 g |
| Fiber | 3.8 g |
| Sugar | 1.4 g |
| Sodium | 595 mg |
