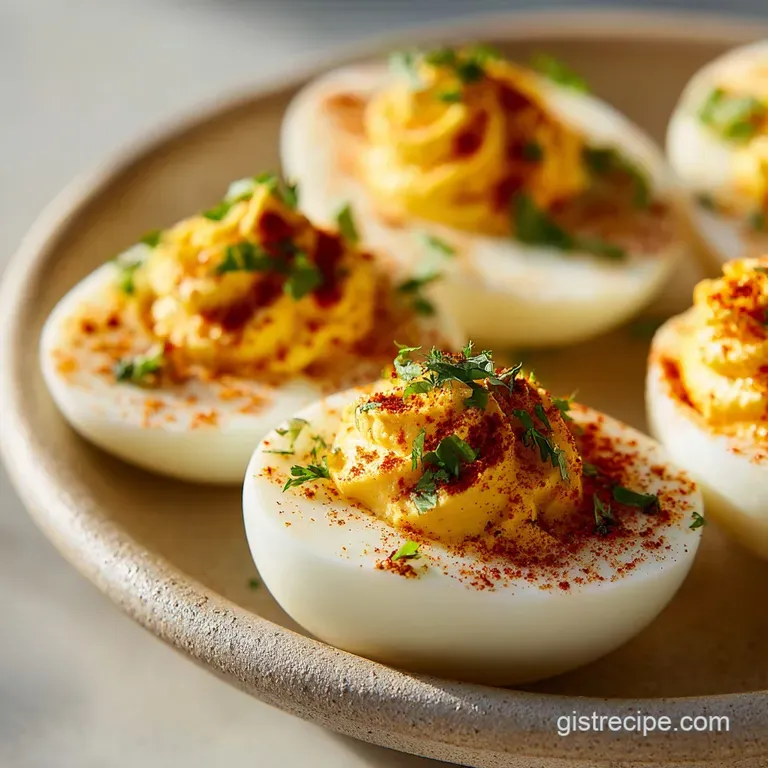
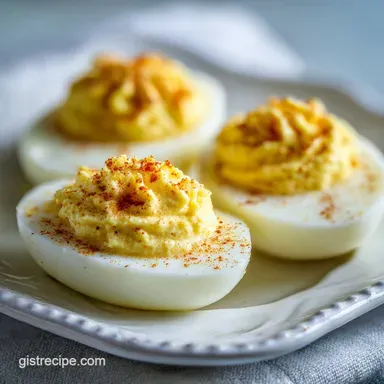
Classic Deviled Eggs
- Time: Active 15 mins, Passive 12 mins, Total 27 mins
- Flavor/Texture Hook: A velvety, mustard spiked filling nestled in a firm, snappy egg white.
- Perfect for: Holiday gatherings, budget-friendly potlucks, or a simple high protein snack.
- The Secrets to Crafting the Best Deviled Eggs Recipe
- Crucial Timing for the Perfect Creamy Center
- Selecting Simple Elements for Maximum Flavor Impact
- Essential Tools for a Smooth Filling Process
- Mastering the Step-by-Step Deviled Eggs Method
- Solving Common Issues for Flawless Egg Halves
- Creative Variations for Every Occasion and Palate
- Smart Storage Solutions to Keep Eggs Fresh
- Elegant Finishing Touches for a Stunning Platter
- Recipe FAQs
- 📝 Recipe Card
The Secrets to Crafting the Best Deviled Eggs Recipe
I remember my first attempt at making these for a backyard BBQ. I spent forty minutes hunched over the sink, picking tiny shards of shell off mangled egg whites that looked like they'd been through a paper shredder. It was frustrating and, frankly, a waste of good eggs.
But after a few dozen batches and a lot of trial and error, I realized that the "perfect" egg isn't about luck. It is about understanding the simple chemistry of the shell and the yolk.
When you crack into a well made egg, you should hear that clean snap of the white, followed by the richness of a filling that isn't just mayo, but a balanced emulsion of fat and acid. We aren't aiming for a rubbery puck here. We want something that feels luxurious but costs pennies to make.
Trust me, once you stop treating the boiling process like an afterthought, you'll never go back to those store-bought, bland versions again.
The Science of the Easy Peel
The pH Shift: As eggs age, their pH level rises, which weakens the bond between the inner shell membrane and the egg white. Using eggs that have sat in your fridge for at least a week ensures the shell slips off in one or two large pieces rather than sticking.
Crucial Timing for the Perfect Creamy Center
Getting the texture right is all about the clock. If you undercook them, the yolks are jammy and won't mash into a smooth paste. Overcook them, and you get that unappetizing grey green ring caused by a reaction between the iron in the yolk and the sulfur in the white.
We want a bright, sunshine yellow center that crumbles easily when pressed with a fork.
| Boil Time | Yolk Texture | Best For | Visual Cue |
|---|---|---|---|
| 7 minutes | Jammy/Soft | Ramen topping | Liquid gold center |
| 10 minutes | Custardy | Salad topper | Slightly soft middle |
| 12 minutes | Fully Set | Deviled eggs | Chalky, pale yellow |
| 15 minutes | Overdone | Egg salad | Greenish outer ring |
Finding that sweet spot at 12 minutes is the goal for this specific recipe. It provides enough structure to hold the filling without turning the white into a bouncy ball. If you're using extra large eggs, you might need to add an extra minute, but for standard large eggs, twelve is the magic number.
Selecting Simple Elements for Maximum Flavor Impact
You don't need truffle oil or expensive garnishes to make these stand out. The beauty of a budget smart kitchen is using pantry staples like Dijon mustard and apple cider vinegar to mimic higher end flavors.
The vinegar provides a sharp brightness that cuts right through the heavy fat of the mayonnaise, making the whole bite feel lighter than it actually is.
| Ingredient | Science Role | Pro Secret |
|---|---|---|
| Large Eggs | Structural Base | Use week old eggs for easier peeling. |
| Mayonnaise | Primary Emulsifier | Full fat provides a much silkier mouthfeel than light versions. |
| Dijon Mustard | Tang & Depth | The wine base in Dijon adds a complex "gourmet" note. |
| Smoked Paprika | Aromatic Finish | Smoked is better than sweet to add a faux bacon depth. |
For the foundation, we are using six large eggs. It’s a manageable amount for a small gathering and fits perfectly in a standard medium saucepan. If you try to crowd twelve eggs into a small pot, they’ll knock against each other and crack prematurely, leaking whites into the water.
For the Velvety Filling
The filling is where the magic happens. We’re using 1/4 cup (60g) of mayonnaise as our base. Don't be tempted to swap this for salad dressing; the flavor profile is too sweet and will ruin the balance.
The 1 tsp (5g) of Dijon mustard adds a necessary bite, while the 1 tsp (5ml) of apple cider vinegar provides the acidity needed to lift the flavors.
Essential Tools for a Smooth Filling Process
You don't need a fancy piping kit to make these look professional. In fact, a simple zip top bag with the corner snipped off often gives you more control than a stiff plastic nozzle.
The most important tool in your kit for this recipe is actually a fine mesh sieve if you want that truly velvety, restaurant style texture. Pushing the yolks through a sieve removes every single lump before you even add the wet ingredients.
Chef's Tip: If you don't have a piping bag, use two small spoons to "quenelle" the filling. It creates a rustic, mounded look that holds onto the paprika and chives much better than a flat surface.
Another trick I've learned is to use a damp paper towel under your cutting board. It keeps everything stable while you're trying to slice those slippery eggs perfectly in half. There is nothing worse than a knife slipping and tearing the delicate white of your best looking egg.
Mastering the step-by-step Deviled Eggs Method

1. Boil the Foundation
Place 6 large eggs in a medium saucepan and cover with 1 quart of water. Add 1 tsp of salt to the water. Note: Salt doesn't help with peeling, but it helps the whites coagulate faster if a shell happens to crack. Bring to a rolling boil over high heat.
2. The Timed Simmer
As soon as the water reaches a boil, turn off the heat and cover the pan with a tight fitting lid. Let the eggs sit in the hot water for exactly 12 minutes. Wait until the timer beeps before moving them.
3. The Thermal Shock
Prepare a bowl with ice and cold water while the eggs cook. Transfer the eggs immediately to the ice bath for at least 10 minutes. Note: This "shocks" the egg, stopping the cook and shrinking the protein away from the shell.
4. The Clean Peel
Gently tap the eggs on a hard surface to crack the shell all over. Peel under cool running water or submerged in the ice bath. Expect the shell to slip off in large, satisfying sections.
5. Slice and Separate
Pat the eggs dry with a paper towel. Slice them lengthwise with a sharp, non serrated knife. Gently pop the yolks into a small mixing bowl using a finger or a small spoon, being careful not to tear the whites.
6. Create the Emulsion
Mash the yolks with a fork until they look like fine sand. Add 1/4 cup (60g) mayonnaise, 1 tsp (5g) Dijon mustard, 1 tsp (5ml) apple cider vinegar, 1/8 tsp sea salt, and 1/8 tsp black pepper. Whisk until the mixture is silky and pale.
7. Fill the Cavities
Transfer the filling to a piping bag or a plastic bag with the corner cut off. Pipe the mixture into the hollows of the egg whites. Mound the filling slightly above the rim for a generous look.
8. The Final Flourish
Dust the tops with 1/2 tsp smoked paprika. Sprinkle 1 tbsp of finely minced chives over the eggs. Serve immediately or chill until ready.
Solving Common Issues for Flawless Egg Halves
Why Your Filling Is Runny
If you find your filling is looking more like a sauce than a paste, you likely added too much liquid or your eggs were slightly undercooked. Heat also plays a role; if the yolks are still warm when you mix in the mayo, it can melt the fats and thin the consistency.
| Problem | Root Cause | Solution |
|---|---|---|
| Grainy Filling | Yolks not mashed enough | Push yolks through a fine mesh sieve before adding liquids. |
| Rubbery Whites | Eggs boiled too long | Stick strictly to the 12 minute off heat method. |
| Slippery Shells | Fresh eggs used | Use eggs that are 7-10 days old for a cleaner release. |
Common Mistakes Checklist
- ✓ Don't skip the ice bath; it’s the only way to prevent the dreaded green sulfur ring.
- ✓ Always pat the whites dry before filling, otherwise, the yolk mixture will slide right out.
- ✓ Use a sharp knife and wipe it clean between every single cut for pristine edges.
- ✓ Don't over mix once the mayo is in, or you'll lose the airy volume of the filling.
- ✓ Avoid "lite" mayonnaise as the higher water content can make the filling weep over time.
Creative Variations for Every Occasion and Palate
One of the reasons I love this recipe is how easily it adapts to what you have in the fridge. If you're out of Dijon, a bit of yellow mustard and a pinch of horseradish can fill the gap.
If you want to make it feel a bit more "gourmet" without spending a fortune, a single slice of pickled jalapeño on top adds both heat and a beautiful green pop that contrasts with the paprika.
- If you want more crunch: Fold in a tablespoon of very finely minced celery or pickles.
- If you want it spicy: Swap the apple cider vinegar for the brine from a jar of pickled jalapeños.
- If you want it smoky: Increase the smoked paprika and top with a tiny piece of crispy bacon.
Comparing Fast vs. Classic Methods
While some people swear by steaming or pressure cooking, I find the classic "boil and sit" method provides the most consistent texture for the yolks.
| Method | Total Time | Texture | Reliability |
|---|---|---|---|
| Classic Boil | 27 mins | Velvety & firm | Very high |
| Steam Method | 20 mins | Softer whites | Medium |
| Pressure Cook | 15 mins | Very firm whites | Variable by altitude |
Smart Storage Solutions to Keep Eggs Fresh
Deviled eggs are best eaten within a few hours of assembly, but you can definitely prep the components ahead of time to save your sanity. Store the empty egg whites in an airtight container with a damp paper towel to keep them from becoming rubbery.
The filling should be kept in a sealed piping bag or a bowl with plastic wrap pressed directly onto the surface to prevent a skin from forming.
- Storage
- Keep assembled eggs in the fridge for up to 2 days. Be aware that the paprika may bleed into the filling slightly as it sits.
- Freezing
- Honestly, don't even bother. Cooked egg whites turn into a watery, spongy mess in the freezer. It’s one of those things you just have to eat fresh.
- Zero Waste
- If you have leftover filling, it makes an incredible spread for a piece of toasted sourdough or a quick "deconstructed" egg salad sandwich for lunch the next day.
Elegant Finishing Touches for a Stunning Platter
The difference between "church basement" eggs and "party ready" eggs is all in the presentation. Instead of just plopping them on a plate where they'll slide around, create a bed of fresh arugula or curly parsley.
This not only looks beautiful but acts as a friction barrier so your eggs stay put while you're carrying the tray.
Use a microplane to grate a bit of extra hard boiled yolk over the top for a "mimosa" effect, or use a star tip on your piping bag to give the filling some height and texture. A little bit of height makes the dish look much more substantial.
Remember, we eat with our eyes first, and a tiny sprinkle of fresh chives provides that vibrant green contrast that makes the yellow yolks really sing.
Avoiding the Slide
If you aren't using a dedicated egg platter, you can slice a tiny sliver off the bottom of each egg white to create a flat "foot." This prevents them from rolling over and dumping the filling. It takes an extra thirty seconds but saves you a lot of headache during transport.
Just be careful not to cut so deep that you hit the hollow where the yolk sits!

Recipe FAQs
What are the five golden rules of deviled eggs?
No single universal five rules exist, but the essentials are: Use week old eggs for easy peeling, cook them for exactly 12 minutes then shock in ice water, mash yolks to a fine sand before mixing, use acid (vinegar) to cut the richness, and always pat the whites dry before filling.
What are the ingredients in deviled eggs?
The core ingredients are hard boiled eggs, mayonnaise, Dijon mustard, and seasonings. For best flavor, add a touch of acid like apple cider vinegar and finish with smoked paprika and fresh chives.
What is the forgotten ingredient I always add to my deviled eggs?
Apple cider vinegar is the often forgotten acid component. It is crucial because it cuts through the richness of the mayonnaise and brightens the overall flavor profile, preventing the filling from tasting flat.
What is the 5 5 5 rule for eggs?
No, the 5 5 5 rule does not strictly apply to deviled eggs. This number combination often refers to a specific technique for soft boiling (e.g., 5 minutes boil, 5 minutes steam, 5 minutes ice bath), but for a fully set yolk suitable for mashing, 12 minutes off the heat is the recommended time here.
How do I prevent the grey green ring from forming around my yolks?
Immediately plunge the cooked eggs into an ice bath after boiling. This rapid temperature shock stops the cooking process instantly, preventing the sulfur in the white and the iron in the yolk from reacting and forming the unattractive ring.
How do I achieve a truly silky, lump free filling?
Push the cooked yolks through a fine mesh sieve before adding any liquids. Mashing alone often leaves small, stubborn lumps; sieving ensures a smooth, uniform texture that pipes beautifully without tearing the pastry bag.
How do I keep my peeled eggs from drying out before filling?
Store the peeled whites in an airtight container layered with a damp paper towel. This prevents moisture loss and keeps the whites pliable, ensuring they don't turn rubbery while you prepare the yolk emulsion.
Classic Deviled Eggs Recipe
Ingredients:
Instructions:
Nutrition Facts:
| Calories | 71 kcal |
|---|---|
| Protein | 3.2 g |
| Fat | 6.2 g |
| Carbs | 0.3 g |
| Fiber | 0.1 g |
| Sugar | 0.1 g |
| Sodium | 102 mg |
